Water Behind Paint on Plaster Cladding

We recently carried out an inspection for a client who started to notice patchy discolouration on their cladding. Naturally concerned, they decided to get a thermal imaging scan carried out.

Fortunately for the home owner they had a cavity system in place so the likelihood that water got across the cavity, then across the building paper which is wrapped around the framing was very remote. The moisture meter did not detect any sign of moisture on the framing at the time of inspection.

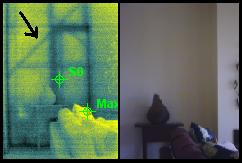
Take a look at this photo…

Look closely and you can see in the righthand image where the paint has changed colour, and in the lefthand image the infrared camera is dark in colour which indicates a change in temperature.

What’s going on here?

To start with, the home had not been painted with an elastomeric paint since built. Plaster houses should be painted by an approved applicator every 5 – 7 yrs. The reason you need an approved painter is so your paint manufactures warranty will be valid (The good painters warranty the work). EG. If Joe the painter down the road puts the wrong paint on top of the existing paint, then it could bubble up after a couple of years, especially on the sunny side of the house. You need someone who stands by their work and doesn’t run for the hills when you call with a workmanship issue.

In the above image, the resins in the paint have literally broken down and the water has soaked through the paint and into the cladding system… and therefore the paint can no longer adhere to the cladding. Even if your paint looks fine, it can ‘all of a sudden’ take a turn for the worse if you don’t maintain it. If there was no cavity behind this cladding, it could have really turned to custard for this home owner because the water would most likely find its way onto the framing.

In this case, the paint may need to be scrapped away from this area to dry out the cladding behind, otherwise if they paint directly over the area where moisture has already penetrated through, it will most likely with fail and discolour again.

Planning to get your home painted?

Get an infrared imaging scan for moisture first, then proceed to contact a certified applicator of paint onto plaster systems. The company you employ should also do the crack repairs and seal around the windows as part of the job.

Although we don’t do this type of repaint work ourselves (We only do the moisture testing and infrared inspections), feel free to call us and we can suggest a couple of experienced companies who specialise in this type of painting at a fair price, and further back their work with paint manufactures warranties in place. These are independent painters who do not form part of our company. Always get multiple quotes.

Thermal Imaging Inspection Cost

How much does a thermal imaging inspection cost?

Infrared inspection costs can vary depending on what type of imaging you require. Here are the most common types of inspections we perform weekly:

  • Pre purchase building, moisture and leak detective inspections
  • Infrared electrical inspections of switchboards
  • Pre sale house moisture testing for clients preparing to sell their home
  • ‘Piece of mind’ check ups to catch any issues with a house or commercial building before any hidden problems create further extensive damage.

So what are the costs?

Prices vary based on the size of the house, or in the case of electrical thermographic surveys, how many switchboards need infrared testing.

General leak detections vary between $220 up to $300… depending on how long the job takes.

Full house inspection costs can range from $300 for a small house, right up the $600+ for a larger house, especially when there is reporting and extensive invasive testing required. Some diagnosed leaky home inspection costs can be up to $1500.

As you can see, the variation in costs is quite wide for thermography inspections depending on application, but on average you are looking at around $450+GST for an average size home.

Some companies may offer inspections cheaper, but they could have a hidden agenda, like upselling repair services etc.

Thermal Imaging Consultants – Auckland

Are you looking for an experienced thermal imaging consultancy firm in Auckland, Wellington, Christchurch and everywhere inbetween?

Now operating internationally!

Over the years, our thermography services have been commissioned by some of NZ’s largest public companies and insurance firms on a routine basis (mainly for electrical and mechanical thermographic surveys), and as a result we are now acting as thermal imaging consultants and further being deployed internationally to carry out infrared inspections, particularly in the oil industry.

Our infrared consultancy business has been experiencing steady growth, and has built a solid reputation in the electrical and oil industry in New Zealand, Australia, Fiji and now potentially into India in the very near future.

If you are reading this website from a country outside on NZ, it is important for you to know we are now available to operate internationally with flexibility to service your requirements at short notice, in all areas and applications of thermography. We also have a range of thermography consultants with vast experience across the USA that we deal with on a regular basis, therefore allowing us to offer you infrared imaging services at short notice with minimal travel time in both Nth and Sth America.

Email Dean at quote@findaleak.co.nz for all international enquiries.

Structural Cracks in Buildings after Earthquake

We’ve been keep very busy in Christchurch since the big earthquake hit, carrying out leak detection investigations, building and apartment inspections using our infrared thermal imaging cameras.

The aim of our infrared investigations in the Canterbury region are to determine: Is the moisture damage in the buildings we have leak tested there from before or after the quake? This makes a big difference to what the insurance companies will pay out on. We have a set process we work through to determine an accurate result in this situation.

It’s only logical that when a building moves, the probabilities of water leaking into the walls and roof space (if any) increase dramatically. It’s not so much the obvious leak sources, like a chimney falling through a roof, it cracks occurring in critical junction points that suddenly open up and let water in… and you can’t see them.

These types of leaks can cause major headaches for the landlords, because they will continue to slowly leak into the building envelope and potentially go unnoticed for some time. We have been detecting these types of leaks for home owners and body corporates of larger multi storey dwellings (i.e Apartment buildings) with earthquake related structural issues, and providing reports as proof the leaks are caused by the quake, and not ‘older’ leaks.

One of the main issues with how some properties were built in the ‘leaky building’ era, is that common water ingress points (like around windows), are only remaining weathertight thanks to a single coat of paint around the aluminum window/door frame on the external side. We even found a series of windows on a property we inspected recently that looked like they were sealed, but you could literally pull the ‘silicone’ away from the window like a piece of spaghetti. So it looked perfectly sealed, but was actually letting a flood of water in, causing window jambs and sill plates to soak up the overflow… great!

Another scenario we found consistently across one of the apartment buildings in Christchurch we inspected, is the earthquake had shook all the window wedge rubbers out. The problem they now face is that the pane of glass is no longer sealed where it fits into the frame, therefore when it rains the water will run down the glass and into the joinery itself… and we are talking a lot of water here. When you get major movement to a building, the window mitres could open up quite easily (Mitres are very fickle and vulnerable to loosing their seal due to the leverage applied to the joint when movement occurs), letting this water directly down onto the sill plate and studs which supports the window… especially when the building doesn’t have a cavity system installed.

In addition to the above, 99% of the time you won’t even know if your window joinery has failed unless you are really looking for it, or have a trained eye. The way you normally end up finding out is when visual evidence of moisture damage appears on your gib board under the window, or the skirting board swells up… or carpet suddenly becomes wet for no reason.

Finding leaks  early can save you from:

  • Replacing the timber studs,
  • Replacing wet insulation,
  • Having to replaster and paint the whole room to colour match (More money!).
  • Potentially needing to replace an area of carpet…. and depending on your floor type (such as particleboard), it could blow out and swell, therefore needing more remedial work.

If you suspect anything suspicious is going on to your property in terms of water ingress, an infrared building inspection and leak scan could be the best ‘first’ option.

Call us for a free quote over the phone, and we’ll be happy to spend the time to answer your questions. We inspect plenty of homes, so no doubt we will have experience with a property in the past with similar issues to yours… therefore the problem could be quicker and cheaper to solve. Sometimes we can tell you where the leak is over the phone without needing to come out to your property!

Thermal Imaging Used to Detect Bracings and Fixings Behind Walls

Are you considering renovating your home, or trying to get a CCC and need a simple way to prove the appropriate bracings, studs and nogs are in place?

Using our infrared cameras is the quick way!

As you can see in the thermal imaging photo below, there has been alterations to this wall which the home owner didn’t know about. More importantly, you can see the builder has installed diagonal bracings behind the wall to strengthen the area.

There are very few techniques available that will give you such a clear picture of how your walls are constructed, without having to do damage. We have thermal imaged quite a few ‘granny flats’ and add-ons that were built without a CCC … and with our unique thermal imaging reports, we’ve helped strength our clients cases to get buildings passed through council without removing any sections of wall.

Just like a female goes to get breast thermography for pain free screening, or a dentist uses an x-ray machine to see what’s happening behind your gums before he/she operates… thermal imaging of NZ houses is the best possible way to detect leaking problems, building construction, moisture detection and missing insulation detection.

Get the visual facts about your house before making any structural or renovation decisions (or painting the house).

Accurate Thermal Imaging Reports

The longer the leaky home crises goes on, the more I see plaster home owners getting pushed down into a hole by some inspection companies… even if their home isn’t leaking!

Why do I bring this topic up?

Let me start by saying a thermal imaging camera is accurate and doesn’t lie… it is what it is. But, the interpretation by the thermographer of what the infrared camera is actually seeing can vary wildly.

‘Suspicious’ patterns in a thermal camera could simply mean the insulation isn’t pushed into the corners correctly, or maybe there’s been a wind draft through the roof space that has slightly lifted the batts up off the gib… but hardly a deal breaker!

If an anomaly appears on the camera screen, then further confirmation is required (Some companies may not do invasive testing)… but accurate thermal imaging inspections go beyond what the camera says.

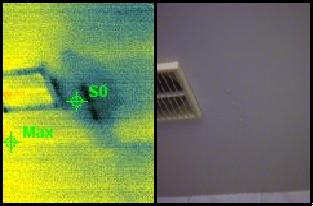
Here’s what a ‘clean’ thermal image looks like…

Notice the nice clean lines on the ceiling?

This is a ‘not so good’ thermal photo…

The ‘thermal anomaly’ to the left is a leak from a shower above that clearly can not be seen on the ceiling in the right hand photo (as the human eye would see it).

What’s really behind the walls in the home you’re looking to purchase? Are you 110% sure? Most of the leaks we’ve detected in NZ houses showed no visual evidence of a problem before we infrared imaged the property!

Every home is a good deal at the right price, regardless of how many problems are found… so get it tested and negotiate the price accordingly. People buy leaky buildings for the price of the dirt!

How can you seriously negotiate a property contract unless you base your offer on FACTS… not what the GV says, or what the agent tells you. It’s up to you to find out the true condition of the property… and you only, because no-one is going to do it for you. You’ve got big $$$ on the line when buying a house, so do your research correctly, and don’t fall into the ‘dumb purchaser who didn’t do their homework first’ category. I witness this scenario all the time with novice investors and first home buyers!

Hopefully this info above gets you thinking on the right track before signing the dotted line.

Residential Thermal Imaging – Energy Loss

Residential thermal imaging is becoming increasingly popular in NZ… and it’s amazing what the infrared camera will find in the hands of a certified thermographer!

It’s eye opening when you walk into a multi million dollar home that the builders haven’t quite finished off as one would expect… especially when the home owner has absolutely no idea that a problem exists. Some of the issues are minor, and others major.

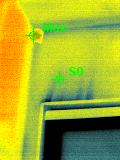
Residential homes should all be thermal imaged for leaks and energy loss at some stage in their life, just to stay ontop on maintenance if anything. Here’s an example of cool air entering a residential home in NZ around the door jamb…

Door Jamb Air Leak

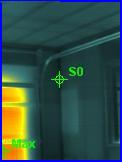
The dark wispy pattern is cool air running up the wall at the top left corner of the door frame… completely invisible to the human eye!!

Infrared thermography in residential houses is a must if you want to know if your home is energy efficient and/or has an energy loss problem or not.

Thermal Imaging of Computer Data Centres

Do you have  a computer data centre that your company relies on to make money? 

Having access to your data is absolutely critical, and the last thing you need is a shutdown due to an overheated component. Periodic thermal imaging inspections of your data center should be seriously considered in your regular maintenace scheduales.

As of late, some insurance companies are now insisting on thermal inspections of data centers to reduce their chances of having to pay out on a claim due to failed equipment and lost data.

What type of potential issues are we looking for?

Most data centers and computer systems work in such a way, that if one component fails, then all other components relying on that one failed component will most likely fail also. When we conduct the infrared inspections of your computer systems, we prefer to start at the original source that is powering the whole system, then work our way back towards the computer. The inspection needs to be conducted during business hours to ensure maximum power load is being drawn through your system (There’s no point inspecting a data centre running at 50% capacity, as a vital fault area could be missed).

We will also check any back up generator systems that the data center is connected to. Again, we need to have someone on site who has the knowledge of how to switch the system over to back up so we can test it under load.

Step 1: We check out the main switchboard which feeds your computer system for loose connections, hot spots, faulty switches etc.

Step 2: Your UPS (uninterruptible power supply). We conduct a thermal scan on all terminals, inverters (where capacitors and fuses are housed), and input connections.

Step 3: Your system should have a battery section. We check to see how fast they heat up and cool down. Batteries that may need replacement will  generally heat up and cool down quickly (the cells have failed).

We take several other steps as we head ‘downstream’ towards the server racks and beyond.

At the end of the day, your company and customers need a reliable computer system to avoid financial loses. Most of the companies who set up and maintain large data centres are usually on the ball… but they won’t see what an infrared thermal imaging camera will see. Too many companies get caught out with electrical failures because they don’t check in advance before they happen. Does your company? Once you see how our thermal camera detects faults in computer systems, you’ll quickly see why insurance companies are taking advantage of our service.

If you’ve never had a thermal imaging inspection as part of your computer data centre preventative maintenance scheduale, then give us a call for a free quote! We’ll get the job done, and provide you with a written report with all infrared images taken during the inspection.

Thermal Imaging Surveys

Thermal imaging surveys are what we do everyday right across NZ!

Everything you need to know about thermal imaging in right here on this website.

Since the new requirements from several insurance companies for an electrical thermal imaging survey prior to issuing an insurance policy on commercial buildings, enquires through our website have surged dramatically. Some companies are now using our service exclusively for their thermal surveys because they know our reporting standards are compliant with what all insurance companies require.

If your insurance company does not accept our report, then we’ll give you your money back! (We have never had to refund anybody).

With the growing demand for thermal imaging survey services in general, there are now more ‘newbie’ companies getting into the business, so here’s why you should be very careful with who you choose…

You will notice that the majority of companies who now offer electrical infrared surveys, also happen to be in the business of fixing the faults they find. Do you think these companies are going to possibly find more faults and ‘bigger’ issues then there actually are? In some cases they will, so they can then sell you the work to fix the problems… therefore you could get a biased thermal imaging survey that channels towards the thermographers back pocket.

The reason we have so many repeat clients, is because we do not sell electrical services at the end of the job… guaranteed. No matter if we find 1 fault, 10 faults or zero faults within your electrical switchboards, it makes absolutley no difference to us.

You can view the types of clients who use our thermographic survey service – HERE

One other ‘catch’ you need to keep an eye out for, is if you get any other quotes, make 100% sure they are certified thermal imaging surveyors… there is a big difference between buying an infrared camera and being certified to operate it!

We look forward to hearing from you, and possibly completing your thermal imaging survey requirements. All reports on small-medium size jobs (between 1 – 70 switchboards) have a 48hr report turn around time. Larger jobs are between 24 – 72 hrs… and the report will be accepted by your insurance company or your money back.

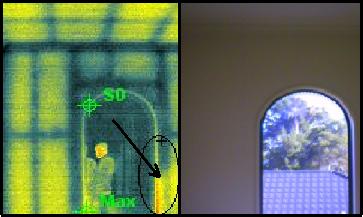
Thermal Image of missing or damaged timber frame behind wall

What kind of damage can a leak or moisture ingress really do to your home?

How is the structural integrity of your load bearing walls?

Recently during a thermal imaging inspection of a plaster clad home built in the late 90’s, I came across an unwanted finding with the infrared camera.

Can you see what’s missing behind the wall in this infrared thermal photo below?

signs-of-timber-missing

Correct, that is signs of either rotted of missing timber. Thermal imaging does not see through walls as such, but it usually gives an instant result if there are signs of hidden ‘anomalies’ that can’t be seen with the human eye.

There does actually appear to be timber there when you look closely, but the density of the timber frame around this window looks to have perished on the right hand side. See how it’s very light in colour where the arrow is pointing? This indicates that moisture may have already have ‘been and gone’, and dry rot may have set in.

Let me explain further…

Keep in mind that a thermal imaging camera is only detecting heat radiation, so the reason you can see all the framework in the above image is because where the gib board is touching the timber is a slightly different temperature due to transfer of heat from the timber onto the gib (or visa versa… heat transfer normally travels for hot to cold). So the reason the above image indicates the timber may have lost its integrity, is because the density of the potential dry rot is different to the rest of the sound timber frame around it.

Window leaks are very common with plaster style building construction, especially around window and door frames due to general expansion and contraction of the cladding forced by climatic conditions… hence the term and building method of installing ‘expansion joints’.

Should you buy a home without an infrared building inspection first? You decide.