Locating Leak Damage on Wall Frame Stud

Moisture or leaks infiltrating your wall frame studs can cause problems, regardless if the timber is treated or not.

One of the most common questions I get asked when someone calls me for a pre purchase thermal leak inspection, is “Should I worry about getting a leak/moisture test because the timber is treated?”. YES!

For example: Lets say the home is only 4 years old (Built to the new building code… treated timber on external framing), and there was a window joinery failure from day 1. If the window has been getting hit by wind driven rain on a regular basis, then ‘gradual leak damage’ could occur on the timber framing if the water didn’t get out through the cavity. The same scenario would apply  for pre 1992 built homes… in fact, the timber framing will rot no matter when the place was built if enough water gets to it.

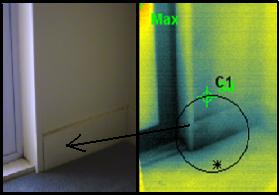
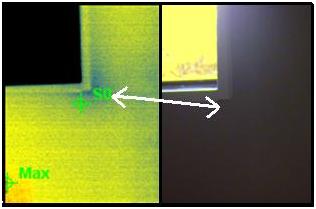
Here’s an infrared thermal imaging leak photo of a wet wall stud in a home with treated timber…

The darker wall stud is a different temperature... couldn't be seen on the wall as indicated in right hand image

Locating a leak in one section of a wall can be simple with the right leak detection equipment. If you have any doubt at all in the home you are buying… get it checked for leaks, because the home owner may have fixed the source of the leak, but not the damage it caused along the way.

The benefit of our thermal imaging camera, is that ‘tricky’ vendors who paint over walls and ceilings in an attempt to hide leak marks will get caught out, because if there is moisture on the gib at the time of inspection, no paint will hide it, as it will be a different temperature… which is exactly what our infrared camera will detect and locate.

Marketing and Selling a House with Known Leaks

Does your real estate agent have a good poker face?

Home buyers… there are still real estate agents in NZ who are willing to say whatever it takes to get pen on paper. Most agents are above board and ethical… but you get the odd one who needs to make money and has a good poker face when it comes to telling you how “they don’t know of any leaking issues with the home“. (Even if there is water dripping through a ceiling like the case below).

Today was a classic example which you may be able to relate too, or it may sound familiar. It went something like this…

1) It was a rainy day and the home owner decided they were sick and didn’t want anyone around at the house. We put the heat on them for cancelling the infrared inspection at the last minute. The buyer got his way and we got into the home to do the inspection as per original plan.

2) We get in the house, and the first thing I see is the cleaner with a mop and bucket in hand? So much for no-one being welcome that day. You’ll see why the cleaner was really there in a moment.

3) Before I started the thermal imaging inspection, the real estate agent tells me “the home owners are pedantic and very fussy, and if there were any leaks they would have had them fixed”. I took her on face value (Turns out to be ‘poker face’ value)

4) The very first room I find a leak with the infrared camera… and this continued for the first 3 rooms. 3 rooms, three leaks. Hmmm.

5) I then see the cleaner moping the tiled floor in the next room we were about to moisture test. She then leaves, and what do you think the first thing we see is? Water dripping from the top of the door frame onto the floor! The cleaner was staying one step ahead of us moping up the leaks hoping we wouldn’t see any signs! Are you kidding me!!! She did this on two occasions and got caught both times. Little did she know that a thermal imaging camera will see the leaks anyway.

6) To cut a long story short, there was a total of 14 leaks throughout the house, and 12 of these were big ones. Here’s just one of them…

Water dripping onto the floor through this leak

I like most agents, and I get plenty of work through them… and most of realtors do disclose everything for their own sake… but some just aren’t following the rules.

Summary: You can’t point the finger at the agent if you buy a home that leaks because you didn’t get it tested first on your own accord. Regardless of the marketing and verbal representations made when buying a house, it’s up to you to do your own research.

Do Solid Block Houses Leak? – Wet Batons

Are you considering buying a solid block house?

Is there any point getting it checked for water leaks?

The general perception about homes made of solid block, is that they will never fall down and won’t leak… so there’s no real need to get a pre purchase  leak inspection before buying. This is not true… you certainly can get water seeping through block walls and rotting the batons and carpet etc. I’ve seen it many times over.

Rotted batons below ground level

The most likely scenario for such leaks to occur, is when the floor level of the house is below the ground level directly outside the area. The other reason the batons behind the wall will rot is there’s a roof leak travelling down the wall.

In general, block houses are more solid and less likely to leak then other traditional building methods, but are you prepared to take the risk of buying an ongoing hidden leak for the sake of spending a few hundred dollars for a thermal inspection prior to buying?

Fortunatly the owner of the above home is ethical and is doing the right thing. At the time of this building inspection, he was in the process of repairing and sealing the block wall prior to selling the house. You can actually seal block/brick wall to prevent water leaking through, but it’s a very vulnerable area that isn’t straight forward to fix long term.

If you are buying a house with any external wall of the home below ground level (i.e. Built into the side of a hill), then certainly consider getting a thermal imaging leak inspection… it could make a huge difference to your purchase price if the structural intergrity of the area has failed. Leaks can be a real pain… so find out first!

Some leaks found during home inspections are nothing to really worry about (like an internal plumbing leak). It’s the leaks inside external walls that are the ‘not so friendly’ ones… regardless if it’s a solid block home or standard home with timber framing (especially plaster cladding homes with no cavity).

One question I commonly get asked from buyers, is “How many homes do you inspect wouldn’t have any leaks?”. The answer is about 5%. Yes, 5%. But… there are good leaks, and bad leaks. Good ones can be fixed easy at low cost and most likely have caused minimal structural damage. Then you have the monster leaks that travel down between the walls, penetrate the timber, saturate the insulation, rot the bottom plate, blow out the skirting board then make their way onto your carpet and saturate the underlay in the process. Most homes will leak at some stage… it’s just a matter to what extent. Even new homes leak if there’s a failure in the window joinery, or the shower hasn’t been sealed correctly. These are all things you need to know before paying the $$$. 

FACT: You will not see the leaks that I will see when walking through a house due to the high tech equipment that I use (I wouldn’t see these leaks with my naked eye either)… and that’s why you should consider getting thermal imaging during your buying process. It may be cheaper than you think… and certainly a great peace of mind after you move in!

Gardens Against Plaster Cladding Causing Leaks

Are you living in a plaster cladding home, or a house with no wall cavity system?

One common issue we regularly come across is where home owners have pushed a garden up against the house to a higher level than the base of the cladding.

There should be a sufficient gap between your ground level and the bottom of the cladding (‘Ground Clearance’). If you put dirt up to or above the bottom of the plaster cladding, you could get what’s called ‘capillary reaction’. This simply means the saturation of the dirt can soak back up the plaster and get absorbed into the bottom plate of timber in your wall (and beyond). If you notice your skirting boards have swollen or you have a small leak around the edge of your carpet, then you may already have wet timber in that wall, and possibly other walls of the home if the ground levels around the house are similar.

No matter what type of cladding you have, you should always keep your garden off the wall where possible, unless it’s up against a concrete foundation that has a waterproofing membrane as a precautionary measure. Just like a human, a home needs to breathe, and air needs to be able to circulate around to help dry out any damp areas. Gardens can stifle this process in critical areas, especially if the drainage in the area is not getting the water away from the house.

Can you simply cut the bottom of the cladding to create sufficient ground clearance?

This would depend on how far the cladding runs down past the bottom plate of timber. In many cases you won’t be able raise the height of the cladding base because you’ll expose the timber and potentially compound the issue. Consult a qualified builder who has experience with monolithic, harditex, insulclad or preferably all types of plaster cladding systems to assess your situation and what can be done to improve your drainage etc.

Tip: Take a walk around your house, and if you can see ANY areas where water could potentially touch the bottom of your cladding (excluding block), then you may need to look at drainage options for that area.

If you do see an area where wet dirt or water could be leaking into your home or building, then a moisture test in the area could be a wise move to make sure you aren’t covering up already rotted timber. Moisture and leaks in your walls can spread like cancer… don’t take the risk. Thermal imaging and leak testing could quickly put your mind at ease!

Cheap Leaky Buildings for Sale

If you are seriously in the hunt to buy a bargain property, just be careful that you don’t actually get more than what you bargained for!

In this case, a ‘first time’ unexperienced buyer of leaky buildings hired me to moisture test a property after he had already payed a non-refundable deposit (auction).

If you see any advertising telling you about cheap leaky buildings for sale, then please proceed cautiously, because some leaky buildings leak so badly that they are beyond your standard re-clad to fix up.

Recently I did a home inspection for a client who was aware the home had moisture issues… it even stated that in the marketing materials for the home. You see, it’s easy for a real estate agent to say “the building might need a total re-clad”, but what if all the floor joists are also rotted? If you see a leaky home/building for sale in the Mission Bay, St Heliers, Kohimarama area at just $270k, then surely you would have to be suspicious there is more than meets the eye, right? You bet! Especially when it’s on a tiny cross leased piece of land with no view.

So what’s it really worth?

Unless your an experienced builder or investor who has dealt with leaky buildings in the past, then in my opinion you will need a complete structural intergrity survey of the home first (Don’t get excited by the price to quickly)… and if it’s so rotted that it’s close to a ‘knock down’ (don’t forget to factor in costs to take it away), then it’s barely worth the piece of dirt it sits on.

Everything property is a good deal at the right price, but make sure you also factor in your building experience into the price… and don’t let the hype of an auction grab your bank account and tear it apart like I have just witnessed!

Maybe ask a current or past leaky building owner if they would buy another one for a cheap price.  I highly doubt it… especially if they aren’t experienced in the building industry. Take Care!

Window Condensation Channel Leak – Mitre Joint Failure

Home buyers beware…

Window condensation channel failure causes leak issues.

Have you ever noticed how leaks seem to appear under the corners of windows more often then any other place in the home? They appear all the time, and usually you can’t see 70% of them with the naked eye! Not only that, most of the time the window looks really well sealed where the aluminium window frame meets the cladding.

As you can see in the infrared thermal imaging photo below, there is a dark spot in the corner of the window. That dark spot is hidden moisture the home owner knew nothing about…

Leak Caused by Mitre Joint Failure

The mitre joints in most windows are vulnerable to losing their seal, and the slightest movement in the house can cause this. It’s rare to physically see the seal has failed because water only needs the slightest of gaps to escape… and it likes to escape right onto your timber frame behind your walls!

An infrared imaging camera in conjunction with quality moisture testing equipment on your home will detect these types of issues…  and to be fair, we would have missed 90% of the hidden leaks we’ve found in NZ houses without the support of the instruments we use.

If there are windows in the house, then there is potential for leaks… which could result in gradual leak damage and/or timber rot. Don’t risk buying a home without this type of testing… otherwise it could get very costly, especially if  the joinery throughout the house is low quality (plenty of that around NZ).

Swollen or Bulging Skirting Board? Leak

One of the most common indicators of a leak is a swollen skirting board.

Commonly referred to as a ‘blowen skirting’.

The key is to find the leak source before it gets to the point of doing damage, but that’s not always possible. So where is it coming from in the first place?

The following thermal imaging photo shows you what I found during a house inspection in Sumner, Christchurch. In this case, the skirting was actually in tact and not showing any signs of swelling due to mositure , yet the thermo camera picked up the problem right away….

Dark area indicates hidden leak

Wouldn’t you prefer to know this before buying the house!

This particular leak was actually coming from the roof, and running down the side of the window frame and showing itself at the bottom of the wall/skirting area. There was a cladding detail running around the perimeter of the house that was flat of top, so the water had no way of running off. The cause of the leak was a crack in the polystyrene cladding above this detail just below the roof line.

We find leaks and moisture… that’s all we do.

Roof Valley Flashing Leak

Should a roof valley flashing leak?

The sky is the limit when it comes to ‘mystery’ leaks in houses!

We have found many different types of leaks in NZ homes, and some you just don’t expect.

Some people seem to think buying a good old fashioned brick and tile home is a safe bet, and that there is no need for a thermal imaging leak inspection before buying. Not always the case.

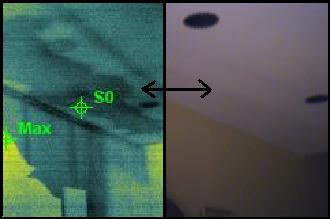
The infrared image below shows a huge leak on a ceiling underneath a tiled roof. What caused it? A leak in the valley flashing directly above. The interesting part is there was no sign of the leak on the ceiling!

Dark area shows large water leak

The home owners were slightly skeptical about getting a quick scan on their home given the nature of the build, but no matter how solid your walls are (i.e. Brick/block), you can’t stop leaks coming in from the roof area, or in this case a failure in the valley flashing. In addition, they had insulfluff insulation which was saturated and needed to be replaced.

 If you are buying a brick and tile home, don’t overlook a leak inspection first!

Water Leak Dripping Through Top of Window Frame

How you noticed water dripping in from the top of a window frame?

Is the water coming down from the floor above due to a window joinery failure or roof leak, or has the head flashing failed somehow?

Recently a customer called us because he had water dripping through a wooden window frame. In this case the home was a 1970’s brick and tile. Here’s what we found…

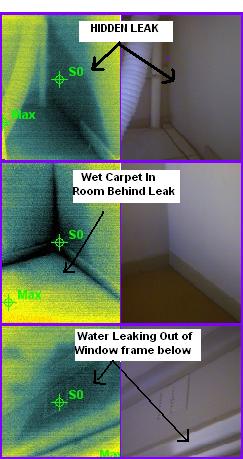
The bedroom on the 2nd floor of the house above the leak had wet carpet in one corner, and the laundry was up there also. Both of these areas were directly above the downstairs window where the water was penetrating through. Within 5 minutes I worked out the source of the leak thanks to my thermal imaging camera and moisture meter. Take a look at these images…

Photo 1 is where the washing machine site. Photo 2 is the room behind the laundry with wet carpet, and photo 3 is the window underneath where the water was dripping through the frame!
Photo 1 is where the washing machine sits. Photo 2 is the room behind the laundry, and photo 3 is the window downstairs where the water was dripping through the frame!

Findings: It turned out to be a plumbing leak behind the laundry/bedroom dividing wall. The interesting part was that the leak in the laundry and the wet carpet couldn’t be seen to the naked eye. These photo’s clearly demonstrate the power of using our infrared camera to hunt down leaks… fast!

Auckland City Council – Building Leak

Recently I was hired by the Auckland City Council to check a leak that was coming out of a light fitting in one of their buildings.

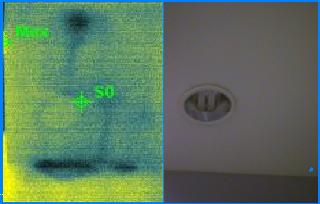
Below is an interesting infrared image of the light fitting in question, which clearly shows you how water can track ‘sideways’ from the leak entry point.

In addition to this leak, there were several other roof leaks revealed… instantly. That’s the upside to using our thermal imaging camera… the results are instant and can be confirmed using moisture testing equipment on the spot.

Can you see where the leak starts and finishes?

You can see how the leak tracks down towards the light, then does a 90 degree turn... then continues down the wall
The leak tracks down towards the light, then does a 90 degree turn, then continues down the wall

Notice how you can’t see this leak in the right hand image?