Cold Store Panels Retaining Moisture

Here is an infrared photo from a thermographic survey we did for one of the largest dairy companies in the world.

Thermal imaging cameras are an excellent tool for detecting moisture ingress into cold store panels.

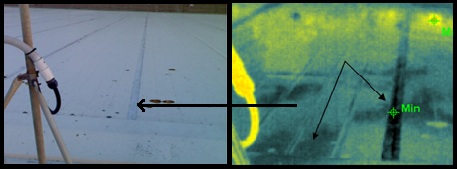
We were recently hired to detect any signs of water leaking into a building freezer cool room made up entirely of 150mm thick polystyrene panels (poly in the middle and a plastic skin on either side). Between each panel is a join as seen in this image below.

cold store panels leaking

(The darkest area is water under the sealant between the panels. The lighter shades is water under the panels)

In theory: The roof should be a uniform temperature across the entire surface, as there is no shade or obstructions that could cause a different infrared temperature reading in isolated areas. On this roof, there were thermal anomalies in several areas which indicates there could be moisture ingress inside the panels.

The reason we can detected these anomalies, is because the moisture inside the panels would heat up and cool down at a different rate to the rest of the panels where no moisture is present. Thermal imaging can detect such anomalies instantly.

Taking into account the cool stores are running below zero degrees, any water inside these panels will most likely freeze. Frozen water will lead to excess weight inside the panels, and will also cause loss of cold air by conduction.

Potential Danger: A large build up of ice inside a low pitch roof cavity which is only 150mm thick could cause the roof to collapse due to sudden increase in weight.

Time of Survey: Just as the sun went down to avoid reflection giving off false readings. We needed some daylight so we had a reference point in the still images. This infrared inspection should have been done from a cherry picker or helicopter for safety reasons, but the pitch of the roof was low and safe to walk on.

In summary: Further invasive testing should be carried out in random areas to confirm if moisture/ice is present, and to confirm the structural integrity of the roof area.

Which Type of Cladding Leaks the Most?

One of the most common questions I get asked, especially from first time home buyers wanting a building inspection:

“Which type of plaster cladding leaks the most?”

Let me get directly to the answer, based on inspecting over 1300 plaster houses at the time of writing this. It’s not very often that water physically gets through the plaster system when there are no cracks in the cladding.

Here are a few of the reasons why houses leak: (These causes can get worse with no cavity and untreated timber framing)

  • Where the cladding meets the window joinery it’s not flashed correctly causing water to get in behind the plaster, then further down in behind the building paper and onto the framing.
  • There are no head flashings above the window, letting water in around the top of the frame
  • Large cracks in the cladding allow water to soak through in behind cladding and possible through building paper penetrations.
  • Decks leak directly down into the wall and onto the timber framing
  • Internal gutters leak or butanol membranes fail from not lipping high enough up underneath doors/parapets and so on.
  • Water gets through fixings such as deck railings, nails and anything screwed through the cladding etc

There are plenty of other reasons that cause leaky buildings (or isolated leaks), but as you can see above that it’s not the actual plaster itself that leaks… it’s the workmanship and design of the home that is the problem. You could stand there all day with a hose and spray a large section of polystyrene or harditex cladding in an area where there are no windows, and it won’t leak directly through (Providing there aren’t any cracks). Even if there are cracks in areas away from windows, the water still needs to get past the building paper to penetrate the framing. Then… you could spend just 10 minutes spraying the nearest window and it might leak like crazy right away if it’s not sealed/flashed correctly or the window mitres have failed.

Other common opportunities for moisture to enter your walls which could cause you grief:

  • When your shower plumbing (such as the mixer) is up against an external wall. A slow drip in the plumbing will then proceed to fill your external wall framing with water every time the shower is used! It’s get worse if it’s on the top floor because gravity takes over and it fills up the lower level wall below it also. Nice!
  • If you get any condensation then you need to stop it asap. Not only does it cause unhealthy mould on curtains, it runs down the window and potentially rotting the sill (Which has a timber sill plate below it), or even worse the internal mitres on the window have failed and you wall is filling up with condensation water… even on those sunny days.
  • Shower screen leaks. If your shower is leaking water out the corners of the screen, then reseal it asap with a high quality sealant. We have seen many cases where home owners just think “It’s only a shower leak… no big deal“… well… it starts getting into the wall without you knowing and can become a real headache. Have you ever seen the gib board in the corners of your showers start to look like you could put your finger through it? Too late… the water is already in the bottom plate and possibly in behind the shower box itself.

Both home owners and buyers need to take care of the property they own or are buying, because it’s the small leaks that you already know about that turn into big decreases in your bank balance over time. Remember, if you can see visual evidence of moisture problems then it’s already too late in many cases.

Get a thermal imaging quick scan today and stay ontop of any pending disasters before they get out of hand! We give free quotes over the phone for these type of ‘peace of mind’ inspections, and it’s well worth it every time.

DIY Building Inspection Checklist

Are you looking for an ‘unofficial’ DIY building inspections checklist in NZ?

When you first inspect a house, you generally look at the property from an emotional point of view. That’s normal.

Following your first ’emotion’ inspection, you then need to look at the property with a ‘next step’ set of eyes. Take the list below with you and see if you can detect any initial ‘red flags‘ before you call in the profession inspectors!

NOTE: Do not make any purchase decisions based off this list, because it doesn’t include moisture testing procedures, or the experience of a qualified inspector. This list only serves as a guide to help you view the property from a different angle with areas to look at which you may not have thought of yourself. Always use a professional building inspection company prior to purchasing a house!

OUTSIDE:

The Garden

  • Check the general condition of fences and gates. Is there any visual evidence of rot, bora etc?
  • Are there any large trees to close to the house? The root system of the trees could potentially cause structural cracks to the home , particularly in brick or veneer homes, and concrete slabs.
  • Are there any ‘sharp’ or ‘poisonous’ trees on the property that would be dangerous to kids?

Out-Buildings – Garages,  Sleep outs, Granny Flats

  • Does it look like the structural integrity off any external walls is sound? Any swollen skirting boards? Mould?
  • Look for low hanging wires, exposed wires around power points, any potential fire hazards?

Outside Walls

  • Carefully inspect the walls to ensure that they are straight. Stand at one end of the home and look down the line of the wall. In timber houses, sagging weatherboards could mean the timber piles supporting the home may have rotted, or concrete piles or brick piers have subsided.
  • Check for rotten weatherboards, window frames, doors and verandah posts. Sometimes weatherboards have been recently painted, but there is actually rot sitting under the thin coat of paint!
  • Thoroughly check for cracks in the mortar between the bricks. Also check to see if it’s crumbling away.
  • In the case of a brick house, check the weep holes between the bricks nearest to the ground are unblocked.
  • Take a look up at the soffits around the home. Are they mouldy, sagging or fitted incorrectly?

On the Roof

  • Lean your ladder against the guttering and look for a wavy roof line.
  • Look for broken roof tiles and loose ridge and valley tiles.
  • Check that corrugated iron sheets are in good condition and well nailed/screwed down.
  • Ensure that valley and eaves guttering are free from holes and rust. Even small holes can create large leaks.
  • Make sure that flues and chimneys are structurally safe and the flashings around them are secure.

Under Timber Floors

  • Look under the floor for props or bricks holding up the floor instead of stumps, piers or dwarf walls
  • With timber piles, look for piles with the heaviest water stain.
  • Inspect timber framing and floors generally for rot, mould and evidence of bora.
  • Check to see that the ground is not excessively wet. This can case rising damp.
  • If you are in any way unsure about bora, the house should be checked by a specialist.

In the Roof Space

  • Look for sagging roof framing, cracked or broken tiles, rusty iron roofing and leaking ridges or valleys.
  • Check for shoddy or damaged electrical wiring. Do not touch!
  • A pungent odour or rat-like droppings could indicate the presence of vermin.
  • Note whether or not the ceiling has been insulated. What type of insulation.. pink batts, spray insulation?

Concrete Floors

  • Although the underside of the concrete floors cannot be inspected check if there is any exposed perimeter to ensure that the plastic waterproofing membrane is not exposed.

INSIDE:

These checks should be carried out in each room of the house.

Timber Floors

  • At regular intervals, jump lightly on the floor to detect any rotten floorboards, borer infestation or looseness in the floor framing.
  • Check to see if the floors are level, or there are gaps between floor and skirting. If piles or piers are sinking, floors will always fall away from fireplaces or brick walls.

Concrete Floors

  • Look for signs of dampness, such as lifting or buckling floor tiles and rotten carpet.
  • Ducted heated systems are millimeters wide, they could indicate a significant structural problem.

Walls

  • Check that walls are straight and true.
  • Look for cracks and general movement and be particularly wary of freshly painted or wallpapered areas. Any signs of leaks?
  • Carefully inspect brick walls for signs of dampness.
  • Tap solid brick walls for a hollow sound or a change in tone.
  • Look for cracks beside chimneys and look for doorways and windows that aren’t square, or are jamming.
  • Lightly tap walls and tiled surfaces with the handle of your screwdriver.
  • Look at all skirting boards. Is there any swelling consistent with moisture damage?
  • Is there a cavity system behind the wall, or is the external cladding fixed directly onto the timber frame?

Ceilings

  • Check that ceilings are straight and true, and look for cracks or signs of movement at the cornices.
  • Look for water stains and mould growth which could indicate excessive condensation, roof leaks or missing insulation.

Windows and Ventilators

  • Make sure that windows can be opened and check for broken window panes.
  • Check for excessive condensation and mould growth on windows and walls. Look at the back of curtains for mould… this would indicate the room condensates, therefore it may be a damp room.
  • Are the windows single glazed, or double glazed?
  • Any rot on the window sills?

Electrical Systems

  • Check that the light switches and power points work.
  • Test all power points with the tester.
  • If you are at all in doubt about the condition of the electrical system, you should have it checked by a qualified electrician or thermal imaging.

Plumbing Systems

  • Check all plumbing fittings for cracks or leaks.
  • Test the water pressure in hot and cold taps.
  • Partially fill the bath or laundry tubs and observe whether or not the water drains away properly.
  • Look for damp ground in the vicinity of the drains.
  • Check for dampness and soft soil where down pipes meet the ground.

General

Examine the house for appropriate room layout, orientation to the sun, views, relation to neighbours, traffic noise, and if not optimal, whether the house can be improved at an affordable cost.

Renovations and Extensions

If the house has recently been renovated, or if extensions have been carried out, check with the local Council to ensure that a CCC was obtained. Illegal alterations could become your responsibility, particularly if they contravene the building regulations. Some older homes had extensions built in the 90’s and early 2000’s when they used alot of untreated timber framing. Untreated timber can rot fast if exposed to any moisture.

If you are buying with a view to doing extensions in the future, check Council requirements for set-back distances, maximum site coverage and restrictions on types of construction. You may need to seek professional advice.

If you require a moisture test on the home, call us for a free quote!

What Causes Mould on Curtains

Have you got a HUGE  health hazard covering your windows?

Mouldy curtains can be very unhealthy, and you wouldn’t even suspect it. Curtains are normally very absorbent to moisture, and act like a big sponge to any moist air in the room… especially bedrooms. Once the mould starts to grow on the back of curtains, you ‘officially’ have mould spores flying around the room when you open up the curtains. Not very healthy!

What causes mould to grow on curtains?

Apart from moist air in the room, it’s the condensation on windows that cause bad mould issues. Wet windows are sitting right next to the curtains and basically transfer wet air directly onto the curtains, nets or blinds… especially when they touch the window! Single glazed windows don’t help the cause either.

So how do you stop condensation which causes mold?

You can try 2 very popular products called:

‘Curtain Magic Mould Remover’ and…

‘Condensation Magic’. 

VIEW THESE EXCELLENT KIWI PRODUCTS IN ACTION HERE!

At the end of the day, there are so many cases where home owners are living and sleeping in a rooms full of floating airbourne toxic black mould spores and they don’t do anything about it! Take action today, and breathe easy tomorrow.

Damp Testing Houses in NZ

One of the most unhealthy problems you can encounter in your house is dampness problems.

Damp is invisible to the naked eye, but you can smell it (can cause allergies) & you can see it (in the form of mould). What about the moisture in the air? Is using a dehumidifier enough?

The issue with dehumidifiers is they are expensive to run, and they can only do a small area. Also, if you have condensation all over your windows, then you are introducing plenty more moisture  into the air, and certainly into the curtains where it gets held… and further causing mould growth. (Read more here about mould on curtains – click here)

Unless you have a permanant moisture reduction system installed and double glazed windows, then you may be ‘stuck’ with the moisture problem in your home… and damp could be getting into all your furnishings etc.

All the above equals a very unhealthy damp home!

Damp testing can either be ‘air sampling’, which involves taking an air sample and having it lab tested for potential black mould spores. Or, you can have your walls tested to see if there is any dampness behind the wall. We can assist you with both of the above scenarios.

Otherwise it could be a straight out leak that you can’t see. We use a damp test meter and equipment to determine moisture meter levels. Call today for more info!

How to Stop & Eliminate Condensation on Windows

How to eliminate condensation on windows

This is one of the most common questions we get asked… and the answer is actually straight forward. Click Here to see how you can do it within minutes!

Let me start by saying that I’m in NZ houses almost every day of the week testing for moisture, or inspecting houses for ‘leaks’ under windows. Well, in many cases they are not actually leaks coming in from the outside (i.e. Weather tightness issues), it’s condensation pouring down the windows and straight into the walls! This is especially the case for windows with no condensation channels, or situations where the miter joints have failed. Even some homes with double glazed windows still get moisture beading on the aluminum frame due to a high moisture content in the air.

“How do you stop condensation?”

Click Here to see how you reduce condensation within minutes!

If you have single glazed windows, then you’re in for an uphill battle right from the get go. Homes with single glazing will always be susceptible to moisture and damp issues if there is no air circulation. A classic example of ‘lack of air circulation’ is when a home owner calls telling us their basement is damp. If you smell damp in the basement of your house, simply ‘test’ putting a dehumidifier in the room. If the smell fades away after a few days, then you know it’s simply moist air. If the smell remains (providing it’s not a permanent smell in carpet), then you could have other moisture/drainage related problems, especially if the external walls are built into the side of a hill.

Back to stopping window condensation…

If you and/or your children are sleeping in a room with condensation on the windows, you should put a stop to this asap, purely for health purposes if anything. If you or someone in your home gets asthma, or generally gets sick over winter, then you need to do your best to begin a logical ‘process of elimination’ of what could be causing the problem. Here’s a few options to test…

  • Put a dehumidifier in the room… if it fills with water in 24hrs or less, you know the air is very moist! Consider getting some kind of system installed that works 24/7 to keep your home dry and healthy (HRV, DVS, Moisture Master etc).
  • If the dehumidifier doesn’t work, go for a holiday somewhere and sleep in a different environment for 5 days or so. Has the health condition of the person changed in a positive way? You might find it will, therefore your house is the problem.
  • Are the bedroom curtains moist? They most likely will be if you have condensation. Curtains in moist rooms act like a big sponge… further introducing ‘sustainable’ damp in the room. Not good.
    As a result of moisture on the back curtains (transferred from the wet windows), mould will start growing on the curtain, potentially causing further health issues! Try using this mould cleaning product on curtains… www.removehousemould.co.nz
  • Here is your best option… Click Here to see how you can manage and control condesation on windows within minutes!

Double glazed windows will certainly help reduce condensation, and also help to retain any heat that is introduced into the room. If you live in a damp area of NZ and are constantly getting sick, then you may have no choice but to sell up and leave! That is the extreme case I know, but many people take this option to resolve moisture related health problems almost right away. Why would you compromise your lifestyle and health, when you could be living somewhere warmer, healthier and generally a dryer environment!

In summary, NZ has moist climatic conditions over winter and there is nothing that you or I can do about part of it… but there are always ways around it, generally at a cost. Before you hit the panic button, the best low-cost place to start is with moisture testing the home to make sure the problem isn’t originating from behind the wall, which is often the case… and usually doesn’t cost much to fix providing it’s not a widespread moisture ingress isssue.

Internal Gutter Leaking

Infrared Thermal Imaging Clearly Identifies Leaking Internal Gutter

Insufficient butanol join overlap causes major headache for home owner!

One of the very common signs that you could have a leak or moisture in your ceiling space (normally flat roofs), is you can see signs of the gib board pulling back down over the screws that are holding it up. Have you seen small round marks on your ceiling the size of a screw head? That could be more than meets the eye.

One of the inspections we did this week detected the exact problem as outlined above, although the home owner had no idea what was ACTUALLY going on. They called us in because they had a damp smell in the room and couldn’t work out where is was coming from.

Here’s what we saw with the infrared leak detection camera the moment we walked in the room…

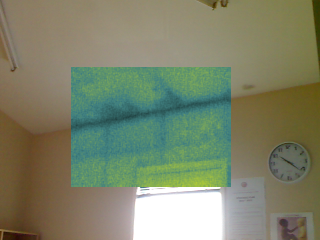
Those big black round marks are leaks detected as seen through the thermal imaging camera on the ceiling of the ‘damp smelling’ room… and the home owner has absolutely no idea these leaks even existed.

The home owners issue was solved within minutes… but finding the source of the leak in the butanol lined internal gutter was the next challenge. Well actually it wasn’t a challenge at all. Instead of using the standard 100mm overlap at the join of the butanol, the 45 angle in the corner of the internal guttering has caused the issue by flapping up slightly thanks to a shortfall in overlap on the join… not to mention that water that was pooling the area!

On the ceiling you could clearly see the gib fixing screw heads where the water had basically saturated the gib above and under the weight (and gravity) caused by high levels of moisture caused a slight sagging in the ceiling.  What to do next?

Step one is always to fix the source of the leak first. Then it’s probably best to cut the area open and pull out the wet insulation, otherwise all that trapped moisture could cause the ceiling to eventually sag right down and make a mess! It’s always good to have a visual inspection of the area in a situation where a roof has been leaking for some time, as mould growth could be taking place.

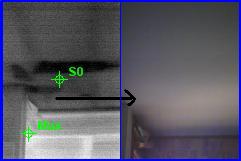
Here’s another photo of a leak at the top of a wall thanks to leaking internal guttering. The thermal image is over the top of the visual image how we see it during an inspection…

If you have any ‘visual’ cues that something isn’t right with your home, or an unusual damp smell has suddenly appeared that wasn’t there this time last year, then jump straight onto it and get a moisture ‘check up’ on the house.

Moisture Testing Companies

Are you looking for a moisture testing company to test the timber framework in your house… or the house you’re about to buy?

It’s true… there are several companies to choose from in NZ who do moisture testing, but like any other type of business, are they using the equipment correctly? What exactly are they looking for?

Here’s what prompted me to write this post. I found an online sample of a building moisture testing report from an inspection company in the North Island. It showed the actual moisture meter he used to ‘test for moisture’ in wall. The meter had two 15mm pins and he simply put them through the gib board and onto the timber stud… here’s the problem with this method in my opinion:

First of all, gib board is 10mm thick, so the majority of the pin was directly touching the gib, and only 5mm of the pin actually penetrated the timber. So how on this earth will he detect the moisture on the outer side of the timber?

There are 1000’s and 1000’s of homes in NZ with no cavity system, which means the cladding is fixed directly onto the timber framework. If the cladding leaks through cracks (especially plaster), then it goes directly onto the outer side of the timber (cladding side). So if you stick two small pins into the internal side of the timber, and the moisture hasn’t got across that far, then the moisture inspection company could be missing the first signs of a leaky home.

Moisture testing companies in NZ will vary, so if they are going to do an invasive inspection for you, make sure they at least first drill holes through the gib that are wider than the pins, so the pins don’t take a false reading off the gib! In some cases the gib is slightly moist, but the timber is fine… yet that could throw out the reading and cause a ‘false positive’ reading.

One of the moisture testing companies we use in Auckland actually bypass the internal side of the timber and only penetrate the longer moisture meter pins into the external side of the timber as close to the cladding as possible. This is critical in most areas of the home. Leaks under windows are more likely to cause an even spread of moisture on the timber frame and the testing equipment will normally detect that from the internal side… even with a non-invasive moisture meter and usually infrared thermal imaging also. 

In many cases, the moisture testing inspector will use a non-invasive meter to first establish where there are signs of moisture… and these meters will usually pick up where the moisture issues are in the home very quickly because they are extremely sensitive and calibrated accordingly… even through gib board. If timber is moist, it will transfer that moisture onto the gib and that’s what we are actually reading with the non-invasive meter, and that’s what you also are ‘seeing’ in the infrared camera photos on this website (different temperature on the surface of the gib where the leak(s) are).

Would you buy a car without even looking at it? Probably not. Well why would you buy a house without getting an idea of what the timber frame is like! After all, it’s the ‘bones’ of your walls.

Don’t get caught buying a dog like many immigrants do! The problem is they don’t even consider the moisture testing option when buying a home, mainly because most homes around the world don’t have the leaky home issues like we do here in NZ. It’s not that these offshore buyers are silly, it’s just that they aren’t aware of the problem NZ faces. Better to be safe then sorry!!

Moisture Meter – Measuring Moisture Content of Wood

We have a serious moisture problem in this country when untreated timber comes into the picture!

The moisture content within timber has a very important bearing on the uses for that type of wood. Having a good understanding of how moisture and leaks effect timber types is therefore critical to determine utilization. Moisture meters are the fast way to read moisture levels in wood.

Here’s a quick lesson about wood moisture, how it works in timber… and why we have leaky homes and leaky buildings in NZ:

The makeup on wood is best described as 1000’s of tiny cells… and within those cells are cell walls and cavities. Heartwood and Sapwood in their raw form (freshly cut) are saturated with moisture, and you may have noticed this yourself when you cut down a tree. In between the saturated cells are very small spaces of air. Once the wood has been cut, and the drying out process of the timber begins, the first part of the cell to loose it’s moisture content is the cell cavity, and then the cell wall.

Important to understand: Once the moisture from the timber cell walls has completely evaporated and the timber itself has somewhat shrunk in the process, the woods moisture content will then be in equilibrium with its surroundings (EMC – Equilibrium Moisture Content).

Once the timber framework of your home has been put in place by the builder, from then on its integrity and life span will be subject to the variations in surrounding relative humidity (and to a lesser extent, temperature). In general, most countries around the world including New Zealand, will have wide variances in humidity between winter and summer months, therefore the Equilibrium Moisture Content of the timber will affected (swelling and shrinking) if it wasn’t originally dried to the average moisture content is will attain in use. That’s why moisture meters quickly help us to determine if the timber is either dried out, or wet.

Are you starting to get the picture about why the high moisture content in untreated timber is causing major issues here is NZ with leaky buildings?

How does temperature affect moisture readings?

Most companies will initially calibrate their moisture meters around 19 -21 degress. The problem with people who aren’t experienced and don’t know how to use a moisture meter correctly, is they aren’t aware of how to add or subject readings based on temperature corrections. The basic rule of thumb, is that you subtract 1 from the meter reading either way per 5 degrees in temperature variance (this only applies up to 70 degrees in temp). The best moisture meters for sale in NZ will have this correction feature as a function.

You should have knowledge about the different timber species used in NZ buildings prior to arriving at a benchmark moisture percentage to work with. Treated and untreated timber will require adjustments. Untreated timber will actually give the most true reading because there aren’t any chemical preservatives to throw the moisture reading out.

We use a moisture meter to test NZ houses daily, and it works out cheaper for us to do the moisture inspection for you then buying one for yourself. 

(Source: Some of the above info was provided by NZ Forest Research Institute)

Cheap Leaky Buildings for Sale

If you are seriously in the hunt to buy a bargain property, just be careful that you don’t actually get more than what you bargained for!

In this case, a ‘first time’ unexperienced buyer of leaky buildings hired me to moisture test a property after he had already payed a non-refundable deposit (auction).

If you see any advertising telling you about cheap leaky buildings for sale, then please proceed cautiously, because some leaky buildings leak so badly that they are beyond your standard re-clad to fix up.

Recently I did a home inspection for a client who was aware the home had moisture issues… it even stated that in the marketing materials for the home. You see, it’s easy for a real estate agent to say “the building might need a total re-clad”, but what if all the floor joists are also rotted? If you see a leaky home/building for sale in the Mission Bay, St Heliers, Kohimarama area at just $270k, then surely you would have to be suspicious there is more than meets the eye, right? You bet! Especially when it’s on a tiny cross leased piece of land with no view.

So what’s it really worth?

Unless your an experienced builder or investor who has dealt with leaky buildings in the past, then in my opinion you will need a complete structural intergrity survey of the home first (Don’t get excited by the price to quickly)… and if it’s so rotted that it’s close to a ‘knock down’ (don’t forget to factor in costs to take it away), then it’s barely worth the piece of dirt it sits on.

Everything property is a good deal at the right price, but make sure you also factor in your building experience into the price… and don’t let the hype of an auction grab your bank account and tear it apart like I have just witnessed!

Maybe ask a current or past leaky building owner if they would buy another one for a cheap price.  I highly doubt it… especially if they aren’t experienced in the building industry. Take Care!