Should I Use the Building Inspector Which My Real Estate Agents Refers?

The process of buying a home in NZ is not as easy as it appears, so if you are in the market to buy a property, you might like to read this!

If you like a particular home and get your offer accepted, should you hire a building inspection company which the real estate agent recommends?

Well… if you ask the client that I did a building moisture inspection for yesterday, then he’ll tell you a big NO! Here’s what happened…

To start with, let me say that the good real estate agents will always suggest getting a building and moisture inspection anyway, for your sake and their reputation.  But, if they go on and give you the name of an building consultant to do the inspection, then be careful. Most inspectors will do the right thing either way… but like in any industry, there’s the odd ‘loose cannon’ who simply needs to make a dollar fast. That’s not who you want to hire.

My client purchased a monolithic cladding townhouse, and the inspector ‘verbally’ told the client that there was no need for a moisture test on the home because the paintwork was in good condition. Are you kidding me! Any building inspection company in NZ should know that these types of buildings could be leaky buildings. In my opinion, the building inspector is asking for trouble telling people no moisture test in needed with plaster homes.

Even if the paintwork looks good (He also failed to see a very large crack in the cladding), you can still have window joinery failures which lets water down into the wall and onto the timber. And guess what? That’s exactly what happened in this case.

Due to the fact the builder/building inspector ‘verbally’ said not to worry about it, then the buyer has no real come back because  it’s not in writing… and second to that, the new home owner was beginning to wonder if the inspector and real estate agent were working in together, because the buyer wasn’t there through any of this process… it was all  ‘organised’ through the agent.

The end result was that I found moisture IN THE UNTREATED TIMBER under one of the windows, and it extended right down the timber stud to the bottom plate. Although this area was isolated and it shouldn’t cost much to fix, it’s still something you need to know prior to purchasing.

Always choose an inspector who offers a non-biased opinion… be it a structural building inspection, or an infrared thermal imaging test.

Condensation Moisture – Ants crawling out corner of window sill?

Have you noticed signs of timber rot in the corners of your window sills?

One on the ‘red flags’ that will normally catch my eye when doing a thermal home moisture inspection, is when the window sill has a soft spot up against the window joinery OR if ants are crawling out of the sill in the area.

Recently during a moisture inspection, my equipment detected signs of moisture behind the wall under a window. There was a builder with me at the time of inspection, and without hesitating, he pulled off the gib board on the spot.

Here’s what the thermal camera detected (Dark area in bottom right corner indicates a potential issue)

rotted-window-sill

What did we find behind this area?

Ant nests, black mould, rotted timber and all the things you don’t want to see if you own the home. Who else was there? The tenant. The tenant had 3 kids and went into a panic due to the unhealthy aspect of the home… like black mould spores floating into the air etc.

Typical: The home owner didn’t even know the window sills were rotting, because the tenants didn’t say a word about these issues when they first appeared, and now the vendor has some serious remedial work to undertake. (The cladding was plaster with no cavity). On top of that, the tenant is now taking this to the rental tribunal to get out of the lease on the grounds of an unhealthy home.

The message here is that if you own a home that is rented out, and it’s built between 1992-2004, then you should consider a thermal moisture ‘check up’ to detect potential problems caused by joinery leaks and window condensation… before the whole wall rots due to gradual leak damage!

Should you bother getting an infrared moisture scan? Take a look around this website to see what other types of leaks our thermal camera has found behind walls…

Banks requiring leak and moisture inspections before lending?

Here’s another solid indicator about the risks involved with buying a home built in NZ

There have been a growing number of phone enquiries to us saying “the bank would like a leak and moisture test on the home before they lend us the money”. So why would this be?

As you are most likely aware, the leaky home problem in NZ  is constantly talked about in the media… and for good reason. People are watching their bank balances plummet to the floor in legal fees because they didn’t get a moisture test before buying their home (not to mention the stress involved)… and guess who else risks losing money on leaky buildings? The banks!

Question: Would you lend your money to someone buying a home in NZ built between 1992 and 2004 (leaky home era), without getting it checked first with a thermal imaging camera and moisture testing equipment? Unlikely. I know I wouldn’t.

The banks can also see that some of these homes are ‘risky’ or potential leaky buildings, so to help reduce their risk, they also want to know if the home they are lending money on is a potential ‘lemon’. The bank may not require moisture testing if you have a very large deposit, but if you intend on borrowing the majority of the money, then don’t be surprised if an infrared moisture inspection becomes one of their lending conditions.

Are there any homes that don’t leak?

The majority of homes we inspect do have a leak of some kind. Some types of leaks wouldn’t warrant pulling out of a property deal, whilst others certainly would. EG.Would you prefer to find a shower leak that only requires the screen to be resealed, or find a leak running down the wall from ceiling to floor in a home with no cavity system and untreated timber (Common is leaky buildings)? Give me a shower leak anyday!

Take care when buying, because some homes simply aren’t as tidy as they appear… and most people find that out after they become unconditional on the home… because they didn’t want to spend the money up front to get it checked out.

Now that you know about infrared thermal leak detection, do you think you could buy a home without it? Some people would take the risk and ‘hope for the best’, but with all the leaky home issues in NZ, most savvy home buyers don’t take the risk of buying without an infrared building inspection first. Here are more thermal images of hidden leaks in ‘nice looking’ homes.

Pre Purchase Moisture Inspection Saves Another Unsuspecting Kiwi Home Buyer!

Can’t decide whether you should get a pre purchase moisture inspection before buying?

Some building inspectors could miss the hidden moisture issues within a building envelope if they don’t use an infra red camera!

One of my clients was just days from going unconditional on a home recently in West Harbour, and at the last moment decided to get a non-invasive moisture inspection on the home for a peace of mind on his families $800,000 purchase. This was a very wise decision, and here’s what he had to say about it….

$800,000 that was what we had signed up on, it was a huge 5 bedroom house we were going to buy.
Dean’s very professional and prompted service saved us from buying this property which was a leaky home. Nearly every room had a leak or excessive moisture. We can’t thank him enough and every home buyer no matter how much they like the house must get this company in to do the thermal imaging. It may save them hundreds of thousands of dollars like they did for us and stress that would of come with it. The house was checked on the 2/07/08.” John S – West Harbour

The point here is that no matter how great the home looks (like this one in West Harbour), you can’t be too careful when investing large sums of money on a home purchase. John almost got caught bigtime! Can you imagine the stress this would have caused within the family long-term?? Please remember that a thermal imaging camera can see what no human can see (building inspectors included), so at least investigate the option of an infra red scan of your future home, because it’ll be to late once the deal is done.

Home Making You Sick? Moisture, Mould and Dust.

Moisture, mould, dust and dirty carpet… that’s what we found in an NZ home today when conducting a thermal imaging inspection!

Do you consistently get allergies that comprimise your quality of life?

When you have a health situation that you can’t explain or find the cure for (such as an irritation to your system like sneezing or coughing), then it comes down to a process of elimination. Q. What are you most commonly surrounded by that could be the catalyst ‘setting off’ your allergies? A. The walls of your home (literally), and all the contents inbetween.

Today we inspected a home with a wicked combination of factors that is having a real health impact on its residents. To confirm my thoughts of what I saw in this house, when I left the home I had excess mucus build up in my throat for the next 3 hrs! That’s not an everyday moisture inspection result (thankfully), but it was a result of only 2 hrs in that house… so can you imagine the impact it’s having on the home owners living in there everyday!

The carpet was old and full of dust, the rooms were full of clutter like rugs, cushions and excess couches. All these additional unused ‘bits and peices’ are moisture and dust sponges. In addition there was moisture in the walls. The moisture content of the home is the main issue here, and the home owner repeated the words multiple times during the property inspection “I wish we got this done long ago”.

If you suspect you may have hidden moisture behind your walls that may be triggering your allergies, or there is mould growing in an area of the home that you can’t explain, why not get a free quote for a home thermal imaging/moisture test?

Visit curtainmagic.co.nz for an amazing DIY product that gets rid of mould while you watch… awesome results!

Moisture Inspection – Specific For NZ Home Owners

Moisture inspections are critical in NZ due to the wet climate. We conduct non-invasive thermal imaging moisture inspections for both current home owners and pre purchase inspections.

Here’s an outline of why you should consider NZ Leak & Heat Loss Detection Ltd to perform a moisture inspection on your property …

Current home owners – See details and thermal imaging photos of typical moisture ingress

Pre Purchase Inspections – Don’t buy a home until you read this!

Contact Us today for a moisture detection scan today!

What Causes Damp and Moisture Around the Home?

 The first course of action when curing a damp problem is to establish where the water source is and how it is gaining entry in to the walls. Check the following areas:

Broken or perished damp-proof course (DPC)

If the dampness is on the ground floor, beginning at ground level or below, a faulty DPC may be implicated. This may not be easy to establish by eye or without invasive investigations, so should be considered once all other sources have been eliminated. If the property has suffered from subsidence, the DPC may well have been ruptured.

Bridged damp-proof course

It is not uncommon for the ground levels surrounding a property to slowly rise as garden debris and external finishes such as decking and driveways are added. Check the perimeter of your property and be sure that these surfaces do not carry water to a level higher than your DPC, effectively rendering it useless. Cavity wall insulation is also capable of bridging the DPC, so check that this has been properly installed and does not pass below the level of the DPC.

Broken or blocked guttering

Broken or blocked rainwater goods such as guttering, drainpipes, roofing and flashing can be large contributors to damp. If rainwater isn’t conducted safely away to drainage points, it will leak uncontrollably onto walls unprotected by a waterproof layer.

Defective ground and surface drainage

As they meet the external perimeter, surfaces butting up to the walls of your property should be angled slightly upwards so that rainwater drains away from the building. If ground drainage is blocked, rain and waste water will not be able to drain away promptly, and the property is at risk of flooding.

Condensation

This is caused by humid air hitting a cool surface, so check that kitchens, bathrooms and boilers are well ventilated to carry this moisture rich air away. The area beneath suspended wooden floors is highly susceptible to condensation, so check that there are sufficient airbricks (all sides of the property, every 180cm (5ft 11in)) and most importantly that they are not blocked by garden debris or cavity wall insulation.

Sub-floor and chimney ventilation

Leaking plumbing

Leaks are most often at the joints between shower trays or bathtubs and the walls, so check that sealant and grouting is in tact and continuous. Also check pipework for leaks, particularly at joins, which may simply be rectified by a new joint or washer.

Masonry & chimneys

Check brickwork, rendering, stone and plinths for damage that compromises the waterproof surface.

If the damp is in walls above a fireplace (not necessarily in the same room as the fire, but the room above!), hygroscopic salts are likely to be drawing moisture into the masonry.

We detect damp areas using thermal imaging – non-invasive approach.

Contact Us today for a quote.

Moisture Meter Inspection Useful to Avoid Buying a Home Full of Rotting Timber.

Below you will find a link to a checklist that will  help you to avoid buying a ‘lemon’… yes, some walls are full of water and you can’t see it with the naked eye.

If you’re a first home buyer, don’t fall into the ’emotional’ trap of buying the first good looking, well priced, recently renovated home you see. Always get a certified inspector to come and do a moisture reading on the home first. The inspector should obviously be carrying a moisture meter, but in addition, a thermal imaging camera like our inspectors carry. This is how we detect where the leak begins and ends.

The NZ Herald recently posted this article… and as you’ll read, just about every home will leak at some point in its life, it’s just a matter of you being on the ball and detecting it early before it becomes destructive. Here’s the article…

Beginners Guide to Avoid Buying a Rotting House

Call us for a ‘check up’ to see what’s happening behind your walls!

We can see what the naked eye can’t!

Why Condensation Forms in the Home, and Why Mold Thrives on it!

Is your household damp in areas?

Dampness can cause serious mould build up on walls and furniture … and also cause your window frames to rot. A damp cold home will encourage the growth of mould and mites, and mites thrive on moulds… increasing the risk of allergic reactions and respiratory illnesses to the home occupants.
Dampness can be caused by condensation. The information below explains how condensation forms and how you can reduce the potential of dampness and mould growth in the home.

Step 1 – Condensation
If you have a condensation problem in certain areas of your home, you will need to take the appropriate steps to fix the problem as soon as possible, but in the meantime, there are some precautionary measures you can take right away.
Wipe down the windows and sills wherever the condensation is forming every time you see it appear. This process is slightly tedious but it’s only a short term measure until the overall solution is complete.

Condensation channels and sponge strips can be purchased at just about all DIY shops, such as Bunnings. They are fitted to windows to collect the condensation and thus help prevent window frames from rotting and avoid damp forming under sills. Care must be taken to fit these devices properly.

First steps to prevent mould
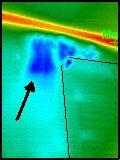
First treat the mould already in your home. If you deal with the basic problem right away, the mould won’t resurface for some time. If aren’t sure where the damp areas are (usually you won’t see them until it’s too late), then NZ Leak & Heat Loss Detection Ltd can quickly identify these areas with a thermal imaging camera for you.

To eradicate and remove mould, wipe down walls and window frames with a fungicidal wash or similar. Follow the manufacturer’s instructions and you should get the result you’re looking for. Dry-clean mildewed clothes, and shampoo your carpets. Carpet in the home can be a silent killer! Disturbing mould by brushing or vacuum cleaning can increase the risk of respiratory problems, so get those carpets cleaned asap!

Use a quality fungicidal paint to help prevent mould in the future after you’ve cleaned the wall thoroughly. This type of paint is usually not effective if applied over the top of existing paints or wallpaper.

Eliminating dampness in the home altogether is the only long term solution. Our company specialises in detecting mould using infrared equipment… so finding the mould has never been so easy.

Is it actually condensation that’s causing the damp?
Condensation is not the only catalyst causing dampness. It can also come from:
• Leaking pipes, wastes or overflows.
• Rain seeping through the roof where a tile or slate is missing, spilling from a blocked gutter, penetrating around window frames, or leaking through a cracked pipe.
• Rising damp due to a defective damp-course or because there is no damp-course.

These causes of dampness in the home often leave a ‘tidemark’ and you should have the necessary repairs carried out to remove the source of damp. We can detect moisture that has penetrated from the exterior of your home by scanning the interior walls. All damp areas are also confirmed by a secondary check with a moisture meter.
If your home is newly built it may be damp because the water used during its construction (e.g. in plaster) is still drying out. Some people perceive that if a home is brand new that it won’t leak. In most cases they won’t (not visibly anyway), but do check that all showers have been sealed before you begin to use them. Builders and contractors can miss these details from time to time… so just cast your eye around any wet areas to confirm they’re sealed so no water will penetrate through.

If your home is damp for any of these reasons, it could take weeks of heating and ventilating to dry out. Hiring a dehumidifier it always recommended when the source of the leak is determined and fixed. We can track a leak to its source using our thermal imaging process.

If you don’t believe the dampness is stemming from any of these above causes, then condensation is the likely cause.

So what is condensation and how does it form?
There is always some degree of moisture in the air around us, but it’s simply to visible to the human eye. If the air gets colder it cannot contain all the moisture particles, and as a result tiny droplets of water will appear. This is condensation, and we that’s when we can see it. You may notice it when when the mirror mists over when you take a shower.
Condensation occurs mainly during cold weather (like a typical NZ winter), whether it is raining or dry. It does not leave a ‘tidemark’. It appears in places where there is little movement of air. Look for it in corners, on or near windows, in or behind wardrobes and cupboards.

Here’s how to avoid condensation.

These 4 steps below will help you reduce the condensation build up in your household.
1. Produce less moisture
Some of our routine day-to-day activities produce moisture very quickly. Such as…

Cooking: To reduce the amount of moisture escaping the kitchen, cover pans and do not leave kettles boiling after they hit the boiling point. Use the kitchen fan always.
Portable flueless bottled-gas heaters: These type of heaters put moisture directly into the air. Did you know that one gallon of gas or paraffin produces approx 4 liters of water? If you have a problem with condensation, try to find alternative means of heating, or vent the heating you do have.
Washing clothes: If you use a clothes dryer, make sure you vent it to the outside (unless it is the self-condensing type). The other option is to hang the clothes in a room with a fan blowing and window open. Be sure to shut the door to avoid the moist air spreading through the rest of the home.

2. Ventilate to remove the moisture
You can ventilate your home without needing air draughts.

Some kind of ventilation is needed to get rid of moisture that is consistently being produced, including that from people’s breath. Keep a small window slightly ajar or a trickle ventilator open at all times if possible, and especially when humans are in the room.

Larger amounts of ventilation are required in the kitchen and bathroom when cooking, washing up, bathing and drying clothes etc. This simply means opening the windows wider. A humidistat-controlled electric fan is always best… this type of fan will come on automatically when the air becomes humid).

Close the kitchen and bathroom doors when these rooms are in use even if your kitchen or bathroom has an extractor fan. It will help to draught proof these doors. Doing this will help stop the moisture flowing into other household rooms, especially the bedrooms, which are more often than not colder and more likely to form condensation… resulting in mould spore growth on the walls, sheets and pillows etc.

Allow space for the air to circulate in and around your furniture. Open doors to ventilate cupboards and wardrobes from time to time. Leave space between the backs of wardrobes and the wall (this is a common place for mould growth). Where possible, position wardrobes and furniture against internal walls, i.e. walls which have a room on both sides, rather than against outside walls where there is a larger temperature variation and higher chance of condensation forming.

When you have a curtain or blind drawn, it makes the surface of the window cooler and increases condensation, especially with single glazed windows. If you replace your windows any time soon, make sure they are double glazed to reduce condensation.

3. Insulate and draught proof
Insulation in the ceiling, cavity wall insulation and draught proofing of windows and doors will help keep your home warmer, and as a result you will have lower energy bills. When the whole home is warmer, condensation is less likely to form.

When draught proofing doors and windows:
– Do not block permanent ventilators.
– Do not completely block chimneys (leave a hole about two bricks in size and fit a louvered grill over it).
– Do not draught proof rooms that use a fuel burning heater (e.g. gas fire) or cooker.
– Do not draught proof windows in the bathroom or kitchen… these are the places the need air circulation.

If you live in a house, insulating your loft is a cost-effective way of cutting heating costs. Remember to draught proof the loft hatch but do not block any eaves ventilation. Cavity wall insulation is also an effective way of cutting heating costs, and this should be standard in most NZ homes. Many properties, however, are built without suitable cavities (especially in the last 15 yrs in NZ). If you are in doubt, you should seek the advice of a building professional who will advise you on the need for permits required. The other issue with insulation in some insulation installation contractors ‘miss’ spots, which can cause your energy bill to increase dramatically. We can detect missing insulation fast with our thermal imaging camera.

Secondary glazing of windows reduces heat loss and draughts but you must ensure that there is some ventilation and adequate means of escape in an emergency such as a fire. Remember that any alteration to your windows, including their replacement, must meet NZ building regulations. You should consult you local authority on the need for a building permit before any work is undertaken.

4. Heat your home a little more
In cold winter weather, the best way to keep rooms warm enough to avoid condensation is to keep low background heating on all day, even when there is no one at home. This is very important in flats and bungalows and other dwellings where the bedrooms are not above a warm living room. If you have central heating set it to provide background warmth in all rooms including unused rooms.
Otherwise install suitable thermostatically-controlled heaters where necessary (do not use paraffin or flueless bottled gas heaters for this purpose). The thermostats will help control heating and costs. Remember to provide background ventilation at the same time.
Dehumidifiers will help dry out damp in newly built houses. They can also help reduce condensation but they are of limited use in cold damp rooms.

 Important moisture reduction points to remember…

Produce less moisture:
– Cover pans
– Dry clothes outdoors
– Vent your tumble dryer to the outside
– Avoid using paraffin or flueless bottled gas heaters

Ventilate to remove moisture:
– Ventilate all the time, especially when someone is in the room
– Increase ventilation of the kitchen and bathroom when in use and shut the door
– Ventilate cupboards, wardrobes and blocked chimneys

Insulate and draught proof:
– insulate the loft
– draught proof windows and external doors
– consider cavity insulation
– consider secondary glazing
– find out if you are eligible for a grant or other help

Heat your home as often as possible!
– if possible, keep low background heat on all day, with background ventilation
– find out about benefits, rebates and help with fuel bills

NZ Leak & Heat Loss Detection Ltd is certified for thermal imaging detection of moisture related problems around the home that can cause serious health issues.

Is your home, your coffin?

Contact us today for a thermal imaging health scan of your home before it’s too late!

Tips on How to Remove Mold 

How to Fix Moisture & Leak Damage Around the Home

If you’re looking for a simple way to fix moisture or leak damage around the home, there is many ways to fix a leak… but the big question is this… how far has the moisture damage behind the wall or ceiling travelled?

Take a look at this photo for a moment, then test your leak detection skills by answering a couple of ‘home handyman’ questions underneath the photo…

Water Leak Detection Using Thermal Imaging

This leak is quite obvious right? Well no it’s not really, because if you didn’t have this thermal imaging photo to begin with, you may have needed to rip down the walls to find the extent of it.

Is the leak from the bathroom above? It could be. But it could also be coming from the roof or window joinery in the bathroom above… and eventually tracking down both walls. So do you take the risk of pulling down the walls in this photo, and the walls in the bathroom above … only to find it was from the shower pan? It’s coming from somewhere up above… we know that much. Time to gamble … or is it better to get a thermal imaging scan done to reveal the leak source within minutes?

So how far has the problem really extended? This photo shows water above the window. The insulation could also be storing moisture in the dark blue area.

Is that a faint air leak coming out of the edge of the cornice on the ceiling side? Did you even see that? This is why we provide a service that reveals ‘things’ that the human eye can’t see. Air leaks in insulation… and in this case the wall/ceiling juncture isn’t sealed properly. These types of issues will drive up your home energy bill.

Our company can detect a leak fast… and certainly save you alot of time. Problems like the above can really start to suck the equity out of your home if you don’t get it identified and fixed… and the structural integrity of your home is sub-standard and costly to repair.

Contact us today for a free quote!