DIY Rent, Hire or Buy Moisture Meter for Sale

DIY – Now you can keep a close eye on the moisture levels in your house on a regular basis!

Our company tests homes using an electronic moisture meter almost everyday in NZ, and a very common question we get asked is…

 “Where can I buy a moisture meter in NZ the same as yours to monitor the house for leaks in the future?”

Due to the fact we offer moisture detection services, it didn’t make sense for us to share the ‘trade secrets’, but we’ve now changed our approach to help more home owners stay in touch with their biggest asset.

Rather than shop around for moisture meter suppliers in NZ (and get confused), we can now sell you the same type of non-invasive testing equipment we use!

You can own your own hand held monitor to keep a close eye on the moisture content of the wood in your home. Great for shower leaks, window leaks and general moisture level monitoring… especially if you own a plaster home!

Why is this a logical investment? Buying a brand new moisture meter works out to be a similar price as an inspection would anyway! In addition, not only can you use it  in your own home, but also family and friends homes!

The type of meter we use isn’t the cheap type … it’s a high quality meter used by professionals, and made in NZ for NZ conditions!

If you’ve been wondering how to test your house for leaks and moisture without putting any holes in the wall… this is it!

What Type of Timber is My House Built With?

Do you know what type of timber is behind your walls?

What type of timber is used in leaky buildings?

Coming up in this article, you will see an outline of what H1, H2, H3, H3.1 and the different stamping on timber means… and which timbers are associated with leaky buildings, or potential leaky homes…

1 in 5 phone calls we receive will ask, “How do I know what type of timber my house (or the house i’m looking to buy) is built with?“. You can actually find out quite easily, but you do need to be able to see the woodmark stamp on the timber frame in one of your external walls:

What is treated timber and what is untreated timber?

Which timber will rot if I get leaks?

Hazard classes vary in treatment levels from 1 – 6, so depending on what you use the timber for will depend on treatment type:

H1 : The treatment level for low hazard situations where timber is not exposed to the weather. Its major use is for framing timber and interior linings. This type of timber has been used in external walls of ‘leaky buildings’, and the reason its failed is due to moisture ingress through the cladding and directly onto the timber! H1 timber also has sub-categories:

  • H 1.1 : Timber used in situations protected from the weather, dry in service and where resistance to borer only is required. Do not use this timber in external walls unless additional chemical treatment has been added.
  • H 1.2 : Timber used in situations protected from the weather but where there is a risk of moisture exposure conducive to decay (Pink or Blue in colour). Minimum standard to use in external walls. Check with council to confirm this minimum requirement has not been upgraded before building.

H2: This level is very similar to H1 but includes an insecticidal treatment to protect against termite attack… normally for use in Australia.

H3: For moderate decay situations where timber is exposed to the weather but is not in contact with the ground. H3 is also split into sub-categories.

  • H3.1 : Timber used outdoors above ground, exposed to the weather – generally in non-structural applications; i.e. fascia boards, weatherboards.
  • H3.2 : Timber used outdoors above ground, exposed to weather or protected from the weather but with a risk of water entrapment; i.e. decking, fencing and pergolas. Used in areas of high risk to water penetration, such as balconies.

H4: Used in high decay areas such as ground contact or fresh water. Generally used for fence posts and landscaping timbers.

H5: Used for severe decay hazard risks such as ground contact where conditions of severe or continuous wetting may occur. End uses for this hazard class are house piles and poles, retaining walls, crib walling and horticultural supports.

H6: This hazard class is for marine use. Wharf piles and fenders, marine and jetty components regularly immersed in seawater or estuarine ground.

Sometimes you may need to remove a small section of interior lining on an external wall to see the timber stamp on the frame. Otherwise it could be written on the original building plans.

Painting over plaster cladding cracks to prevent leaking

How often should you paint a plaster cladding home? The answer to this question can vary… but here are a couple of things to think about prior to opening the paint tin.

Why are you considering getting your plaster home painted in the first place?

The most likely answer is because you are seeing cracks, or hairline cracks appearing under windows, around windows or vertically down the external walls. Before you jump ahead and get the place painted, you should seriously consider finding out if signs of water ingress have occurred. Water ingress basically means water soaks in through the cracks and penetrates through onto the timber framework. If the timber is untreated, then there is serious potential for fungal growth and rot to set in. This is what happens with a leaky building in many cases.

Should you just turn a blind eye and cover up the cracks with a thick paint?

Some people will trick themselves into thinking that a coat of paint will sort out any potential leaking problems. Well… yes and no. Yes, it will stop more water getting in, but it won’t stop the result of previous leaks. Will you be able to sleep peacefully at night taking the ‘cover up’ approach? Would you feel comfortable on-selling the home?

One important thing to keep in mind, is that the vast majority of plaster clad houses don’t have a cavity, therefore once moisture is in the wall there is no air circulation to dry it out (trapped cavity). Secondly, once any insulation gets moist, then its R Value is reduced dramatically.

If you’re buying a home, and it’s just had a ‘fresh coat of paint’, then don’t get too excited about “how well the vendors look after the home”, rather, look at it as a red flag! The moment you smell fresh paint in a home built in the 90’s – 2004, then consider getting a thermal imaging home inspection.

What companies specialise in filling and fixing cracks in plaster cladding?

One common question we get when doing an inspection where cracking has occurred in the plaster system, is “who fixes these types of cracks?”. There are some builders/handymen around who will just slap some silicone in the cracks and run for the hills, and there are companies who specialise in dealing with minor plaster cladding issues (not leaky home re-clads) who will do such a great job you would hardly know a repair has been made… and some companies who repair and fix cracks in plaster cladding will even give you a warranty! Make sure you ring around and get free quotes.

Back to the original question: Every 5-7 years is about the average span of time between painting. Just keep an eye on the cladding every few months, and if hairline cracks start appearing only 2 years after the last paint job, then it may be due for another coat (and don’t use the same painter as last time!)

What type of paint should you use to paint plaster cladding?

There is a small range of paints that have been designed with plaster homes and potential leaky buildings in mind. These paints are nice and thick when applied, they also have waterproofing membrane properties too them, and also have flex in them which can help reduce hairline cracks appearing if movement, or expansion and contraction is occurring within the building envelope.

Fix leaks and leak damage first, then paint last.

Not sure if your home has leaks? We can quote you over the phone right now on what it will cost for a building moisture inspection (includes thermal imaging) based on the size of your home… it probably costs less then you think. Is it really a ‘cost’ or an ‘investment’? It’s an investment.

How to Package Up Your Marketing and Sell Your Home Quicker!

Has your home been stuck on the market longer than you would like?

Has your real estate agent packaged up the marketing to cater for Kiwi home buyers biggest fear?

No matter if it’s a business or a home, if you’re selling something, people need to know about it. To get as many potential buyers through your property as possible, you need to eliminate the BIGGEST fear kiwis will have when considering a home to buy… and it needs to be done within your marketing, otherwise they may never even get to the stage of coming to have a look at your property!

We have a ‘creative’ idea that you need to consider ASAP if you’re selling your home. Click this link below… it’s a very interesting way to approach your marketing!

Creative Marketing Idea to Sell My Home ‘

How to Dry Out a Wet Wall

Not matter how good the construction of your home is when it’s initially built, you’ll find that leaks will eventually start to appear after approx 10yrs.

If water has crept into your walls over time, you may find it’s soaked into the timber framework causing potential structural integrity problems, mould and rot. These leaks need to be found and sealed before you begin to dry out the wet wall in the area affected (In some cases you may need to pull the drywall down to find the leak)

What are common ways for water to get into your walls?

Rain, wind blown rain, plumbing and piping leaks, flooding, damp or moist air, kitchen/bathroom/laundry/shower floods.

The most common of the above is rain. Rain can find its way in through cladding, windows, window joinery, parapets and balcony penetrations.

wet insulation

If you don’t detect these leaks and get them dried out, you could soon have a home full of fungi. Fungi can spread 1.7 meters per year through your timberwork if not dried out!

How to dry out wet walls:

There are several ways to dry out a wet wall, such as forced air movement in the wall cavity with a fan, using dehumidifiers and drilling small holes in the wall to let air circulate etc, but if the leak appears to be substantial, then it’s best to be certain the wall is dry, therefore pulling down a small area of the wall could be your best chance at doing the job properly! Here’s why….

1) Insulation can take up to 10 years to dry out, so fan forced air simply won’t do the trick if water has penetrated the insulation. Taking down the wall in the wet area will allow you to visually inspect the insulation damage if any.

2) The leak may have been slowly damaging your timber framework long before the problem become visual to you, therefore the timber could be rotted altogether in the area. Again, using fan forced air would not detect this.

3) You may find the source of the leak! If you can get a proper look at what’s going on behind the wall, you may be able to track the leak to the source and fix the issue once and for all!

If you haven’t had a moisture check on your home recently, give us a call and we can scan your walls with our infared camera. Don’t wait until you can see the leak, otherwise it may cost you big $$$ into the future.

How to Reduce Your Home Energy Bills

 Most of us don’t have excess money to burn on energy bills, and it can be very annoying when your bill arrives and it’s bigger than the last bill for no apparent reason!

Here’s 11 no-cost tips to help reduce your energy bills….

reduce energy bills

Turn off lights when you leave the room.
Use cold water for laundry, and wash only full loads.
Use sun and wind to dry your laundry.
Repair leaky hot water taps.
Close windows and curtains at sunset in the winter.
When you buy a new appliance, ask for an energy efficient model (check its energy rating label, or check for models with an Energy Star).
Exclude draughts with a stuffed snake under the door.
Switch appliances off at the wall when you’re not using them – otherwise they could be guzzling standby energy.
Check your hot water cylinder to see if it is set at 60 ºC (140 ºF).
Use the microwave instead of the oven.
Put an extra blanket on the bed instead of using an electric blanket.

(Thanks to Contact Energy for the above tips)

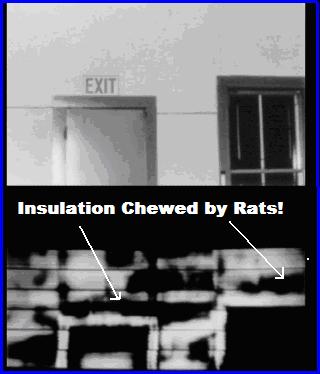
The biggest area of heat loss in the home is missing insulation (see picture). We can quickly identify areas in your home where heat is escaping, therefore saving you money long term in energy bills!

Contact us today for a moisture and heat loss scan of your home!

DIY Rent, Hire or Lease a Thermal Imaging Camera

Has the thought of renting, hiring or leasing a thermal imaging camera crossed your mind?

A thermal imaging camera is world’s apart from your standard still shot camera, therefore the skills needed to operate infrared cameras are very specialised also. Only a certified thermologist should operate a thermal imaging camera, otherwise the image created from the emitted IR radiation via the camera detector may be misinterpreted.

A thermal imaging camera operator should be competent in the following:

Emmisivity – Knowledge in different emittence values (E-values) of materials, and knowledge of the efficiency materials emit radiation against a ‘blackbody’ is critical. Without knowledge of emmisivity, the thermal image created may be interpreted incorrectly leading to a misdiagnosis of the object being imaged.

Delta T: Having sufficient delta T is critical during a thermal imaging inspection. Incorrect conditions can cause subtle thermal anomalies to be missed.

Training on IR equipment: Navigating around a thermal imaging camera needs specific training. Adjusting the focus, level, gain and colour palettes for each inspection to create detailed thermal images is important in the process of an inspection.

Back up Moisture Meter and Confirmation Equipment: When conducting a thermal imaging inspection, all thermal anomalies should be confirmed with a moisture meter if imaging potential areas of excess moisture, such a NZ leaky home or ‘leaky building’ inspections. When imaging electrical components, a certified operator of ammeter’s and voltmeter’s (usually an electrician) should be present for the inspection to confirm load readings.

The above are just a few of the skills needed to operate a thermal imaging camera successfully.

certified thermologists

What other options are available for you?

You can hire a certified thermographer for a day:

Home buyers: You can benefit by lining up all your home inspections for one day, and simply take our thermographer with you to all inspections. This will work out cheaper for you, and as a result increasing your return on investment. Using thermal imaging during a building inspection can save you from buying a ‘lemon’.

Company Owners: Any size company, plant, factory or any business that has machinery which draws high electrical current or has rotating machinery, should seriously consider a thermal imaging inspection.

 A thermal imaging camera can pick up temperature increases/decreases on components weeks before the situation becomes catastrophic and a complete unscheduled shutdown occurs. An ‘unexpected’ shutdown of machinery can cost a company both product and wages… a thermal imaging inspection can help prevent this situation.

You can hire our company for a day (or whatever time frame needed) for a complete thermal imaging inspection of your entire workplace for faults, overloads, areas of excess temperature, or imbalanced loading on machinery.

Contact us for our thermographer day rates (Best value)

Interesting: The average return on investment of hiring a thermographer averages 4:1, and up to 11:1 for predictive and preventive maintenance on electrical systems!


What Causes Damp and Moisture Around the Home?

 The first course of action when curing a damp problem is to establish where the water source is and how it is gaining entry in to the walls. Check the following areas:

Broken or perished damp-proof course (DPC)

If the dampness is on the ground floor, beginning at ground level or below, a faulty DPC may be implicated. This may not be easy to establish by eye or without invasive investigations, so should be considered once all other sources have been eliminated. If the property has suffered from subsidence, the DPC may well have been ruptured.

Bridged damp-proof course

It is not uncommon for the ground levels surrounding a property to slowly rise as garden debris and external finishes such as decking and driveways are added. Check the perimeter of your property and be sure that these surfaces do not carry water to a level higher than your DPC, effectively rendering it useless. Cavity wall insulation is also capable of bridging the DPC, so check that this has been properly installed and does not pass below the level of the DPC.

Broken or blocked guttering

Broken or blocked rainwater goods such as guttering, drainpipes, roofing and flashing can be large contributors to damp. If rainwater isn’t conducted safely away to drainage points, it will leak uncontrollably onto walls unprotected by a waterproof layer.

Defective ground and surface drainage

As they meet the external perimeter, surfaces butting up to the walls of your property should be angled slightly upwards so that rainwater drains away from the building. If ground drainage is blocked, rain and waste water will not be able to drain away promptly, and the property is at risk of flooding.

Condensation

This is caused by humid air hitting a cool surface, so check that kitchens, bathrooms and boilers are well ventilated to carry this moisture rich air away. The area beneath suspended wooden floors is highly susceptible to condensation, so check that there are sufficient airbricks (all sides of the property, every 180cm (5ft 11in)) and most importantly that they are not blocked by garden debris or cavity wall insulation.

Sub-floor and chimney ventilation

Leaking plumbing

Leaks are most often at the joints between shower trays or bathtubs and the walls, so check that sealant and grouting is in tact and continuous. Also check pipework for leaks, particularly at joins, which may simply be rectified by a new joint or washer.

Masonry & chimneys

Check brickwork, rendering, stone and plinths for damage that compromises the waterproof surface.

If the damp is in walls above a fireplace (not necessarily in the same room as the fire, but the room above!), hygroscopic salts are likely to be drawing moisture into the masonry.

We detect damp areas using thermal imaging – non-invasive approach.

Contact Us today for a quote.

Sub Floor and Chimney Ventilation

Sub-Floor and Chimney Ventilation 

Ventilation is key to keeping a property free of moisture and damp, which is good for the health of the building and those living within it. Because of its importance, a whole section of the building regulations is specifically concerned with this element of property construction and care.

The building regulations cover a wide range of ventilating methods. Here we consider two key, often forgotten, aspects of ventilation that should be observed to keep your property free of damp:

Sub-floor ventilation

Many traditional properties are built with a suspended wooden floor which sits above a void air space between the perimeter walls and ground. If this space is not ventilated, the air in it becomes stagnant and humid, and the moisture within it begins to condense on the brickwork and flooring. Over a prolonged period, this moisture causes the floor to rot from the underside.

To avoid this situation airbricks must be positioned in the wall such that air can exchange freely between the sub-floor void and the outside. These airbricks are manufactured in terracotta and plastic to approximately the size of a standard brick, and one should be inserted in the wall every 180cm (5ft 11in), on all sides of the property.

Once you have sufficient airbricks in place, ensure that they can work properly by keeping them free of debris and dust. Particularly if you have cavity walls to which insulation has been added, ensure that the passage of air has not been blocked.

To insert an airbrick in a solid wall, simply chisel the mortar away from one brick in the wall and replace it with an airbrick and repoint.

In a cavity wall, the airbrick should be inserted into the exterior leaf of the wall as for a solid wall, but you will need extra long drill bits (300mm, 12in) to cut through the interior leaf of the wall as well and thereby maintain the through flow of air to the sub-floor void.

To prevent debris blocking the cavity between the two holes, fit a telescopic ducting sleeve to the back of the airbrick and extend it through the hole in the internal wall.

Where the exterior ground level is too high to carry air to the sub-floor void in a straight line, a telescopic underfloor vent should be attached to the back of the air brick to conduct and protect the airflow across up to 5 brick courses.

You will need to chisel out a much larger area than a single brick to be able to pass the angled duct through.

What Causes Damp?

Chimney Breast Insulation

Despite ‘period features’ being a highly attractive attribute, it is not uncommon these days for fireplaces to be covered over.

Under normal circumstances, a fireplace allows air to flow freely through the chimney upwards and downwards depending on the prevalent weather conditions. If the fireplace has been panelled over, it is absolutely imperative that the air inside the chimney breast can continue to move so that it does not become stagnant and cause condensation and then damp.

If the fireplace has been bricked up, check that at least one airbrick has been included, and if not, insert one in a low, central position. The plaster immediately on top of this brick must also be perforated to avoid interrupting the air flow.

If the fireplace has been covered over with a wooden panel, this must also include one or more holes. The simplest approach is to drill several holes of 12mm (½in) diameter into a low central portion of the panel. Alternatively, for a more professional look, a large hole can be cut into the panel in the same position, using a keyhole saw, and covered with a vent grill. Ensure the hole is 10mm (⅜in) small on all sides than the vent itself so the vent can be screwed on.

Moisture can destroy structural integrity of your home. Call us today, we can detect moisture issues in your home that the human eye can not see which may need immediate attention.

Why Should You Insulate Your Walls?

Why Should Kiwi’s Make Sure their Walls are Insulated? 

It’s simple really, un-insulated walls cost you money. Up to 45% of the heat produced in your home is lost through the walls, therefore insulation can;

Reduce your heating bills
Lower the ‘wear and tear’ on your boiler
Positively impact Global Warming & Climate Change.
-Create a warmer and more comfortable home.
Lessen the risk of ill health from damp and draughts.

Also insulating your property will increase it’s market value, as well as potentially reducing the amount of maintenance required for it’s upkeep.

How are your walls insulated?

Getting your walls insulated couldn’t be easier. If you own a relatively modern house, with cavity walls, then the insulation is normally injected through small holes from the outside, with the entire process taking just a few hours to cover the entire house.

If you own an older house, with solid walls, then the material can either be applied internally in the form of thermal boards attached to the inside walls of your house, or externally as a protective render.

The heat loss through an un-insulated solid wall is typically more than double that of an un-insulated cavity wall.

Cavity Wall or Solid Wall?

In general, the walls in your home can be categorised into 2 distinct types. Modern style homes, usually built post-war (1945), are constructed with Cavity walls. Older style homes are constructed with Solid Brick walls.

If you are unsure which type of wall you have, then try checking the thickness of an outside wall by any door or window. Cavity walls are at least 26.5cm (10.5 inches) thick. Alternatively, look at the brick pattern of your outside walls, as cavity walls usually differ from solid walls, see image.

Regardless of the types of wall your house is constructed with, there are plenty of different types of insulating material on the market for you to choose from. Use the links below to find out more;

Cavity wall insulation
Solid wall insulation

We detect missing insulation… fast! Thermal imaging can see air gaps and missing insulation without needing to climb into the manhole.

Contact Us today for a missing insulation inspection!