Swollen or Bulging Skirting Board? Leak

One of the most common indicators of a leak is a swollen skirting board.

Commonly referred to as a ‘blowen skirting’.

The key is to find the leak source before it gets to the point of doing damage, but that’s not always possible. So where is it coming from in the first place?

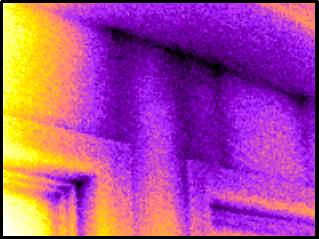
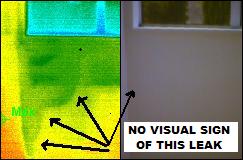
The following thermal imaging photo shows you what I found during a house inspection in Sumner, Christchurch. In this case, the skirting was actually in tact and not showing any signs of swelling due to mositure , yet the thermo camera picked up the problem right away….

Dark area indicates hidden leak

Wouldn’t you prefer to know this before buying the house!

This particular leak was actually coming from the roof, and running down the side of the window frame and showing itself at the bottom of the wall/skirting area. There was a cladding detail running around the perimeter of the house that was flat of top, so the water had no way of running off. The cause of the leak was a crack in the polystyrene cladding above this detail just below the roof line.

We find leaks and moisture… that’s all we do.

Liquid Leak into River – Aerial Infrared Photo

An infrared camera is an excellent way to detect ‘hard to solve’ problems that the human eye won’t see.

Below is an infrared image of liquid leaking into a river.

Here’s why this leak could be seen using a highly sensitive thermal imaging camera: See where the liquid is spilling into the river? That liquid is a different temperature to the water it’s flowing into… therefore an infrared thermographer can instantly pinpoint the source of the leak. There is no way this spillage could have been detected with the human eye, because the colour of the liquid was almost the same as the water it was flowing into.

These same principles are what we use to detect leaks in NZ houses. This thermal imaging photo is taken from the sky out of a small aircraft.

Courtesy of AITscan
Courtesy of AITscan

We detect leaks all over NZ using infrared technology!

Hidden Water Leak Found Under Window

Have you ever heard the saying “What you don’t know won’t hurt you“?

The home owner of this Glenfield (Auckland) home below no longer agrees with the above statement.

On a routine home thermal imaging inspection yesterday, we uncovered a huge water leak around a window that certainly wasn’t visable to the human eye.

window leak thermal imaging

The only hint we had of potential moisture ingress in the area, was a small piece of paint that had slightly changed colour at the bottom of the wall on the bottom floor. This particular leak in the photo was originating from around a second floor window directly above the front door.

You will notice that in the righthand side of this picture, there is absolutely no sign of a leak? If you’ve been considering getting an infrared thermal imaging inspection, then this photo is a classic example of why you should get it done sooner rather than later.

Are you considering buying a home? This photo certainly demonstrates why you should get a moisture inspection in addition to a building inspection prior to handing over your hard earned dollars.

Here’s another window that leaked not long after being fixed in a North Shore home, as seen through our infrared camera…

The dark area in the centre of the image is water below the window.

Contact us for a free quote!

Tracing the Source of a Water Leak in Your Home

Can you see signs of a leak in your home?

Can you detect were the leak is coming from?

We had an interesting scenario today on a routine leak detection in an Auckland home. The leak itself actually appeared on the ceiling about 1 meter to the side of a skylight (The home had a flat roof). The first thought is the water is surely coming in from the skylight somewhere”, but after testing the area with thermal imaging and a moisture meter, we found it was coming from a completely different area, and just so happened to end up penetrating the gib there.

So what can you do if you see a leak in your home?

Guess where it’s coming from. That’s about all you can do, especially if you don’t have the appropriate equipment to track the source of the leak.

The point of writing this information, is if we hadn’t gone into this particular home with the infrared camera, the home owner’s next course of action was to re-seal around the skylight, which wouldn’t have solved the problem at all.

Water can track sideways, angles, down, and even up. Unless you can clearly detect where the leak is tracking, then you may end up damaging parts of your home that aren’t required. You should certainly consider getting your leak tracked using our thermal imaging technology and moisture testing… then proceed to repair the source. Taking this course of action could certainly save you time and money, as it did for the home owner in the above case.

Contact us for a free quote!

Detect Water Seepage Leak Through Bricks and Cement

Do you suspect a water leak behind bricks or cement?

On a routine home moisture/leak inspection this morning in the Howick area, we came across a leaky brick garage wall that was adjoining the home next door. The clients garage was pooling with water in the corner a couple of days after the leak, but not on the actual day of the rain. After a thermal imaging scan of the brickwork, we applied a moisture meter to a pinpointed area of the wall… and the results are shown it the photos below.

The moisture meter reading in the lefthand photo is significantly higher then the righthand photo, yet it was the same wall, same style brick and same paintwork. Now the targetted area of potential moisture has been detected, an invasive inspection can now be carried out without knocking the whole wall out! brick wall moisture readingmoisture reading


If you suspect a leak behind any type of wall, give us a call. Leak inspections are what we do!

How to Find a Burst Water Pipe or Leak Under the Ground?

Do you suspect a burst water pipe, or water leak under ground?

 Before you call a plumber to come and rip apart your yard to ‘try to find’ a water leak, there’s a fast solution that could potentially pinpoint the water leak under the ground without needing to touch your dirt. If you can find the leak first, then the problem can be addressed directly, reducing the amount time needed to fix the leak.

  • Blocked Drains Cleared Using Drainage Cleaning Machines
  • Hot Water Cylinder Leak Repairs
  • How to Convert Low Pressure to Mains Pressure
  • Leaks Pinpointed Without Digging up the Whole Yard!
  • Sewer Lines
  • Drainlaying
  • Pump Stations
  • Drain Unblocking
  • Unblock Sinks & Toilets
  • Septic Tanks and Grease Traps

********************************

Advertising:

NZ companies who find underground leaks and detect pipes…

South and East AucklandHOWICK PLUMBING

AUCKLAND WIDEABBOTTS DRAINAGE

Tauranga MACGREGOR’S PLUMBING

********************************

In some cases, you might notice your bore water pump (or any pump) not switching off automatically… this could also be signs of an underground leak.

Please read this short article that explains how:

How Home Owners Can Detect a Water Leak Under the Ground

Suspect a Leak Behind Your Shower Wall & Tiles? See Photo

What could cause a water leak behind the walls and tiles in your shower?

A typical leak issue that many home bathrooms experience is paint peeling off the walls in (and around) the shower… sometimes to the point where the actual drywall and tiles come off also. What can you do about it? The most likely cause of such a leak in the shower would be the plumbing behind the wall around the showerhead and faucets. All it takes is a small hole in the plumbing at the joint, and the water drips (or sprays) onto the rear side of the plasterboard/drywall. The result end result of water hitting these highly absorbant materials, is fast deterioration of the shower area, and potentially damaging the wood structure behind the wall.

result of shower leak 
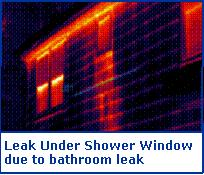
Once water gets into the wood, you need to act fast because the water will track sideways and get in behind the tiles, around windows (see photo), into other walls behind your bathroom, and if the shower is on a 2nd story of your home, it could seriously damage the ceiling of the room underneath your bathroom. The other problem could be that there is simply to much moisture in your bathroom. You must have a vent fan in the ceiling of any interior shower to reduce the chances of moisture problems getting in behind your walls and shower tiles.


So should you open up the wall first, or get a thermal image of the source to assess the extent of the damage?

It only makes sense to use a thermal image to determine the extent of the damage first. All to often people just start ripping down walls all over the place to ‘find’ the source of the leak. Once they do find the source, they still don’t know how far the problem has progressed sideways into the walls of other rooms in your home. Note: By the time you actually see the problem, it’s most likely been leaking for quite a while.

NZ Leak & Heat Loss Detection Ltd uses a high tech thermal imaging camera that to help detect leaks behind bathroom walls. We can determine the exact area that should be investigated for moisture damage before any wall in ripped down. Our infrared camera can also detect temperature differences in the grout between tiles in wet area, to help determine which area is most likely to contain excess moisture.

If you suspect a leak behind any wall in your home, get it checked right away before the costs blow out to get it fixed down the track

Contact us today for a complete thermal imaging scan of the wet areas in your home!

Finding a Water Leak and Tracking it to the Source

How to find a leak before calling a plumber!

Trying to find a leak around the home can be very frustrating and can get very expensive… especially if the leak is behind a wall, or a roof leak. A plumber can usually fix water leaks very quickly, but it’s the actual process to find the water leak that can really cost you big dollars!

When your paying a plumber, roofer or builder to find a leak, they may need to pull down multiple walls to ‘get a better idea’ of where the problem is, and to you, that could mean additional money going out of your pocket to replace the gib board/cladding, plus the painting and plaster work etc to get it all back up to scratch. So what if your plumber/builder is trying to find a leak, and ends up pulling down a wall in an area that has nothing to do with the leak source? It’s easy for someone to pull down a wall, or stick a screwdriver through to ‘test’ if an area has excess moisture, but i’m saying this kind of process to find a leak simply isn’t required. There’s a much faster and non-destructive way to go about it.

leak in ceiling

How to find a water leak in a non-invasive way: 

Leak detection by way of thermal imaging is the key to a fast, neat and tidy leak fix. Why? for starters, we can detect potential leaks penetrating your inside walls within minutes… with both our IR camera and our back up test with a moisture meter. Secondly, we can usually see where the leak is coming from, and where the leak damage ends. After viewing the infrared photos we take, your plumber or builder can go directly to the problem, and not have to tear down your walls in places that aren’t required… saving you money.

Quickest way to find a leak…

Detecting water leaks fast… that’s what we do. We are trained thermographers who specialise in leak & moisture detection using a high tech thermal imaging camera, and pinpointing potential problem areas in your home or office.

Need to find a leak fast? Contact us today!