Finding Balcony Leaks and Preventing Structural Failures

Leaking balconies can be a serious danger, especially if its been leaking slowing for some time before you notice it.

There are plenty of ‘real’ stories about balconies collapsing under load (too many people standing on it at one time), but the most common cause of balcony issues isn’t the load, it’s the fact that the waterproofing has failed and the joists are suffering gradual leak damage and rot which is causing the failure.

You can see in the above photo the discoloured timber cantilevered joists have completely rotted. So do you think decay and rot may have also spread down the external walls below… like cancer? There is a very high chance this has happened, especially with untreated timber behind the plaster cladding.

If you notice any discolouration on the interior lining at the top of your walls or on the ceiling of the room below a balcony, there’s a good chance it’s a leak. Here’s the challenge to finding balcony leaks…

  • Is the water running back across the joists under the deck from outside edge?
  • Has the tile grouting perished and the water is leaking through a join in the waterproofing membrane under the tiles?
  • Has the joinery of the door leading out to the deck failed?
  • Is the base of the cladding touching the deck? Water can potentially ‘wick’ back up into the bottom plate of the timber wall frame.
  • Has the waterproofing membrane been correctly installed underneath the door frame to prevent wind driven rain getting up underneath the door and down into the wall below?
  • Is the water coming down from the roof and running down the external walls?
  • Any cracks in the plaster cladding around the balcony or external walls in the area?
  • What about where the balustrade butts up against the cladding… is the area sealed correctly?
  • Is the deck level the same as the floor level inside the house, or is there a step down of around approx 100mm onto the deck? (The latter is the correct way to build under the current building code).
  • Is the leak visible on the under side of the balcony?
  • Is the balcony drain blocked, or some kind of plumbing failure occured in the area?

Our thermal imaging and moisture detection services can go along way towards detecting balcony leaks through a process of elimination… and might save you from accumulating a few grey hairs in the process!

The one thing you need to make sure of, is that you don’t leave the leak go ‘unsolved’, because the longer you leave it, the higher probability the moisture is eating into your external load bearing walls. Not good.

We find balcony leaks and determine if moisture has penetrated your walls.

Thermal Imaging Used to Detect Bracings and Fixings Behind Walls

Are you considering renovating your home, or trying to get a CCC and need a simple way to prove the appropriate bracings, studs and nogs are in place?

Using our infrared cameras is the quick way!

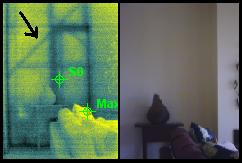
As you can see in the thermal imaging photo below, there has been alterations to this wall which the home owner didn’t know about. More importantly, you can see the builder has installed diagonal bracings behind the wall to strengthen the area.

There are very few techniques available that will give you such a clear picture of how your walls are constructed, without having to do damage. We have thermal imaged quite a few ‘granny flats’ and add-ons that were built without a CCC … and with our unique thermal imaging reports, we’ve helped strength our clients cases to get buildings passed through council without removing any sections of wall.

Just like a female goes to get breast thermography for pain free screening, or a dentist uses an x-ray machine to see what’s happening behind your gums before he/she operates… thermal imaging of NZ houses is the best possible way to detect leaking problems, building construction, moisture detection and missing insulation detection.

Get the visual facts about your house before making any structural or renovation decisions (or painting the house).

Leaks Repaired But Wall Damage Continuing?

Can a small bathroom leak really be that destructive? 

Absolutely… here’s what most home owners don’t realise:

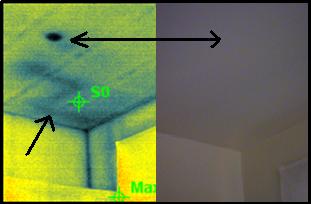
In the infrared photo below, you will see two different leaks on the same kitchen ceiling… and neither could be seen visually. Here’s what the scenario was with this inspection.

There was a bathroom directly above this ceiling, and when you walked across the bathroom floor it was very squeeky. This instantly alerted me there could be water under the tiles and waterproofing, and possible swelling in the particleboard floor that can’t be seen.

When you have a shower up against an external wall, it’s not just a matter of fixing the leak, but what damage has it caused to the timber framing in the wall in the meantime? What about saturated insulation holding moisture in the wall (will take months, if not years to dry)?

Wall damage will continue long after the leak has been repaired if you don’t do an invasive moisture test to confirm the water hasn’t tracked down the external walls below the shower (if on a 2nd floor), and penetrated into the timber. Treated timber will also get damaged if exposed to a gradual leak from and extended period of time.

You can see the track of a leak from a toilet to the left side of the infrared image, and you can also see a seperate shower drain leak captured by the thermal imaging camera (dark spot). The leak tracking across the ceiling on the left was also running down the external wall to the left of the window frame… leaving wet untreated timber in it’s path.

The home owner will not only need to repair the leaks, but also remove the wall lining to assess insulation and let the timber dry out or be replaced if decay and rot hasn’t already set in.

If this home owner had a regular infrared moisture check up of their home, they could have avoided needing to rip up the bathroom flooring etc ($9000 fix!).

Ring today for a free thermal leak detection scan quote of your house!

Accurate Thermal Imaging Reports

The longer the leaky home crises goes on, the more I see plaster home owners getting pushed down into a hole by some inspection companies… even if their home isn’t leaking!

Why do I bring this topic up?

Let me start by saying a thermal imaging camera is accurate and doesn’t lie… it is what it is. But, the interpretation by the thermographer of what the infrared camera is actually seeing can vary wildly.

‘Suspicious’ patterns in a thermal camera could simply mean the insulation isn’t pushed into the corners correctly, or maybe there’s been a wind draft through the roof space that has slightly lifted the batts up off the gib… but hardly a deal breaker!

If an anomaly appears on the camera screen, then further confirmation is required (Some companies may not do invasive testing)… but accurate thermal imaging inspections go beyond what the camera says.

Here’s what a ‘clean’ thermal image looks like…

Notice the nice clean lines on the ceiling?

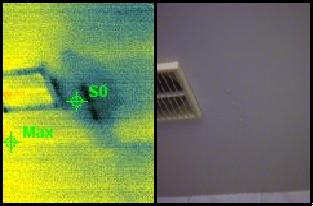
This is a ‘not so good’ thermal photo…

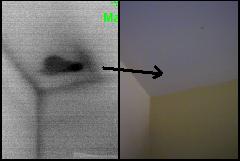
The ‘thermal anomaly’ to the left is a leak from a shower above that clearly can not be seen on the ceiling in the right hand photo (as the human eye would see it).

What’s really behind the walls in the home you’re looking to purchase? Are you 110% sure? Most of the leaks we’ve detected in NZ houses showed no visual evidence of a problem before we infrared imaged the property!

Every home is a good deal at the right price, regardless of how many problems are found… so get it tested and negotiate the price accordingly. People buy leaky buildings for the price of the dirt!

How can you seriously negotiate a property contract unless you base your offer on FACTS… not what the GV says, or what the agent tells you. It’s up to you to find out the true condition of the property… and you only, because no-one is going to do it for you. You’ve got big $$$ on the line when buying a house, so do your research correctly, and don’t fall into the ‘dumb purchaser who didn’t do their homework first’ category. I witness this scenario all the time with novice investors and first home buyers!

Hopefully this info above gets you thinking on the right track before signing the dotted line.

How to Interpret Building Inspection Reports

Are you confused with your building inspection report?

Do you actually understand what your property inspection results mean?

There are some very good building inspection companies in Auckland, Wellington and Christchurch (and everywhere in between), but the reports some inspectors supply can sometimes confuse the buyer with ‘builders’ terminology that you may not understand.

Normally you would call the building inspector with questions, but if they aren’t available for whatever reason, and you want to know right now what they are talking about in the report, then take a look at the glossary of building terminology at the link below for a possible explaination.

For example: If your report says “The leak captured in this thermal imaging report above master bedroom window could be due to a missing head flashing, or miter joint failure in window on 2nd floor directly above this area”… do you actually know what this means?

Here’s a glossary of terms used by builders and home inspection companies:

Interpret Building Terminology Here

The ‘complexity’ of our infrared leaky building inspection reports are written in accordance to the buyers level of building knowledge. If you know nothing about how a house is built, or aren’t sure what certain parts of the home are called, then you will still be able to interpret our reports.

Shower Leaks Causing Damp Smell in House

Do you have a musty or damp smell in certain rooms of your home?

Is the source of the problem obvious?

On a regular basis we get calls from home owners saying they have noticed a damp musty smell appear in their home. If you have noticed this in your home, there is a problem somewhere… as these smells don’t just appear for no reason. If you leave these smells go undetected for an extended period of time, the problem can be compounded if gradual leak damage is taking place where you can’t see it happening.

Sometimes it may be due to rising damp, internal plumbing or bathroom leaks, or leaky cladding/window where water has found it’s way down your wall and onto your carpet under the skirting… without you knowing anything about it.

Recently a home owner of the North Shore called us in to find the source of their damp smell problem. There was very little visual evidence of leaking problems within the house, but our infrared thermal imaging camera instantly discovered the problem.

How to find shower leaks?

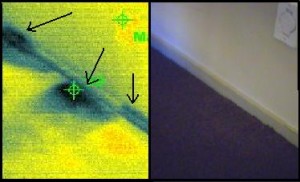
The dark area in the above thermal image is water on the carpet. On the back of the wall is a shower that is leaking. The home owner had a book case pushed up against this wall, therefore they couldn’t feel the wet carpet… and you certainly couldn’t see it with the human eye because the carpet is a very dark blue colour (as you can see in the righthand photo above).

We took this infrared photo so the home owner could use this visual evidence to back up his insurance claim for the shower leak. In addition, the carpet was very slightly discoloured, so he may now be able to claim carpet water damage as result of a plumbing leak through the insurance company!

Can’t detect the source of a ‘suspect’ bad odour or smell in your home? Call us in for a look… we can normally find the problem quickly and easy using thermal cameras and advanced moisture meters.

Infrared Building Surveys – What’s Included?

Are you considering hiring a professional infrared building survey company?

What’s included in the quote?

One of the common questions people will ask when calling for a free quote, is “What do you do during the infrared building inspection?”.

You will see exactly what’s included on our ‘contact us’ page, but before that, it’s also important to know what the purpose of an infrared building inspection report is, and why you actually want to get it done in the first place… because most people just hear about thermal imaging, and go with the flow without understanding what it’s actually about and how infrared cameras work to benefit you.

When you walk into a house and look at the ceiling, what do you see? You most likely see some gib board and lighting… and that’s all we would see also. Using an infrared camera, this is what we see (that dark spot is a hidden leak)….

ceiling parapet leak

What about when you look around the walls of the home during your initial visit to the home? You see windows and walls… that’s about it. During an infrared thermal imaging building survey, this is what the walls look like…

Infrared Building Wall Frame Image

How’s the house looking for insulation… how do you know if there is insulation in a wall or ceiling space of a house? Here’s what we see in your potential future house…

See how the external wall is a different temperature to the ceiling? No ceiling insulation.

These pictures taken in NZ houses demonstrate how the infrared camera gets a completely different ‘view’ of the house to what standard building inspection survey companies will see.

Our infrared house inspection surveys will detect all kinds of annomalies behind walls that are impossible for the human eye to see… and we also deploy back up moisture testing methods during our building survey to achieve the best possible results we can without needing to put holes through the wall.

Read more about what’s included on the contact us page.

Moisture Testing Houses on Dry Summer Days

“Can you moisture test a home on dry summer days? “… a common question clients ask in summer time.

Yes you can, but there’s a couple of things to consider. Before I explain further, here’s a photo of a major leak below a window that we detected on a hot dry Auckland day with thermal imaging and moisture meters… (You can see the mould stain on the internal side of fiber cement board)

The timber doesn't look too damaged does it?

This is a very common type of window leak that was caused be cracks opening up around where the plaster cladding meets the aluminium window frame. There were no visual signs of this leak on gib board, skirting or external cladding.

So can you detect moisture problems in houses when it hasn’t rained?

First of all, there is a difference between moisture and leaks. Moisture will accumulate in a wall (with no cavity), and penetrate into insulation as a result of a leak. Moisture will stay long term, even if you fix the source of the leak… and if the timber in the area is untreated, mould and decay will start to take place, and you won’t even know it. A pitched roof leak for example could be missed if it hasn’t rained for some time, as the air circulation in the ceiling space will potentially dry the leak out… but not so with trapped moisture in walls.

The moisture damage below the window above was due to lack of cladding maintenance around the windows… coupled with design issues.

Here’s part 2 of what happened with the job above:

The home owner got his local builder to take the gib board off where we had found the leak. The vendor then had the source of the problem fixed and they used a dehumidifier to dry the area out. He kept the area open and dry of two weeks before replacing the gib, plastering and painting. The reason he went ahead and closed it all back up is because the timber frame looked and felt dry… and the screwdriver didn’t go through the timber when he tested further. Then…

He called me back to do a ‘re-test’ and get a clean moisture report. Guess what? After all that time drying it out, the moisture readings came back at 60% (Well over 18 – 20% moisture that it should be). Why was this? The moisture was inside the untreated timber and couldn’t be ‘seen’. See, the window leak was running down the internal side of the cladding where the timber frame was touching, therefore the majority of the water was soaking in through the back on the timber and across… and didn’t leave much visual evidence on the side of the timber that could be viewed.

Now what?

The area is now getting pulled back apart and the timber is coming out. Ideally, he would have had it moisture tested before closing it back up.

Summary: Dehumidifiers won’t completely dry out moist untreated timber, and what ‘looks’ dry may not be… even if you can’t push a screwdriver through it.

Further info about how moisture can accumulate in walls HERE

Residential Thermal Imaging – Energy Loss

Residential thermal imaging is becoming increasingly popular in NZ… and it’s amazing what the infrared camera will find in the hands of a certified thermographer!

It’s eye opening when you walk into a multi million dollar home that the builders haven’t quite finished off as one would expect… especially when the home owner has absolutely no idea that a problem exists. Some of the issues are minor, and others major.

Residential homes should all be thermal imaged for leaks and energy loss at some stage in their life, just to stay ontop on maintenance if anything. Here’s an example of cool air entering a residential home in NZ around the door jamb…

Door Jamb Air Leak

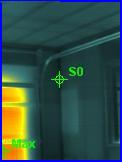
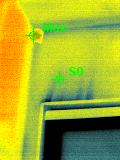
The dark wispy pattern is cool air running up the wall at the top left corner of the door frame… completely invisible to the human eye!!

Infrared thermography in residential houses is a must if you want to know if your home is energy efficient and/or has an energy loss problem or not.

Infrared Electrical Surveys – 2000+ Switchboards Imaged

Our company has successfully conducted infrared electrical surveys on 1000’s of switchboards in NZ.

With more and more insurance companies referring their commercial clients to us, infra red electrical surveys are quickly becoming the most requested service we offer… all over NZ. Infrared thermographic imaging allows us to quickly and easily determine if an electrical fault is ‘in the making’, allowing you to make a targetted repairs without causing further faults in the system down stream.

If you’ve never had your company switchboards imaged with an infrared camera, then now could be the time. The other advantage to our service, is that we can see if the boards have been neglected, dusty, rats living inside etc etc… all the potential fire dangers that you may not have thought of. Rats like to chew the insulation off wiring, so we’ll keep an eye out for those types of small issues on the way around your switchgear as part of the service.

We are a preferred supplier of thermographic infrared electrical surveys all over NZ, so we can certainly service your company with our accurate service and reporting standards which will comply with insurance company requirements. Read about the types of companies we already service here…

http://findaleak.co.nz/results-thermal-imaging-of-electrical-switchboards.html