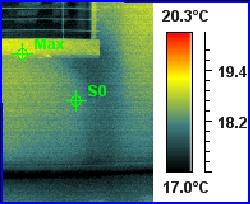
Painting over plaster cladding cracks to prevent leaking

How often should you paint a plaster cladding home? The answer to this question can vary… but here are a couple of things to think about prior to opening the paint tin.

Why are you considering getting your plaster home painted in the first place?

The most likely answer is because you are seeing cracks, or hairline cracks appearing under windows, around windows or vertically down the external walls. Before you jump ahead and get the place painted, you should seriously consider finding out if signs of water ingress have occurred. Water ingress basically means water soaks in through the cracks and penetrates through onto the timber framework. If the timber is untreated, then there is serious potential for fungal growth and rot to set in. This is what happens with a leaky building in many cases.

Should you just turn a blind eye and cover up the cracks with a thick paint?

Some people will trick themselves into thinking that a coat of paint will sort out any potential leaking problems. Well… yes and no. Yes, it will stop more water getting in, but it won’t stop the result of previous leaks. Will you be able to sleep peacefully at night taking the ‘cover up’ approach? Would you feel comfortable on-selling the home?

One important thing to keep in mind, is that the vast majority of plaster clad houses don’t have a cavity, therefore once moisture is in the wall there is no air circulation to dry it out (trapped cavity). Secondly, once any insulation gets moist, then its R Value is reduced dramatically.

If you’re buying a home, and it’s just had a ‘fresh coat of paint’, then don’t get too excited about “how well the vendors look after the home”, rather, look at it as a red flag! The moment you smell fresh paint in a home built in the 90’s – 2004, then consider getting a thermal imaging home inspection.

What companies specialise in filling and fixing cracks in plaster cladding?

One common question we get when doing an inspection where cracking has occurred in the plaster system, is “who fixes these types of cracks?”. There are some builders/handymen around who will just slap some silicone in the cracks and run for the hills, and there are companies who specialise in dealing with minor plaster cladding issues (not leaky home re-clads) who will do such a great job you would hardly know a repair has been made… and some companies who repair and fix cracks in plaster cladding will even give you a warranty! Make sure you ring around and get free quotes.

Back to the original question: Every 5-7 years is about the average span of time between painting. Just keep an eye on the cladding every few months, and if hairline cracks start appearing only 2 years after the last paint job, then it may be due for another coat (and don’t use the same painter as last time!)

What type of paint should you use to paint plaster cladding?

There is a small range of paints that have been designed with plaster homes and potential leaky buildings in mind. These paints are nice and thick when applied, they also have waterproofing membrane properties too them, and also have flex in them which can help reduce hairline cracks appearing if movement, or expansion and contraction is occurring within the building envelope.

Fix leaks and leak damage first, then paint last.

Not sure if your home has leaks? We can quote you over the phone right now on what it will cost for a building moisture inspection (includes thermal imaging) based on the size of your home… it probably costs less then you think. Is it really a ‘cost’ or an ‘investment’? It’s an investment.

Gardens Against Plaster Cladding Causing Leaks

Are you living in a plaster cladding home, or a house with no wall cavity system?

One common issue we regularly come across is where home owners have pushed a garden up against the house to a higher level than the base of the cladding.

There should be a sufficient gap between your ground level and the bottom of the cladding (‘Ground Clearance’). If you put dirt up to or above the bottom of the plaster cladding, you could get what’s called ‘capillary reaction’. This simply means the saturation of the dirt can soak back up the plaster and get absorbed into the bottom plate of timber in your wall (and beyond). If you notice your skirting boards have swollen or you have a small leak around the edge of your carpet, then you may already have wet timber in that wall, and possibly other walls of the home if the ground levels around the house are similar.

No matter what type of cladding you have, you should always keep your garden off the wall where possible, unless it’s up against a concrete foundation that has a waterproofing membrane as a precautionary measure. Just like a human, a home needs to breathe, and air needs to be able to circulate around to help dry out any damp areas. Gardens can stifle this process in critical areas, especially if the drainage in the area is not getting the water away from the house.

Can you simply cut the bottom of the cladding to create sufficient ground clearance?

This would depend on how far the cladding runs down past the bottom plate of timber. In many cases you won’t be able raise the height of the cladding base because you’ll expose the timber and potentially compound the issue. Consult a qualified builder who has experience with monolithic, harditex, insulclad or preferably all types of plaster cladding systems to assess your situation and what can be done to improve your drainage etc.

Tip: Take a walk around your house, and if you can see ANY areas where water could potentially touch the bottom of your cladding (excluding block), then you may need to look at drainage options for that area.

If you do see an area where wet dirt or water could be leaking into your home or building, then a moisture test in the area could be a wise move to make sure you aren’t covering up already rotted timber. Moisture and leaks in your walls can spread like cancer… don’t take the risk. Thermal imaging and leak testing could quickly put your mind at ease!

How Much Does an Infrared Building Inspection Cost?

Are you paying too much for your building inspection?

The reason I decided to write this article, is because a real estate agent who was present with me during a recent infrared building inspection made an interesting observation.

She said “How much do you charge for an infrared building inspection?”

I gave her the figure based on the size of the house we were inspecting at the time, and to my surprise, she said “That’s half the price of what some other companies are charging for a similar inspection!”. Now I can’t speak for other companies and how they operate, but she said my inspection is very similar to what most other companies do… and she has obviously seen plenty of pre purchase moisture tests over her 27yrs in the business.

There is no set inspection price to charge clients in our industry, and what you get for your money can vary… so make sure you do your homework.

How much does a building inspection cost?

Generally, it’s based on the size of the house and what you require. For example, if you don’t require a written report (verbal inspection), then our company charges less because time has been saved not having to put the report together.

Be sensible before making a decision on which home inspection company to use. Take a look at the company testimonials, check out their ‘about us’ page, make sure they specialise in what they do, and take a good look at example of their work. AND… make sure they don’t offer further services to fix the problems once they find them… because some companies may have a cheap building inspection fee up front, then sell you services to fix the leaks, or sell you whatever else they can to make more money out of the job.

An example of what I’m talking about here, is a home I inspected in Mt Roskill recently which had signs of two leaks under each end of a single window. Instead of doing an invasive test first (logical way to go), some local builder came around and told the home owner he will need to take out ALL the windows around the whole house and install sill flashings. Hmmmm.

Make sure you get multiple quotes for any type of remedial work that needs doing on your home… prices can vary wildly for the exact same job.

We quote you a fixed price over the phone… and it doesn’t change once we get there!

Cheap Leaky Buildings for Sale

If you are seriously in the hunt to buy a bargain property, just be careful that you don’t actually get more than what you bargained for!

In this case, a ‘first time’ unexperienced buyer of leaky buildings hired me to moisture test a property after he had already payed a non-refundable deposit (auction).

If you see any advertising telling you about cheap leaky buildings for sale, then please proceed cautiously, because some leaky buildings leak so badly that they are beyond your standard re-clad to fix up.

Recently I did a home inspection for a client who was aware the home had moisture issues… it even stated that in the marketing materials for the home. You see, it’s easy for a real estate agent to say “the building might need a total re-clad”, but what if all the floor joists are also rotted? If you see a leaky home/building for sale in the Mission Bay, St Heliers, Kohimarama area at just $270k, then surely you would have to be suspicious there is more than meets the eye, right? You bet! Especially when it’s on a tiny cross leased piece of land with no view.

So what’s it really worth?

Unless your an experienced builder or investor who has dealt with leaky buildings in the past, then in my opinion you will need a complete structural intergrity survey of the home first (Don’t get excited by the price to quickly)… and if it’s so rotted that it’s close to a ‘knock down’ (don’t forget to factor in costs to take it away), then it’s barely worth the piece of dirt it sits on.

Everything property is a good deal at the right price, but make sure you also factor in your building experience into the price… and don’t let the hype of an auction grab your bank account and tear it apart like I have just witnessed!

Maybe ask a current or past leaky building owner if they would buy another one for a cheap price.  I highly doubt it… especially if they aren’t experienced in the building industry. Take Care!

Should I Use the Building Inspector Which My Real Estate Agents Refers?

The process of buying a home in NZ is not as easy as it appears, so if you are in the market to buy a property, you might like to read this!

If you like a particular home and get your offer accepted, should you hire a building inspection company which the real estate agent recommends?

Well… if you ask the client that I did a building moisture inspection for yesterday, then he’ll tell you a big NO! Here’s what happened…

To start with, let me say that the good real estate agents will always suggest getting a building and moisture inspection anyway, for your sake and their reputation.  But, if they go on and give you the name of an building consultant to do the inspection, then be careful. Most inspectors will do the right thing either way… but like in any industry, there’s the odd ‘loose cannon’ who simply needs to make a dollar fast. That’s not who you want to hire.

My client purchased a monolithic cladding townhouse, and the inspector ‘verbally’ told the client that there was no need for a moisture test on the home because the paintwork was in good condition. Are you kidding me! Any building inspection company in NZ should know that these types of buildings could be leaky buildings. In my opinion, the building inspector is asking for trouble telling people no moisture test in needed with plaster homes.

Even if the paintwork looks good (He also failed to see a very large crack in the cladding), you can still have window joinery failures which lets water down into the wall and onto the timber. And guess what? That’s exactly what happened in this case.

Due to the fact the builder/building inspector ‘verbally’ said not to worry about it, then the buyer has no real come back because  it’s not in writing… and second to that, the new home owner was beginning to wonder if the inspector and real estate agent were working in together, because the buyer wasn’t there through any of this process… it was all  ‘organised’ through the agent.

The end result was that I found moisture IN THE UNTREATED TIMBER under one of the windows, and it extended right down the timber stud to the bottom plate. Although this area was isolated and it shouldn’t cost much to fix, it’s still something you need to know prior to purchasing.

Always choose an inspector who offers a non-biased opinion… be it a structural building inspection, or an infrared thermal imaging test.

Thermographic Survey of Electrical Systems – NZ

Here is exactly why a regular thermographic survey of company electrical systems is so important.

I inspect switchboards for many different private, commercial and insurance companies right across NZ, but the latest infrared electrical inspection in particular was quite interesting… for all the wrong reasons (In my opinion).

When you have a 24/7 operation, a thermal imaging survey every 6 months should be strictly enforced… not every 9 or 12 months. Recently, I was called out to an oil rig that had just experienced a fire in one of the main switchboard rooms nine months after the first thermographic inspection was carried out. If this company had maintained a strict policy for every 6 months, then this hot spot/fire hazard would have been picked up well in advance. To make matters worse, it was at 1:00am in the morning when the alarm went off. The crew of 40+ workers woke up to a fire on a ship full of oil. Not good. Put yourself in that position!

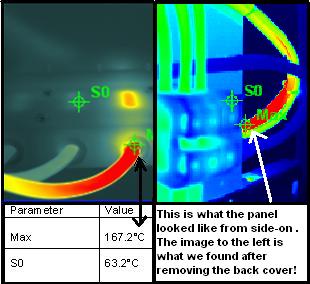
Upon the re-inspection of the surrounding switchboards in the same electronics room, I found another huge hot spot caused by a loose connection on the back of a sea water injection pump. The temperature at the connection was 167 degress! Here’s the photo…

Hot Spot Caused by Loose Connection

This was a large offshore operation, so it was easy enough to shut this pump down and switch to the back up pump. It didn’t end there…

Next… I was thermal imaging a lighting panel in the engine room, and suddenly a glowing 92 degrees hot spot was coming off a 20amp breaker. Further testing showed 27 amps running through. It turns out the breaker and cables were under rated. One fire and two potential fires found within 3 weeks… this is not a record to brag about… but it can happen to any company who turns a blind eye to the importance of electrical system faults.

Remember, it only takes one hidden loose connection to potentially ‘bring the house down’. This is why some insurance companies now require thermal imaging prior to issuing a policy.

If you are considering a thermal imaging thermographic inspection, then now is the time. As the above company recently found out, it can turn out to be very expensive if you just ‘hold off’ for a few weeks or months… or not at all.  More electrical fault photos here

Condensation Moisture – Ants crawling out corner of window sill?

Have you noticed signs of timber rot in the corners of your window sills?

One on the ‘red flags’ that will normally catch my eye when doing a thermal home moisture inspection, is when the window sill has a soft spot up against the window joinery OR if ants are crawling out of the sill in the area.

Recently during a moisture inspection, my equipment detected signs of moisture behind the wall under a window. There was a builder with me at the time of inspection, and without hesitating, he pulled off the gib board on the spot.

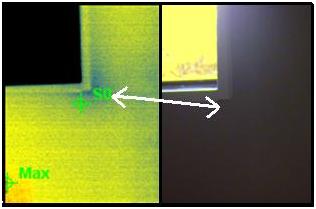
Here’s what the thermal camera detected (Dark area in bottom right corner indicates a potential issue)

rotted-window-sill

What did we find behind this area?

Ant nests, black mould, rotted timber and all the things you don’t want to see if you own the home. Who else was there? The tenant. The tenant had 3 kids and went into a panic due to the unhealthy aspect of the home… like black mould spores floating into the air etc.

Typical: The home owner didn’t even know the window sills were rotting, because the tenants didn’t say a word about these issues when they first appeared, and now the vendor has some serious remedial work to undertake. (The cladding was plaster with no cavity). On top of that, the tenant is now taking this to the rental tribunal to get out of the lease on the grounds of an unhealthy home.

The message here is that if you own a home that is rented out, and it’s built between 1992-2004, then you should consider a thermal moisture ‘check up’ to detect potential problems caused by joinery leaks and window condensation… before the whole wall rots due to gradual leak damage!

Should you bother getting an infrared moisture scan? Take a look around this website to see what other types of leaks our thermal camera has found behind walls…

Thermal Energy Leak – Compare Wall and Ceiling Insulation

Many homes in NZ don’t have insulation in the walls and suffer heat loss in a big way.

Although there are now government subsidies to assist you with costs of installing insulation, most people don’t even know if there is insulation behind their walls in the first place.

If you live in a home built in the 50’s, 60’s and so on up to the year 2000, it doesn’t always mean the home has no insulation. In many cases, the home has been renovated and insulation batts or spray foam insulation has been installed along the way.

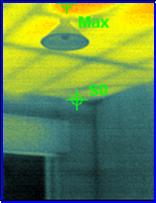
Here’s a thermal image of missing insulation in a wall, compared to a ceiling that does have insulation…

Darker Colour Walls is Cooler
Darker Colour Wall is Cooler

As you can see, the wall is cooler in this image and the ceiling is much warmer. When you have a clear surface temperature difference on the gib board wall like this house, it’s quite obvious there’s a lack of insulation. Climbing into ceiling space to install a thermal barrier like insulation is easy, but to insulate the walls requires more money due to the intrusive nature required to do such a job… and that’s why some home owners skip that step.

So how do you know if you have heat energy loss issues in your home?

Let me say this. I inspect and detect issues behind walls in many New Zealand homes… but I had no idea this home had no insulation behind the walls until I scanned it with the infrared thermal imaging camera… I then knew right away. As you can see in the above photo, there would be serious heat loss issues in this particular house.

Something else to consider when looking to install insulation, is how much of your wall do the windows take up? Some windows take up 80% of a wall is some cases, so if the window is single glazed, it’s almost pointless going to the expense of insulating the other 20% because the large cold window surface could knock out the effect of the insulation! 

Thermal imaging cameras are the tool of choice to see temperature differences of walls and ceiling… and lack of insulation. It’s simple, fast and no holes go in your walls!

Banks requiring leak and moisture inspections before lending?

Here’s another solid indicator about the risks involved with buying a home built in NZ

There have been a growing number of phone enquiries to us saying “the bank would like a leak and moisture test on the home before they lend us the money”. So why would this be?

As you are most likely aware, the leaky home problem in NZ  is constantly talked about in the media… and for good reason. People are watching their bank balances plummet to the floor in legal fees because they didn’t get a moisture test before buying their home (not to mention the stress involved)… and guess who else risks losing money on leaky buildings? The banks!

Question: Would you lend your money to someone buying a home in NZ built between 1992 and 2004 (leaky home era), without getting it checked first with a thermal imaging camera and moisture testing equipment? Unlikely. I know I wouldn’t.

The banks can also see that some of these homes are ‘risky’ or potential leaky buildings, so to help reduce their risk, they also want to know if the home they are lending money on is a potential ‘lemon’. The bank may not require moisture testing if you have a very large deposit, but if you intend on borrowing the majority of the money, then don’t be surprised if an infrared moisture inspection becomes one of their lending conditions.

Are there any homes that don’t leak?

The majority of homes we inspect do have a leak of some kind. Some types of leaks wouldn’t warrant pulling out of a property deal, whilst others certainly would. EG.Would you prefer to find a shower leak that only requires the screen to be resealed, or find a leak running down the wall from ceiling to floor in a home with no cavity system and untreated timber (Common is leaky buildings)? Give me a shower leak anyday!

Take care when buying, because some homes simply aren’t as tidy as they appear… and most people find that out after they become unconditional on the home… because they didn’t want to spend the money up front to get it checked out.

Now that you know about infrared thermal leak detection, do you think you could buy a home without it? Some people would take the risk and ‘hope for the best’, but with all the leaky home issues in NZ, most savvy home buyers don’t take the risk of buying without an infrared building inspection first. Here are more thermal images of hidden leaks in ‘nice looking’ homes.

Window Condensation Channel Leak – Mitre Joint Failure

Home buyers beware…

Window condensation channel failure causes leak issues.

Have you ever noticed how leaks seem to appear under the corners of windows more often then any other place in the home? They appear all the time, and usually you can’t see 70% of them with the naked eye! Not only that, most of the time the window looks really well sealed where the aluminium window frame meets the cladding.

As you can see in the infrared thermal imaging photo below, there is a dark spot in the corner of the window. That dark spot is hidden moisture the home owner knew nothing about…

Leak Caused by Mitre Joint Failure

The mitre joints in most windows are vulnerable to losing their seal, and the slightest movement in the house can cause this. It’s rare to physically see the seal has failed because water only needs the slightest of gaps to escape… and it likes to escape right onto your timber frame behind your walls!

An infrared imaging camera in conjunction with quality moisture testing equipment on your home will detect these types of issues…  and to be fair, we would have missed 90% of the hidden leaks we’ve found in NZ houses without the support of the instruments we use.

If there are windows in the house, then there is potential for leaks… which could result in gradual leak damage and/or timber rot. Don’t risk buying a home without this type of testing… otherwise it could get very costly, especially if  the joinery throughout the house is low quality (plenty of that around NZ).