Cladding to Close to Deck = Moisture Damage

One of the most common questions we get asked, is “What are the most common causes of leaky homes?”

There are several things to look for when buying a home to determine if it could be a leaky building. There are several different telltale design faults that contribute to houses leaking… and here is just one of them:
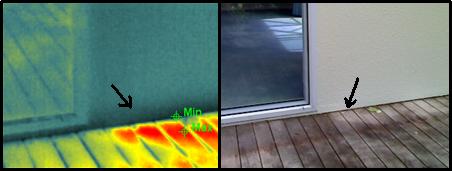
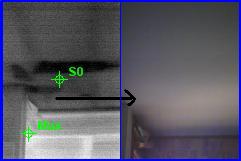
In the righthand photo, you will see how the cladding runs down and touches the deck. In the lefthand infrared photo, you will see a dark shade running across the base of the cladding, indicating signs of moisture ingress at the base of the wall.

The new building code stats you need ‘ground clearence’ (a gap) between the bottom of the cladding and the ground (or in this case, the deck). What’s happened is the above photos, is water has run across the deck and under the base of the cladding. Because the deck is touching the cladding, the water has soaked back up the cladding (Commonly referred to as capillary reaction or ‘wicking’), and into the bottom plate of the timber frame behind the wall.

In addition, there is only a small height difference between the inside floor level and the outside deck level, therefore the water doesn’t have far to wick into the timber frame of the wall.

The above scenario is a common problem in homes built in the ‘leaky home era’, and as a result has caused many homes to sustain serious moisture damage within the building envelope.

In most cases you will not know if water has penetrated the wall unless you have the correct equipment to indicate if there could be an moisture issue… as most of ‘subtle’ leaking problems are not visible to the human eye.

Structural Cracks in Buildings after Earthquake

We’ve been keep very busy in Christchurch since the big earthquake hit, carrying out leak detection investigations, building and apartment inspections using our infrared thermal imaging cameras.

The aim of our infrared investigations in the Canterbury region are to determine: Is the moisture damage in the buildings we have leak tested there from before or after the quake? This makes a big difference to what the insurance companies will pay out on. We have a set process we work through to determine an accurate result in this situation.

It’s only logical that when a building moves, the probabilities of water leaking into the walls and roof space (if any) increase dramatically. It’s not so much the obvious leak sources, like a chimney falling through a roof, it cracks occurring in critical junction points that suddenly open up and let water in… and you can’t see them.

These types of leaks can cause major headaches for the landlords, because they will continue to slowly leak into the building envelope and potentially go unnoticed for some time. We have been detecting these types of leaks for home owners and body corporates of larger multi storey dwellings (i.e Apartment buildings) with earthquake related structural issues, and providing reports as proof the leaks are caused by the quake, and not ‘older’ leaks.

One of the main issues with how some properties were built in the ‘leaky building’ era, is that common water ingress points (like around windows), are only remaining weathertight thanks to a single coat of paint around the aluminum window/door frame on the external side. We even found a series of windows on a property we inspected recently that looked like they were sealed, but you could literally pull the ‘silicone’ away from the window like a piece of spaghetti. So it looked perfectly sealed, but was actually letting a flood of water in, causing window jambs and sill plates to soak up the overflow… great!

Another scenario we found consistently across one of the apartment buildings in Christchurch we inspected, is the earthquake had shook all the window wedge rubbers out. The problem they now face is that the pane of glass is no longer sealed where it fits into the frame, therefore when it rains the water will run down the glass and into the joinery itself… and we are talking a lot of water here. When you get major movement to a building, the window mitres could open up quite easily (Mitres are very fickle and vulnerable to loosing their seal due to the leverage applied to the joint when movement occurs), letting this water directly down onto the sill plate and studs which supports the window… especially when the building doesn’t have a cavity system installed.

In addition to the above, 99% of the time you won’t even know if your window joinery has failed unless you are really looking for it, or have a trained eye. The way you normally end up finding out is when visual evidence of moisture damage appears on your gib board under the window, or the skirting board swells up… or carpet suddenly becomes wet for no reason.

Finding leaks  early can save you from:

  • Replacing the timber studs,
  • Replacing wet insulation,
  • Having to replaster and paint the whole room to colour match (More money!).
  • Potentially needing to replace an area of carpet…. and depending on your floor type (such as particleboard), it could blow out and swell, therefore needing more remedial work.

If you suspect anything suspicious is going on to your property in terms of water ingress, an infrared building inspection and leak scan could be the best ‘first’ option.

Call us for a free quote over the phone, and we’ll be happy to spend the time to answer your questions. We inspect plenty of homes, so no doubt we will have experience with a property in the past with similar issues to yours… therefore the problem could be quicker and cheaper to solve. Sometimes we can tell you where the leak is over the phone without needing to come out to your property!

Leaky Home Inspection Services & Solutions

If you are looking for leaky home inspection services in Auckland, Wellington or Christchurch (NZ Wide), then choose carefully.

We get calls from all over NZ from plaster home owners and buyers who ask us lots of questions about what’s involved with a leaky home inspection. There are so many companies offering all kinds of leaky home inspection services and solutions that it starts to become confusing on who to employ to carry out the work!

If you own a home, and you suspect it ‘could’ be a leaky home or you just want a peace of mind either way, then ask yourself this… would you prefer to hire a company who offers leaky home repair solutions to inspect your house? Or a completely independent service provider who has no vested interest in making money from ‘back end’ leaky building repair opportunities on your home?

The second option is the logical answer… and then once you know if you are living in a leaky home, then get quotes from leak building repair solution companies as step 2, after the leaky home report comes through from an independant building inspection company.

There have been cases where some companies who offer leaky home inspection services will do the leak and moisture test at a ‘dirt cheap’ price, knowing perfectly well they will do the ‘hard sell’ at the other end of the inspection. So the actual prices of home inspections will vary from company to company… especially between Auckland, Wellington and Christchurch and the smaller towns that surround them.

Take the time to research the best inspection company in your area, and choose and/or interview a few different inspectors to get a feel for their knowledge and experience with the type of house in question.

The above information also applies to commercial leaky building inspection services.

Are Earthquake Leaks Covered by Insurance?

The biggest cause of random leaks in a house is either movement or expansion and contraction.

Obviously with an earthquake (such as the quake in Christchurch), the movement is furious so the chances of leaks sources being ‘created’ are very good. Your insurance policy might cover this under the earthquake clause in your contract (If you have this type of cover). Please read the fine print.

Not only will earthquakes create ‘above ground’ leaks such as roof, deck and possible internal plumbing pipes to leak… but you also have the below ground leaks due to the pipes underground not being flexible enough to move with the earth. Keep a close eye on your next water bill to see if there has been a sudden rise in usage and $$$.

Make sure you monitor your home in the coming weeks after an earthquake, as you may need a ‘leak check’ using thermal imaging cameras to detect where the issues could be originating from, and what damage the water has done to your walls, timber framing, carpets and insulation etc. You would then need a report to present to the insurance company.

Strengthen your insurance claim with a infrared thermal house inspection and report! See thermal photo’s of hidden house leaks HERE

Can a House With a Cavity System Leak?

Here’s an interesting question that we get asked alot…

“Can a house built with a cavity system and treated timber framing leak?” Yes it can.

Please be aware that all homes leak at some stage… both brand new and old homes. You can either have internal or external leaking problems in the home, no matter what year it was built, and if it has a cavity or not.

Here’s an example of both types…

Internal:  Some new builds will leak the very first time a tap is turned on. We have been called out to plenty of jobs where a plumber hasn’t joined/glued a pipe correctly behind the wall and water has saturated carpets and external walls directly onto the treated timber framing (Normally H1.2 or above).

External: Recently we inspected a house in Albany, Auckland using thermal imaging and moisture testing equipment. The house was signed off in 2008 and had a 40mm polystyrene cladding on a 20mm cavity. The potential buyer was confident the home should be fine because it was required to have a cavity and treated timber. Wrong! The window joinery had failed and the timber frame was absolutely saturated in some sections of external wall.

How can a new home leak? When the weather turns from hot to cold, you then get expansion and contraction within the building envelope… and ‘things’ move and settle… and this can cause problems. The house itself also needs to settle and slight movement can take place… and then of course you have sub standard tradespeople who didn’t pay attention to details such as sealing off area where water can get into the walls… especially with wind driven rain! All these little factors combined can add up to some serious water damage to the property (Preferrably not your house, or the one you’re about to buy).

If you are prepared to spend anywhere from $1 – $ 1,000,000+ on a property, then you should get a leak test done regardless of the price tag and year it was built. Even if we aren’t the company you select to do the job, get it done regardless of the situation… for your own peace of mind (Read this first before selecting any other company).

When it comes to buying a house and pre-purchase inspections etc, the reality is that we are in New Zealand and it rains alot (We wouldn’t be having this conversation if you were looking at a home in the Mojave Desert)… where there is rain, there are leaks. It’s your risk at the end of the day, so we can only tell you about our past experiences with home buyers getting absolutely stung… and plenty of them have been people with experience in the real estate game.

Infrared Electrical Inspectors – Auckland, Wellington, Christchurch – NZ Wide

If you are looking for infrared electrical inspectors in NZ, we offer an experienced nationwide service by certified infrared thermographers. Our most popular inspection type (normally referred to us by insurance companies), is thermal imaging of electrical switchboard panels.

To date, our company has infrared tested 1000’s of switchboard panels both onshore and offshore in NZ. We are a trusted provider of electrical thermal imaging services nationwide. No client is too big or small.

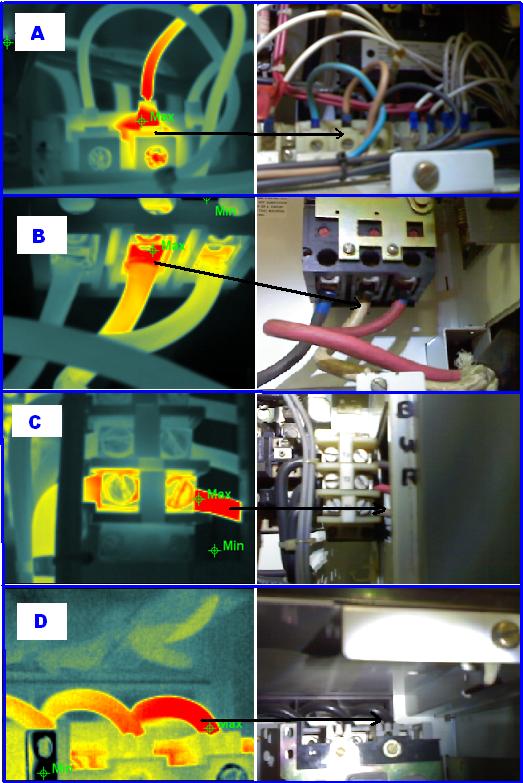
Here’s some photo’s recently taken during an electrical audit of an oil company in NZ…

A: T2 crimp needed to be replaced. Hot spot detected at over 100 degrees on a mud pump blower, requiring immediate further investigation due to the cable not being rated to the detected temperature.

B: Rig Air Compressor. The white phase was running 50% warmer than the black and red phase under the same load. This should be a balanced load.

C: Drill Water Pump: T3 White phase running hot. Incoming and outgoing should be the same temperature in this situation.

D: Load not balaced when all 3 phases were running the same amps.

We offer a prompt, efficient service nationwide… with the best pricing and quality reporting guaranteed.

Infrared electical inspectors and thermographic survey companies: Ashburton, Auckland City, Blenheim, Christchurch, Coromandel, Dargaville, Dunedin, East Auckland, Gisborne, Greymouth, Hamilton, Hastings, Invercargill, Lower Hutt, Manukau, Masterton, Matamata, Napier, Nelson, New Plymouth, Nth Shore, Orewa, Palmerston North, Papakura, Queenstown, Raglan, Rotorua, South Auckland, Taupo, Tauranga, Timaru, Upper Hutt, Waiheke Island, Waikanae, Warkworth, Wellington, West Auckland, Whangarei

How to Stop & Eliminate Condensation on Windows

How to eliminate condensation on windows

This is one of the most common questions we get asked… and the answer is actually straight forward. Click Here to see how you can do it within minutes!

Let me start by saying that I’m in NZ houses almost every day of the week testing for moisture, or inspecting houses for ‘leaks’ under windows. Well, in many cases they are not actually leaks coming in from the outside (i.e. Weather tightness issues), it’s condensation pouring down the windows and straight into the walls! This is especially the case for windows with no condensation channels, or situations where the miter joints have failed. Even some homes with double glazed windows still get moisture beading on the aluminum frame due to a high moisture content in the air.

“How do you stop condensation?”

Click Here to see how you reduce condensation within minutes!

If you have single glazed windows, then you’re in for an uphill battle right from the get go. Homes with single glazing will always be susceptible to moisture and damp issues if there is no air circulation. A classic example of ‘lack of air circulation’ is when a home owner calls telling us their basement is damp. If you smell damp in the basement of your house, simply ‘test’ putting a dehumidifier in the room. If the smell fades away after a few days, then you know it’s simply moist air. If the smell remains (providing it’s not a permanent smell in carpet), then you could have other moisture/drainage related problems, especially if the external walls are built into the side of a hill.

Back to stopping window condensation…

If you and/or your children are sleeping in a room with condensation on the windows, you should put a stop to this asap, purely for health purposes if anything. If you or someone in your home gets asthma, or generally gets sick over winter, then you need to do your best to begin a logical ‘process of elimination’ of what could be causing the problem. Here’s a few options to test…

  • Put a dehumidifier in the room… if it fills with water in 24hrs or less, you know the air is very moist! Consider getting some kind of system installed that works 24/7 to keep your home dry and healthy (HRV, DVS, Moisture Master etc).
  • If the dehumidifier doesn’t work, go for a holiday somewhere and sleep in a different environment for 5 days or so. Has the health condition of the person changed in a positive way? You might find it will, therefore your house is the problem.
  • Are the bedroom curtains moist? They most likely will be if you have condensation. Curtains in moist rooms act like a big sponge… further introducing ‘sustainable’ damp in the room. Not good.
    As a result of moisture on the back curtains (transferred from the wet windows), mould will start growing on the curtain, potentially causing further health issues! Try using this mould cleaning product on curtains… www.removehousemould.co.nz
  • Here is your best option… Click Here to see how you can manage and control condesation on windows within minutes!

Double glazed windows will certainly help reduce condensation, and also help to retain any heat that is introduced into the room. If you live in a damp area of NZ and are constantly getting sick, then you may have no choice but to sell up and leave! That is the extreme case I know, but many people take this option to resolve moisture related health problems almost right away. Why would you compromise your lifestyle and health, when you could be living somewhere warmer, healthier and generally a dryer environment!

In summary, NZ has moist climatic conditions over winter and there is nothing that you or I can do about part of it… but there are always ways around it, generally at a cost. Before you hit the panic button, the best low-cost place to start is with moisture testing the home to make sure the problem isn’t originating from behind the wall, which is often the case… and usually doesn’t cost much to fix providing it’s not a widespread moisture ingress isssue.

Electrical Thermal Imaging Surveys

Our company is now specialising in electrical thermal imaging surveys across NZ, and the more switchboards we inspect, the more we begin to wonder why there hasn’t been more electrical fires!

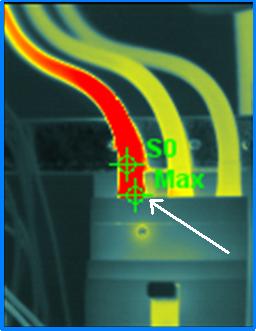
Here’s a photo of a switchboard that was only inspected 6 months earlier… a perfect example of why routine preventative maintenace is so important. This photo is of a hot spot around the termination point of 160 amp breaker. The 3 phases were all running at 73amps, yet the red phase was running 50% warmer. This is called an anomaly requiring further investigation:

We have now detected so many faults during routine infrared scans of electrical systems, we can see why our clients are now switching to bi-annual thermographic surveys rather than annually. The fact that our biggest NZ clients use our service on a repeat basis is testiment to the value of infrared thermography surveys in general, and to the service we offer.

The look on the site managers face when a hot spot is detected which is very close to causing a fire, is one of relief… relief that they decided to get a thermographic inspection if the first place. Situations like this makes them quickly understand the value in what thermal imaging surveys can offer.

Internal Gutter Leaking

Infrared Thermal Imaging Clearly Identifies Leaking Internal Gutter

Insufficient butanol join overlap causes major headache for home owner!

One of the very common signs that you could have a leak or moisture in your ceiling space (normally flat roofs), is you can see signs of the gib board pulling back down over the screws that are holding it up. Have you seen small round marks on your ceiling the size of a screw head? That could be more than meets the eye.

One of the inspections we did this week detected the exact problem as outlined above, although the home owner had no idea what was ACTUALLY going on. They called us in because they had a damp smell in the room and couldn’t work out where is was coming from.

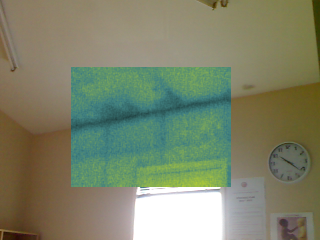
Here’s what we saw with the infrared leak detection camera the moment we walked in the room…

Those big black round marks are leaks detected as seen through the thermal imaging camera on the ceiling of the ‘damp smelling’ room… and the home owner has absolutely no idea these leaks even existed.

The home owners issue was solved within minutes… but finding the source of the leak in the butanol lined internal gutter was the next challenge. Well actually it wasn’t a challenge at all. Instead of using the standard 100mm overlap at the join of the butanol, the 45 angle in the corner of the internal guttering has caused the issue by flapping up slightly thanks to a shortfall in overlap on the join… not to mention that water that was pooling the area!

On the ceiling you could clearly see the gib fixing screw heads where the water had basically saturated the gib above and under the weight (and gravity) caused by high levels of moisture caused a slight sagging in the ceiling.  What to do next?

Step one is always to fix the source of the leak first. Then it’s probably best to cut the area open and pull out the wet insulation, otherwise all that trapped moisture could cause the ceiling to eventually sag right down and make a mess! It’s always good to have a visual inspection of the area in a situation where a roof has been leaking for some time, as mould growth could be taking place.

Here’s another photo of a leak at the top of a wall thanks to leaking internal guttering. The thermal image is over the top of the visual image how we see it during an inspection…

If you have any ‘visual’ cues that something isn’t right with your home, or an unusual damp smell has suddenly appeared that wasn’t there this time last year, then jump straight onto it and get a moisture ‘check up’ on the house.

Finding Balcony Leaks and Preventing Structural Failures

Leaking balconies can be a serious danger, especially if its been leaking slowing for some time before you notice it.

There are plenty of ‘real’ stories about balconies collapsing under load (too many people standing on it at one time), but the most common cause of balcony issues isn’t the load, it’s the fact that the waterproofing has failed and the joists are suffering gradual leak damage and rot which is causing the failure.

You can see in the above photo the discoloured timber cantilevered joists have completely rotted. So do you think decay and rot may have also spread down the external walls below… like cancer? There is a very high chance this has happened, especially with untreated timber behind the plaster cladding.

If you notice any discolouration on the interior lining at the top of your walls or on the ceiling of the room below a balcony, there’s a good chance it’s a leak. Here’s the challenge to finding balcony leaks…

  • Is the water running back across the joists under the deck from outside edge?
  • Has the tile grouting perished and the water is leaking through a join in the waterproofing membrane under the tiles?
  • Has the joinery of the door leading out to the deck failed?
  • Is the base of the cladding touching the deck? Water can potentially ‘wick’ back up into the bottom plate of the timber wall frame.
  • Has the waterproofing membrane been correctly installed underneath the door frame to prevent wind driven rain getting up underneath the door and down into the wall below?
  • Is the water coming down from the roof and running down the external walls?
  • Any cracks in the plaster cladding around the balcony or external walls in the area?
  • What about where the balustrade butts up against the cladding… is the area sealed correctly?
  • Is the deck level the same as the floor level inside the house, or is there a step down of around approx 100mm onto the deck? (The latter is the correct way to build under the current building code).
  • Is the leak visible on the under side of the balcony?
  • Is the balcony drain blocked, or some kind of plumbing failure occured in the area?

Our thermal imaging and moisture detection services can go along way towards detecting balcony leaks through a process of elimination… and might save you from accumulating a few grey hairs in the process!

The one thing you need to make sure of, is that you don’t leave the leak go ‘unsolved’, because the longer you leave it, the higher probability the moisture is eating into your external load bearing walls. Not good.

We find balcony leaks and determine if moisture has penetrated your walls.