Thermal Imaging Used to Detect Bracings and Fixings Behind Walls

Are you considering renovating your home, or trying to get a CCC and need a simple way to prove the appropriate bracings, studs and nogs are in place?

Using our infrared cameras is the quick way!

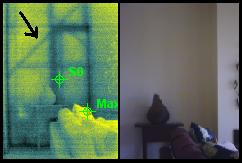
As you can see in the thermal imaging photo below, there has been alterations to this wall which the home owner didn’t know about. More importantly, you can see the builder has installed diagonal bracings behind the wall to strengthen the area.

There are very few techniques available that will give you such a clear picture of how your walls are constructed, without having to do damage. We have thermal imaged quite a few ‘granny flats’ and add-ons that were built without a CCC … and with our unique thermal imaging reports, we’ve helped strength our clients cases to get buildings passed through council without removing any sections of wall.

Just like a female goes to get breast thermography for pain free screening, or a dentist uses an x-ray machine to see what’s happening behind your gums before he/she operates… thermal imaging of NZ houses is the best possible way to detect leaking problems, building construction, moisture detection and missing insulation detection.

Get the visual facts about your house before making any structural or renovation decisions (or painting the house).

Leaks Repaired But Wall Damage Continuing?

Can a small bathroom leak really be that destructive? 

Absolutely… here’s what most home owners don’t realise:

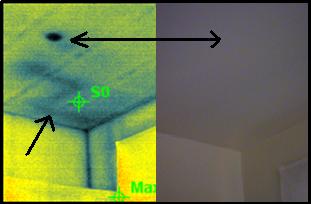
In the infrared photo below, you will see two different leaks on the same kitchen ceiling… and neither could be seen visually. Here’s what the scenario was with this inspection.

There was a bathroom directly above this ceiling, and when you walked across the bathroom floor it was very squeeky. This instantly alerted me there could be water under the tiles and waterproofing, and possible swelling in the particleboard floor that can’t be seen.

When you have a shower up against an external wall, it’s not just a matter of fixing the leak, but what damage has it caused to the timber framing in the wall in the meantime? What about saturated insulation holding moisture in the wall (will take months, if not years to dry)?

Wall damage will continue long after the leak has been repaired if you don’t do an invasive moisture test to confirm the water hasn’t tracked down the external walls below the shower (if on a 2nd floor), and penetrated into the timber. Treated timber will also get damaged if exposed to a gradual leak from and extended period of time.

You can see the track of a leak from a toilet to the left side of the infrared image, and you can also see a seperate shower drain leak captured by the thermal imaging camera (dark spot). The leak tracking across the ceiling on the left was also running down the external wall to the left of the window frame… leaving wet untreated timber in it’s path.

The home owner will not only need to repair the leaks, but also remove the wall lining to assess insulation and let the timber dry out or be replaced if decay and rot hasn’t already set in.

If this home owner had a regular infrared moisture check up of their home, they could have avoided needing to rip up the bathroom flooring etc ($9000 fix!).

Ring today for a free thermal leak detection scan quote of your house!

What to Look For When Buying a House

Another ‘annoying’ story for you about a house I inspected in Wellington that leaked… but not according the structural building inspection company!

This is the 2nd home we’ve inspected for moisture in Wellington recently where the previous building inspector must have been wearing a patch over one eye. Some very basic telltale signs of leaking were visually evident, yet the inspector didn’t note ANY of them on his report! In addition, the buyer went ahead and purchased the ‘leaking home’ (not leaky home).

To their credit, the report said they didn’t moisture test the house… but no fancy leak detection equipment or methods where needed here… just normal eye site.

Here’s a sample what was missing in their inspection report:

  • Wooden doors extended right down and touched the deck (no ground clearance). There was severe rot in the bottom of the door due to the water soaking back up the frame. No mention of this in the report
  • Two splits in the butanol decking over the top of a room were not identified. We detected these leaks on the ceiling of the rooms below using infrared cameras. No mention of these splits in the report
  • HUGE CRACKS all over cladding that could be seen from two houses away… no mention in the report (Crazy). Cracks in plaster cladding could mean moisture ingress issues. The problem was the inspector assumed all walls to be block, but some sections of the wall were hardiflex that blended in with the rest of the cladding. He only needed to tap on the wall to find out what type of cladding was used!
  • ‘Bogged up’ door jams due to leak damage around the door frame.
  • There was a bench seat running along the width of one of the windows below sill level. The top of the seat flapped open with storage room underneath it. There was moist swollen particle board under the hatch… did he even look in there? It wasn’t on his report. Normally we don’t look under seats like this, but when it’s up against an external wall with cracks in the cladding, then any ‘logical’ professional building inspection company in Wellington (or anywhere) should be looking underneath these areas.
  • Rotted floor boards around the base of one door… moisture damage again with no mention in his building inspection reporting.

As mentioned above, the leaking deck that was dripping onto the ceiling underneath could only be seen with the thermal imaging camera… the owner couldn’t believe what I could see that he (or the inspector) couldn’t!

So when you’re thinking about all the different things to consider when buying a house, or what to look for when purchasing a property… then consider using our professional NZ wide infrared thermal imaging services… from Whangarei to Invercargill and everywhere inbetween!

DIY – How to Fix a Leak… All Kinds!

Finally – The Launch of Fix A Leak.co.nz!

Due to client demand, The launch of our new website FixALeak.co.nz has now taken place and is live! This website outlines simple and easy ways to fix common types of leaks… fast and cheap! This is a free service.

Why did we start this new website?

We do all types of leak detection and leaky home checks all over NZ, and the first natural question people ask us when a leak is detected, is “Do you have someone who can fix it?”. The answer is “No”, because we don’t want our clients to feel they are being ‘sold’ further add-on services. We have always been an independent inspection company specialising in locating leaks, and will continue to operate that way.

The new ‘Fix a leak’ website is for people who already know where the source of their leak is, and simply need it fixed.

Take a look around and see if you can find info on the specific type of leak you have. If you can’t find any info on it, then you will very soon! Although the website is work in progress (We have a team working to build the site up with useful information as we speak), there is already info and live video demos for you waiting right now. Visit Fix-a-Leak Here

—————————————————

Are you in the business of fixing leaks with at least 5 yrs experience in your trade?

You can now advertise on the site in your area for a small fee. Not many home owners have the confidence to fix a leak properly, so they usually need help to get the problem sorted asap.

The typical types of calls we get are for:

Roof leak repairs
Deck and butanol waterproofing leaks
Toilet and shower
Plumbing leaks, including underground.
Window flashing and joinery failure causing leaking into walls.
Cladding failures
Leaking gutters, including internal gutters
Flat roof leak repairs
Swimming pool, spa and hot tub leaks

….Just about any type of leaking problems you can have with a house, we get calls for it!

Hit the ‘Advertise Your Business’ button over on the www.fixaleak.co.nz website if you have any questions… we would like to see your business listed on the website!

Confidentiality of Leaky Building Inspection Reports

Are you worried about what the thermal leak detection results may show up during an inspection of your home?

Put your worries to rest…

Confidentiality issues for leaky building, or standard home inspection reports can be a worry for many home owners… and rightly so. If you would rather keep your head in the sand and not get your home tested due to the fear of unfavourable results, then read on… you might change your mind.

Yesterday I got a call from a home owner asking if my infrared inspection reports are kept confidential. The answer is 110% yes. Out of curiousity, I then asked what made him ask that question. He stated…

“We had an inspection 2 yrs ago, and the inspector found two leaks that he felt needed attention. 1 hour later we got two unsolicited phone calls from building companies offering to fix the problems!”

Not good. This means the inspector revealed the issues detected in the home to a 3rd party without permission from the vendor.

The way we handle all building inspections is simple, private and discreet between yourself and us. We do a written report that gets sent to you only… not to repair companies, not to real estate agents or solicitors, and certainly not to the council. Some home owners will ask us to send  the report to 3rd parties, but we refuse to do this for privacy purposes and avoid getting caught up in confidentiality issues down the track.

We respect the fact your home is your biggest asset, and the last thing you need is other people who have ‘nothing to do with it’ knowing your property needs remedial work, be it a minor leak or a reclad. What you do with our report after you receive it is entirely up to you of course.

One option some vendors take is a verbal ‘Quick Scan’, which means nothing is put in writing… further assuring the home owner there is no negative report floating around in ‘cyberspace’ outside of their control. Quick Scans are also cheaper because time has been saved on the report writing component of the inspection.

DIY Rent, Hire or Buy Moisture Meter for Sale

DIY – Now you can keep a close eye on the moisture levels in your house on a regular basis!

Our company tests homes using an electronic moisture meter almost everyday in NZ, and a very common question we get asked is…

 “Where can I buy a moisture meter in NZ the same as yours to monitor the house for leaks in the future?”

Due to the fact we offer moisture detection services, it didn’t make sense for us to share the ‘trade secrets’, but we’ve now changed our approach to help more home owners stay in touch with their biggest asset.

Rather than shop around for moisture meter suppliers in NZ (and get confused), we can now sell you the same type of non-invasive testing equipment we use!

You can own your own hand held monitor to keep a close eye on the moisture content of the wood in your home. Great for shower leaks, window leaks and general moisture level monitoring… especially if you own a plaster home!

Why is this a logical investment? Buying a brand new moisture meter works out to be a similar price as an inspection would anyway! In addition, not only can you use it  in your own home, but also family and friends homes!

The type of meter we use isn’t the cheap type … it’s a high quality meter used by professionals, and made in NZ for NZ conditions!

If you’ve been wondering how to test your house for leaks and moisture without putting any holes in the wall… this is it!

Accurate Thermal Imaging Reports

The longer the leaky home crises goes on, the more I see plaster home owners getting pushed down into a hole by some inspection companies… even if their home isn’t leaking!

Why do I bring this topic up?

Let me start by saying a thermal imaging camera is accurate and doesn’t lie… it is what it is. But, the interpretation by the thermographer of what the infrared camera is actually seeing can vary wildly.

‘Suspicious’ patterns in a thermal camera could simply mean the insulation isn’t pushed into the corners correctly, or maybe there’s been a wind draft through the roof space that has slightly lifted the batts up off the gib… but hardly a deal breaker!

If an anomaly appears on the camera screen, then further confirmation is required (Some companies may not do invasive testing)… but accurate thermal imaging inspections go beyond what the camera says.

Here’s what a ‘clean’ thermal image looks like…

Notice the nice clean lines on the ceiling?

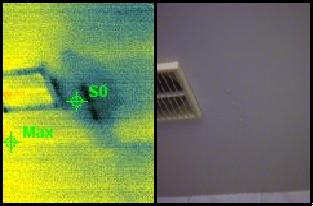
This is a ‘not so good’ thermal photo…

The ‘thermal anomaly’ to the left is a leak from a shower above that clearly can not be seen on the ceiling in the right hand photo (as the human eye would see it).

What’s really behind the walls in the home you’re looking to purchase? Are you 110% sure? Most of the leaks we’ve detected in NZ houses showed no visual evidence of a problem before we infrared imaged the property!

Every home is a good deal at the right price, regardless of how many problems are found… so get it tested and negotiate the price accordingly. People buy leaky buildings for the price of the dirt!

How can you seriously negotiate a property contract unless you base your offer on FACTS… not what the GV says, or what the agent tells you. It’s up to you to find out the true condition of the property… and you only, because no-one is going to do it for you. You’ve got big $$$ on the line when buying a house, so do your research correctly, and don’t fall into the ‘dumb purchaser who didn’t do their homework first’ category. I witness this scenario all the time with novice investors and first home buyers!

Hopefully this info above gets you thinking on the right track before signing the dotted line.

Cost to Build a New House in NZ, or Buy Existing?

Are you buying a house in NZ?

Have you considered the cost of building a new home?

Here’s some food for thought before you commit to a mortgage!

We moisture test homes all over NZ, and one of the most common questions we get from clients, is “If this home was built to the old ‘leak building’ code, could it cause us leaking problems into the future, even if it’s not leaking now?”. The short answer is “yes” in many cases if the house isn’t maintained correctly (especially houses with ‘leaky building’ design issues).

More and more, clients are now starting to realise that it may work out better to buy a section and build! So rather than agonise over buying a potential ‘time bomb’ that may either be leaking now, or turn into a leaky home down the track… why not build a fresh new house! Benefits:

  • Brand new… choose your colours
  • Treated timber will be used in the external walls
  • It will be constructed with a cavity system
  • 10 year master builders warranty in most cases
  • You can build a solid brick and tile that has proven to withstand the test of time (Unlike some plaster systems)
  • Not a leaky home!

Today I was doing a leaky building test for a client looking to purchase a home in Albany on the North Shore. The house was $670,000 to buy… and the plaster system was making the buyer very nervous. This house was 180sqm. Now, lets look at some numbers to compare building v’s buying an existing dwelling that could already be leaking…

If you can buy a section in your desired area (or nearby) in a residential area that already has water and power running to the front gate, for about $300,000… then in the case of the example above, the buyer still has $370,000 left over to build the house. If they can get the house built for $2000sqm (at the time of writing, this figure is above the average build cost according to the department of building and housing), then they end up spending the same amount of money as the plaster home they were about to purchase, except this time they get a brand new home the same size… stress free!

The point of writing this article, is to remind you to ‘run the numbers’ on building a new home as part of your research in the area. If there is no available land left around the particular area you desire to live, then you don’t have an option to build new… but wouldn’t you prefer to move 1omins down the road and have the peace of mind a new home would bring you?

If you have your eye on an existing home… get a thermal imaging moisture test first!

How to Interpret Building Inspection Reports

Are you confused with your building inspection report?

Do you actually understand what your property inspection results mean?

There are some very good building inspection companies in Auckland, Wellington and Christchurch (and everywhere in between), but the reports some inspectors supply can sometimes confuse the buyer with ‘builders’ terminology that you may not understand.

Normally you would call the building inspector with questions, but if they aren’t available for whatever reason, and you want to know right now what they are talking about in the report, then take a look at the glossary of building terminology at the link below for a possible explaination.

For example: If your report says “The leak captured in this thermal imaging report above master bedroom window could be due to a missing head flashing, or miter joint failure in window on 2nd floor directly above this area”… do you actually know what this means?

Here’s a glossary of terms used by builders and home inspection companies:

Interpret Building Terminology Here

The ‘complexity’ of our infrared leaky building inspection reports are written in accordance to the buyers level of building knowledge. If you know nothing about how a house is built, or aren’t sure what certain parts of the home are called, then you will still be able to interpret our reports.

What Type of Timber is My House Built With?

Do you know what type of timber is behind your walls?

What type of timber is used in leaky buildings?

Coming up in this article, you will see an outline of what H1, H2, H3, H3.1 and the different stamping on timber means… and which timbers are associated with leaky buildings, or potential leaky homes…

1 in 5 phone calls we receive will ask, “How do I know what type of timber my house (or the house i’m looking to buy) is built with?“. You can actually find out quite easily, but you do need to be able to see the woodmark stamp on the timber frame in one of your external walls:

What is treated timber and what is untreated timber?

Which timber will rot if I get leaks?

Hazard classes vary in treatment levels from 1 – 6, so depending on what you use the timber for will depend on treatment type:

H1 : The treatment level for low hazard situations where timber is not exposed to the weather. Its major use is for framing timber and interior linings. This type of timber has been used in external walls of ‘leaky buildings’, and the reason its failed is due to moisture ingress through the cladding and directly onto the timber! H1 timber also has sub-categories:

  • H 1.1 : Timber used in situations protected from the weather, dry in service and where resistance to borer only is required. Do not use this timber in external walls unless additional chemical treatment has been added.
  • H 1.2 : Timber used in situations protected from the weather but where there is a risk of moisture exposure conducive to decay (Pink or Blue in colour). Minimum standard to use in external walls. Check with council to confirm this minimum requirement has not been upgraded before building.

H2: This level is very similar to H1 but includes an insecticidal treatment to protect against termite attack… normally for use in Australia.

H3: For moderate decay situations where timber is exposed to the weather but is not in contact with the ground. H3 is also split into sub-categories.

  • H3.1 : Timber used outdoors above ground, exposed to the weather – generally in non-structural applications; i.e. fascia boards, weatherboards.
  • H3.2 : Timber used outdoors above ground, exposed to weather or protected from the weather but with a risk of water entrapment; i.e. decking, fencing and pergolas. Used in areas of high risk to water penetration, such as balconies.

H4: Used in high decay areas such as ground contact or fresh water. Generally used for fence posts and landscaping timbers.

H5: Used for severe decay hazard risks such as ground contact where conditions of severe or continuous wetting may occur. End uses for this hazard class are house piles and poles, retaining walls, crib walling and horticultural supports.

H6: This hazard class is for marine use. Wharf piles and fenders, marine and jetty components regularly immersed in seawater or estuarine ground.

Sometimes you may need to remove a small section of interior lining on an external wall to see the timber stamp on the frame. Otherwise it could be written on the original building plans.