Shower Leaks Causing Damp Smell in House

Do you have a musty or damp smell in certain rooms of your home?

Is the source of the problem obvious?

On a regular basis we get calls from home owners saying they have noticed a damp musty smell appear in their home. If you have noticed this in your home, there is a problem somewhere… as these smells don’t just appear for no reason. If you leave these smells go undetected for an extended period of time, the problem can be compounded if gradual leak damage is taking place where you can’t see it happening.

Sometimes it may be due to rising damp, internal plumbing or bathroom leaks, or leaky cladding/window where water has found it’s way down your wall and onto your carpet under the skirting… without you knowing anything about it.

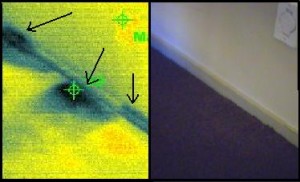
Recently a home owner of the North Shore called us in to find the source of their damp smell problem. There was very little visual evidence of leaking problems within the house, but our infrared thermal imaging camera instantly discovered the problem.

How to find shower leaks?

The dark area in the above thermal image is water on the carpet. On the back of the wall is a shower that is leaking. The home owner had a book case pushed up against this wall, therefore they couldn’t feel the wet carpet… and you certainly couldn’t see it with the human eye because the carpet is a very dark blue colour (as you can see in the righthand photo above).

We took this infrared photo so the home owner could use this visual evidence to back up his insurance claim for the shower leak. In addition, the carpet was very slightly discoloured, so he may now be able to claim carpet water damage as result of a plumbing leak through the insurance company!

Can’t detect the source of a ‘suspect’ bad odour or smell in your home? Call us in for a look… we can normally find the problem quickly and easy using thermal cameras and advanced moisture meters.

How Do I Know if I Have a Leaky Home/Building?

After fielding plenty of calls from NZ home owners/buyers every week, I have noticed a very common pattern occurs over time.

What are the most common questions I get asked?

1) How do I know if I am living in a leaky building?

2) We would like you to moisture test a house before we buy it to make sure it’s not a leaky home… how much is it?

3) Should I buy a home built with plaster? 

The obvious pattern that emerges week after week, is that people are almost scared to buy a house these days without further testing beyond a standard building inspection. This is NZ wide!

While some people want to know how to avoid buying a leaky home, others want to know if they are living in one… so how do you know?

Answer: 95% of time you won’t know, unless you have a background in the building or thermal imaging/moisture testing business.

There have been many cases when a home owner will call me in because they have signs of a leaking problem, such as a skirting board that is swollen, or the carpet has mould growing on it in the corner etc. Then… 1 – 2hrs later i’ve found anywhere between 1 and 10 other leaking problems that were not anticipated. Sometimes all the window joinery has failed throughout the house, and there is water under every window! Unless you have the right equipment, you most likely will have no idea.

Recently I went out to a job in a very wealthy area in the Bombay Hills area of Auckland, and the home owner had just had a re-cladding company quote him $167,000 to reclad the building… and do you know what their justification for this price was? To bring it up to the standard of the new building code!  Hey?

After doing a complete moisture test on this plaster home, it turns out one window was leaking, some drainage needed to be installed around the base of the cladding, and one section of wall needed to be re-meshed and a coat paint over the top… maybe $20,000 work in total, if that. So unless you get an independant inspection from a company that doesn’t sell re-cladding services, you may be getting biased information.

The above company were certianly right that the building was built to the old building code, but the home owner is under no obligation to convert it to the new code if it’s not a leaky building!

If your wondering if you live in a leaky building right now, and your home was built between 1992 and 2004, then it’s worth a ‘quick scan’ thermal imaging inspection for the peace of mind if anything.

Infrared Building Surveys – What’s Included?

Are you considering hiring a professional infrared building survey company?

What’s included in the quote?

One of the common questions people will ask when calling for a free quote, is “What do you do during the infrared building inspection?”.

You will see exactly what’s included on our ‘contact us’ page, but before that, it’s also important to know what the purpose of an infrared building inspection report is, and why you actually want to get it done in the first place… because most people just hear about thermal imaging, and go with the flow without understanding what it’s actually about and how infrared cameras work to benefit you.

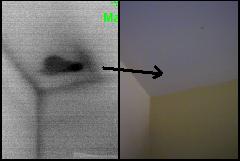
When you walk into a house and look at the ceiling, what do you see? You most likely see some gib board and lighting… and that’s all we would see also. Using an infrared camera, this is what we see (that dark spot is a hidden leak)….

ceiling parapet leak

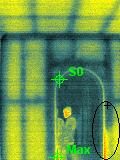
What about when you look around the walls of the home during your initial visit to the home? You see windows and walls… that’s about it. During an infrared thermal imaging building survey, this is what the walls look like…

Infrared Building Wall Frame Image

How’s the house looking for insulation… how do you know if there is insulation in a wall or ceiling space of a house? Here’s what we see in your potential future house…

See how the external wall is a different temperature to the ceiling? No ceiling insulation.

These pictures taken in NZ houses demonstrate how the infrared camera gets a completely different ‘view’ of the house to what standard building inspection survey companies will see.

Our infrared house inspection surveys will detect all kinds of annomalies behind walls that are impossible for the human eye to see… and we also deploy back up moisture testing methods during our building survey to achieve the best possible results we can without needing to put holes through the wall.

Read more about what’s included on the contact us page.

Moisture Testing Houses on Dry Summer Days

“Can you moisture test a home on dry summer days? “… a common question clients ask in summer time.

Yes you can, but there’s a couple of things to consider. Before I explain further, here’s a photo of a major leak below a window that we detected on a hot dry Auckland day with thermal imaging and moisture meters… (You can see the mould stain on the internal side of fiber cement board)

The timber doesn't look too damaged does it?

This is a very common type of window leak that was caused be cracks opening up around where the plaster cladding meets the aluminium window frame. There were no visual signs of this leak on gib board, skirting or external cladding.

So can you detect moisture problems in houses when it hasn’t rained?

First of all, there is a difference between moisture and leaks. Moisture will accumulate in a wall (with no cavity), and penetrate into insulation as a result of a leak. Moisture will stay long term, even if you fix the source of the leak… and if the timber in the area is untreated, mould and decay will start to take place, and you won’t even know it. A pitched roof leak for example could be missed if it hasn’t rained for some time, as the air circulation in the ceiling space will potentially dry the leak out… but not so with trapped moisture in walls.

The moisture damage below the window above was due to lack of cladding maintenance around the windows… coupled with design issues.

Here’s part 2 of what happened with the job above:

The home owner got his local builder to take the gib board off where we had found the leak. The vendor then had the source of the problem fixed and they used a dehumidifier to dry the area out. He kept the area open and dry of two weeks before replacing the gib, plastering and painting. The reason he went ahead and closed it all back up is because the timber frame looked and felt dry… and the screwdriver didn’t go through the timber when he tested further. Then…

He called me back to do a ‘re-test’ and get a clean moisture report. Guess what? After all that time drying it out, the moisture readings came back at 60% (Well over 18 – 20% moisture that it should be). Why was this? The moisture was inside the untreated timber and couldn’t be ‘seen’. See, the window leak was running down the internal side of the cladding where the timber frame was touching, therefore the majority of the water was soaking in through the back on the timber and across… and didn’t leave much visual evidence on the side of the timber that could be viewed.

Now what?

The area is now getting pulled back apart and the timber is coming out. Ideally, he would have had it moisture tested before closing it back up.

Summary: Dehumidifiers won’t completely dry out moist untreated timber, and what ‘looks’ dry may not be… even if you can’t push a screwdriver through it.

Further info about how moisture can accumulate in walls HERE

Can Internal Moisture Cause Timber to Rot?

So you’ve made sure every crack and pentration on the external cladding is sealed, so the house won’t leak… right?

Not so. Sure, the external cladding may now be all sealed up and water tight as a navy submarine, but is there a possibility that moisture can still get into the timber frame of the house? Yes… if there is no wall cavity system, most definately… especially if you don’t have a system in place to expel the trapped moisture.

How is the moisture getting into the wall if the house is ‘sealed’?

Recently I found this topic on a forum which talks about the basic theory of how moisture ‘penetrates’ walls, even when you think your home is water tight. I thought this summed it up nicely…

internal moisture extract

(Did you take note of the last sentence of paragraph 2? Nice analogy!)

In summary, if a wall can’t breathe (i.e cavity system), then it’s only a matter of time before moisture does what it does best to timber… rot.

If you fix cladding directly onto timber, and then you also cover the internal side with gib board, then what you are actually doing is creating a vaccuum. What  happens next, is that the local plumber comes along and fixes a pipe bracket through the plaster which will eventually release and create a small hole. Then what happens?

Here’s what… the outside air pressure is greater than the internal wall pressure, therefore the water gets sucked right into the tightest of holes and penetrations. Got kids? Make sure they dont slam their pushbikes up against the plaster cladding and penetrate it… same effect… in goes the water!!

As a result of many plaster homes leaking, some people will only buy old weatherboard or brick & tile homes… you know, then ones that have been standing for 50+yrs, but wouldn’t get a CCC under the new building code  🙂 . Hmmm.

Did they build with internal gutters back in the good old days (Common design issue associated with leaky buildings)? The basic issue here is that if the gutter leaks, it goes straight down into the wall… and it can’t escape because there is no cavity for it to exit. The only thing standing in the way of the water is untreated timber! Ekkk.

Here’s an interesting fact: Just about every builder I speak too says “I tried to warn the authorities that untreated timber wouldn’t work”. So why did they go ahead and build with it? Because they could, and it was cheaper etc etc. Lets not get into the ‘who’s at fault’ debate… we’ll leave that to the ‘experts’… and no doubt the experts will be the ones that created the problem in the first place (cough).

95% of plaster home owners when asked “Would you buy another plaster home?”, say “NO”. This is based on my own survey whilst inspecting homes, it’s not an official statistic. You can join the dots on the meaning of that one.

Difference Between Leak Finder and Leak Tester

There have been a number clients recently who have commented that it must be frustrating at times being a ‘leak finder’…

The answer is simple… after doing many many inspections and seeing many different scenarios, it becomes easy. This would be the same as asking someone who fixes computers how easy it is to extract lost computer data out of a hard drive… it’s easy for them, but only because they know what they are doing.

Leak detection techniques aren’t complicated as such, it just takes logic and the right diagnostic tools in most cases. You also need other devices to help you confirm the findings. The most technologically advanced leak testing equipment available for sale should give you all the correct signals that will indicate your ‘on the money’ when pinpointing the water entry point, as long as your operating them correctly and can interpret (and confirm) the read outs.

You need to detect the leak before you can test it, but the interesting part is that you will miss most of them without infrared in most cases… especially on high ceilings.

If you’re buying a house, and you think that going out and buying some kind of ‘leak finder’ equipment or moisture meter will be sufficient to diagnose any hidden problems, then please think again. If it wasn’t for using an infrared camera as an additional tool for finding signs of defective windows, roofs, cladding, ceilings etc. , then many of the problems could have been missed… because you simply can not scan a non-invasive leak tester over a huge surface area of ceiling effectively (and you would be there all day). Good luck convincing the real estate agent to stay with you for 6 hours while you test the house!

Leave this type of work to us. We are leak detection experts (Here’s the proof)

You simply can’t afford to miss obvious problems when testing a house for leaks. Taking the DIY approach could work out to be more expensive long term, as opposed to getting the job done correctly and professionally! In addition, the reality is that you won’t actually ‘see’ the majority of anomalies with the human eye.

To answer the question, a leak finder is someone who knows how to find a leak, and a leak tester is the equipment used to indicate the areas where water has penetrated.

33% Chance You Live in Damp Mouldy House?

Did you read the article in the NZ Herald about the new book regarding Damp, Mould and Moisture problems in NZ homes?

There’s a new study out which reveals that up to 33% of homes could have moisture problems in New Zealand? What does this mean to you?

What this means, is that there’s a 33% chance you could end up buying a home with mould and moisture issues! What you need to keep in mind when buying a house, is that the problems are normally behind the wall…  and not visual to the human eye.

They mention in the report that not all homes become mouldy due to the leaky home ‘sub-standard’ building practices, but it’s leaks due to damaged spouting, plumbing failures and lack of correct ventilation which could also potentially be the cause of mould growth. (More info about mould testing here)

NZ has lots of rain, and lots of humidity… and when you couple that with homes that aren’t weathertight… then mould and fungal growth is almost assured. Just make sure you don’t buy one!

With headlines in the newspaper like todays… “Damp Houses a Fact of Life for Many Kiwis”, you know there’s a problem. I’m inspecting these types of damp homes every week, and I can state right here that I certainly find ‘signs’ of moisture in more that 33% of homes… so the above headline is certainly on track based on my experience. Please keep in mind that some homes are worse than others… some may have a shower leak that has spread through a wall, whilst others have major window failures that have filled the wall up with water gradually over time. No cavity system behind walls is one of the major contributors to the problem.

More articles about leaky buildings and what to look out for here

Is the home you’re about to buy damp? Is there a cavity? Is it unhealthy? If you are in any doubt, get it checked!

Moisture Testing Companies

Are you looking for a moisture testing company to test the timber framework in your house… or the house you’re about to buy?

It’s true… there are several companies to choose from in NZ who do moisture testing, but like any other type of business, are they using the equipment correctly? What exactly are they looking for?

Here’s what prompted me to write this post. I found an online sample of a building moisture testing report from an inspection company in the North Island. It showed the actual moisture meter he used to ‘test for moisture’ in wall. The meter had two 15mm pins and he simply put them through the gib board and onto the timber stud… here’s the problem with this method in my opinion:

First of all, gib board is 10mm thick, so the majority of the pin was directly touching the gib, and only 5mm of the pin actually penetrated the timber. So how on this earth will he detect the moisture on the outer side of the timber?

There are 1000’s and 1000’s of homes in NZ with no cavity system, which means the cladding is fixed directly onto the timber framework. If the cladding leaks through cracks (especially plaster), then it goes directly onto the outer side of the timber (cladding side). So if you stick two small pins into the internal side of the timber, and the moisture hasn’t got across that far, then the moisture inspection company could be missing the first signs of a leaky home.

Moisture testing companies in NZ will vary, so if they are going to do an invasive inspection for you, make sure they at least first drill holes through the gib that are wider than the pins, so the pins don’t take a false reading off the gib! In some cases the gib is slightly moist, but the timber is fine… yet that could throw out the reading and cause a ‘false positive’ reading.

One of the moisture testing companies we use in Auckland actually bypass the internal side of the timber and only penetrate the longer moisture meter pins into the external side of the timber as close to the cladding as possible. This is critical in most areas of the home. Leaks under windows are more likely to cause an even spread of moisture on the timber frame and the testing equipment will normally detect that from the internal side… even with a non-invasive moisture meter and usually infrared thermal imaging also. 

In many cases, the moisture testing inspector will use a non-invasive meter to first establish where there are signs of moisture… and these meters will usually pick up where the moisture issues are in the home very quickly because they are extremely sensitive and calibrated accordingly… even through gib board. If timber is moist, it will transfer that moisture onto the gib and that’s what we are actually reading with the non-invasive meter, and that’s what you also are ‘seeing’ in the infrared camera photos on this website (different temperature on the surface of the gib where the leak(s) are).

Would you buy a car without even looking at it? Probably not. Well why would you buy a house without getting an idea of what the timber frame is like! After all, it’s the ‘bones’ of your walls.

Don’t get caught buying a dog like many immigrants do! The problem is they don’t even consider the moisture testing option when buying a home, mainly because most homes around the world don’t have the leaky home issues like we do here in NZ. It’s not that these offshore buyers are silly, it’s just that they aren’t aware of the problem NZ faces. Better to be safe then sorry!!

Residential Thermal Imaging – Energy Loss

Residential thermal imaging is becoming increasingly popular in NZ… and it’s amazing what the infrared camera will find in the hands of a certified thermographer!

It’s eye opening when you walk into a multi million dollar home that the builders haven’t quite finished off as one would expect… especially when the home owner has absolutely no idea that a problem exists. Some of the issues are minor, and others major.

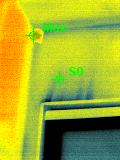
Residential homes should all be thermal imaged for leaks and energy loss at some stage in their life, just to stay ontop on maintenance if anything. Here’s an example of cool air entering a residential home in NZ around the door jamb…

Door Jamb Air Leak

The dark wispy pattern is cool air running up the wall at the top left corner of the door frame… completely invisible to the human eye!!

Infrared thermography in residential houses is a must if you want to know if your home is energy efficient and/or has an energy loss problem or not.

Building Inspectors Auckland – Which Company?

Are you looking for home inspection services in Auckland?

When buying real estate in Auckland (or anywhere in NZ), you seriously need to ask the right questions when booking the inspection before the building inspector turns up!

Why do I mention this?

As time goes by, and after completing 100’s and 100’s of infrared building inspections all over NZ, I get to meet lots of real estate agents who have also seen all types of building inspectors… and how they go about their work. 

Take a read of this!…

Recenting an agent was telling me about an Auckland building inspection company who also does moisture testing. The inspector arrives at the property and begins the job… and the buyer of the home was wondering why he wasn’t testing under the windows and around the skirting board. What was the builders answer when asked why? My knees are too old to get down that low? HEY? That is just not right in my opinion. If you are in this business of real estate home inspections, then you must know that one of the most common causes of leaks is window joinery failure… and wicking of moisture back up under the cladding into the bottom plate of timber.

So in summary, he was “too old” to test the most critical areas for damp and leaks etc. Hmmm.

Next… What about the roof? How is he going to get on his ladder? You can guess the end of this story right? He didn’t even pull the ladder out… even for a visual scan of the roof from the top of the ladder.

When booking your home inspection, maybe ask if you can see proof of at least 20-30 testimonials from other clients… if they can’t provide you with that, then they possibly haven’t been in business long enough, or they aren’t doing an outstanding job.