Leak Inspection Reveals Leaking Skylight

Do you have any skylights in your home?

Have you seen signs of paint changing colour of bubbling in the area?

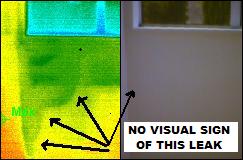
Whilst doing a leak inspection in St Heliers recently, I came across a leaking skylight that the home owner had no idea about. The interesting part was there were no ‘signs’ of a leak on the ceiling or anywhere around the skylight!

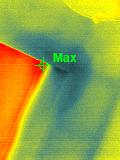
The home owner had called us out for a completely seperate leak detection, but whilst I was there the thermal imaging camera spotted this leak in the photo below. The dark area is a thermal image overlayed over the skylight so you can see what we see through the infrared camera. This leak was dripping out the light fitting where arrow is pointing…

If you would like your skylights checked for leaks (before it drips down onto your furniture or carpet), we give free quotes over the phone.

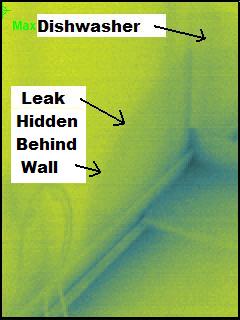
(The red colour in the image is the skylight… it’s warmer in temperature then the surrounding gib board. The dark patch on the corner is a hidden leak that hasn’t penetrated through just yet)

leaking skylight

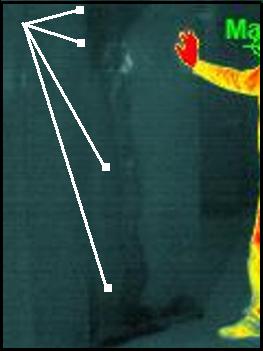
Here’s another example of a leaking skylight which was tracking down a ceiling (darks areas indicate water leak)… thanks  to a faulty flashing detail.

Painted Rust on Roof Causing Leaks

Beware of renovated homes with a nice painted roof… there could be rust under the paint causing leaks!

I can’t post a photo of the home with the ‘hidden’ rusty roof in question for privacy purposes, but please be aware there could be more than meets the eye when buying a home!

Whilst doing an interior moisture inspection on a home in Te Atatu Peninsula recently, I was noticing some very high moisture readings & thermal anomalies on random areas on the ceiling. The interesting part was the home had wide eves/soffits over the verandah… similar to a Queenslander style home. So how could a renovated home like this show high moisture readings?

After working with a building inspector who climbed on the ‘new looking’ roof to look for the source of the leaks, it turns out the home owner had simply painted over the rust… and the rust was so established that it was leaking water directly onto the ceiling and down into the wall cavities!

These type of ‘cover ups’ usually go undetected by the average home buyer (visually), and if their building inspector isn’t savvy and detailed enough, a standard home purchase could turn to custard before you know it.

No matter what the age of the home, a moisture inspection could uncover the ‘trick and flick’ techniques some home renovators use.

Reduce your risk when buying a home… consider an infrared moisture inspection!


Hidden Water Leak Found Under Window

Have you ever heard the saying “What you don’t know won’t hurt you“?

The home owner of this Glenfield (Auckland) home below no longer agrees with the above statement.

On a routine home thermal imaging inspection yesterday, we uncovered a huge water leak around a window that certainly wasn’t visable to the human eye.

window leak thermal imaging

The only hint we had of potential moisture ingress in the area, was a small piece of paint that had slightly changed colour at the bottom of the wall on the bottom floor. This particular leak in the photo was originating from around a second floor window directly above the front door.

You will notice that in the righthand side of this picture, there is absolutely no sign of a leak? If you’ve been considering getting an infrared thermal imaging inspection, then this photo is a classic example of why you should get it done sooner rather than later.

Are you considering buying a home? This photo certainly demonstrates why you should get a moisture inspection in addition to a building inspection prior to handing over your hard earned dollars.

Here’s another window that leaked not long after being fixed in a North Shore home, as seen through our infrared camera…

The dark area in the centre of the image is water below the window.

Contact us for a free quote!

Moisture Appearing on Carpet Traced to Dishwasher Leak

Have you noticed moisture on your carpet in a place that seems unexplainable as to how it could actually get there in the first place?

What if there are no wet areas near the leak?

A lady called me for a leak detection in an Auckland city apartment today. She was totally confused (and for good reason) as to how a moist patch could appear in the middle of her carpet on the 5th floor… on top of a cement slab!

dishwasher leak

After a small investigation, I managed to trace the leak back to the source (behind the dishwasher). The interesting part is that it certainly was not a direct water line from the source of the leak to where it appeared. In this case, the kitchen backed onto a bathroom, so the leak could have been from the combined shower/toilet/laundry area also.

Through non-invasive moisture testing, it turned out the leak had followed the skirting board to a certain point, then under some bathroom floor tiles and ended up leaking under the carpet and settling at a low point on the concrete slab.

This was an interesting leak detection, but we got it through process of elimination. We double checked by testing the surrounding apartments to confirm water wasn’t coming down the wall from up above. Unfortunately we found moisture damage in the apartment bathroom below caused by this particular leak.

Suspect a leak? Contact us today for a free thermal imaging and moisture scan quote!

Solid Raglan Bach Fails Leak & Moisture Building Inspection

 Are you considering buying a good old Kiwi Bach?

Today I did a pre purchase moisture and thermal imaging inspection on a Raglan bach, and the results were not as expected from a solid 1950’s built home.

From time to time my clients will ask “Do I really need a moisture inspection on a home built before 1992?”. The answer is certainly “YES”… here’s why. It’s not only homes that were built when the building code was relaxed in the 90’s that may potentially leak, other homes built outside of ‘that period’ are also vulnerable to moisture ingress due to wear and tear.

This Raglan bach looked sturdy as can be, but all was not as appeared. No matter how solid a home looks, an unsealed penetration on the exterior cladding or roof will let water in sooner rather than later. Unless leaks are caught early, damage may occur that you simply can’t see when doing a regular building inspection on a home. The part that worries me most is that some unsuspecting home buyer will have no idea there are major signs of moisture behind the wall of this bach until it’s all too late.

Protect your future and don’t turn a blind eye to what could be lurking within the walls of your future home!

Contact us today for a free quote on a pre purchase moisture inspection!


Leak Appearing on Ceiling – Deck Built Directly Above

Do you have a room in your home that has a deck built directly above it?

Any signs of leaks on the ceiling or wall below the deck?

Today I did a leak detection on a home that had an interesting outcome. The home owner noticed a drip coming through the tounge and groove on a rimu ceiling. His immediate reaction was to suspect the leak was penetrating from around the decking above. The frustrating part was that he had the deck completely resealed just one year ago.

Using thermal imaging and a moisture meter, I was able to pinpoint the leak source… it turned out to be tracking from behind a wall in a storage cupboard on the second floor. There was a gutter downpipe that was built in behind the cedar cladding in one section, and as you would expect, the source of the leak was hidden in behind there. Using my non-invasive leak detection equipment I picked up the leak on the interior gib board that backed directly onto the drain pipe. The wall looked completely clean without any visual sign of moisture, so there was really no chance of finding it without thermal imaging unless the gib was pulled off… and that would still have been a guess.

After getting that far, we pulled out the measuring tape and took some measurements from the nearest exterior walls to see if the leak source would correspond to the area below where the leak was visually dripping from between the rimu boards. Our measurements were bang on target… so that was that leak issue solved!

This detection was another classic example of a leak coming from somewhere totally different then first thought.

Call us for a free over the phone quote on any moisture or leak issues you may have in your home!


Leak Coming from Apartment Bathroom Above

Do you live in an apartment that has a leak?

Do you know if it’s coming from your apartment, or the apartment above?

Today I received a call from an Auckland highrise building manager regarding a leak in the foyer area on the third floor. The leak was visible around the skirting board, but the issue was going to be finding the source of the leak. It turns out we found the leak right away using our thermal imaging camera.

apartment water leak

This thermal imaging photo shows the leak was coming from the floor above (you can clearly see the water track running down the wall). The building manager was a happy man, because he previously had a plumber in for seperate leak months earlier, and the plumber ripped the gib board off only to find out the leak was tracking from elsewhere.

We went up to the next floor and sure enough there was moisture showing approx 2 feet up the wall from the bottom. It turns out there was a bath tub backing onto the wall. After conducting extensive moisture testing all around the bathroom in question, we pinpointed the leak.

As a result, the tradesperson who goes in to stop/repair the leak can go directly to the source… saving time and money.

If you live in an apartment and notice a leak, just keep in mind that it may be tracking in from above you, even if you notice it around the floor area.

Suspect a leak? Call for a free quote.

Moisture & Leak Detection in Wellington Homes

Live in Wellington? Considering a thermal imaging moisture inspection?

Here’s the results of recent Wellington home inspections: (Names and addresses withheld for obvious reasons)

First home inspected – Built in 2000. The home owners had already spent $45,000 on remedial work on the cladding including a new paint job, tiles on deck removed and decking resealed. Overall the home wasn’t too bad in terms of moisture… apart from the leak that was literally dripping through a bottom floor bedroom ceiling! We managed to narrow down the area of the leak source (two floors above) using our thermal imaging camera and moisture detection equipment.

Second home inspected – Built in 2001. The home owner was just wanting a general ‘check up’ for signs of moisture ingress after reading through our website and realising it’s not such a bad idea. Lucky they called! We uncovered quite a large pool of moisture in the garage ceiling that hadn’t yet penetrated the gib (wasn’t visable to the human eye). Due to the nature of the thermal pattern, we were able to determine the exact area of the leak entry point. The bathroom shower also had a substantial leak.

Third home inspected – Cedar clad, built in the late 90’s. This was an interesting case. The home owner had noticed a leak in the corner of a hallway, and the carpet was certainly wet. The home was built into the side of a sloping hill, so behind the gib board was block, and then a vertical dirt wall. As there was no visible sign of a leak at the top of the wall, the home owner was worried it was coming in from directly behind the wall (No access… dirt wall). After investigating the area extensively (non-invasive), we managed to track the source of the leak to an above ground location. The home owner was very happy with that result!!

In conclusion, most homes will leak at some stage in their life due to general wear and tear (or sloppy building techniques), but the key is to catch the leak early before it causes structural damage.

We inspect Wellington homes and businesses for signs of leaks and moisture using infrared thermal imaging. Call 09 887 3667 today for a free quote.

Tracing the Source of a Water Leak in Your Home

Can you see signs of a leak in your home?

Can you detect were the leak is coming from?

We had an interesting scenario today on a routine leak detection in an Auckland home. The leak itself actually appeared on the ceiling about 1 meter to the side of a skylight (The home had a flat roof). The first thought is the water is surely coming in from the skylight somewhere”, but after testing the area with thermal imaging and a moisture meter, we found it was coming from a completely different area, and just so happened to end up penetrating the gib there.

So what can you do if you see a leak in your home?

Guess where it’s coming from. That’s about all you can do, especially if you don’t have the appropriate equipment to track the source of the leak.

The point of writing this information, is if we hadn’t gone into this particular home with the infrared camera, the home owner’s next course of action was to re-seal around the skylight, which wouldn’t have solved the problem at all.

Water can track sideways, angles, down, and even up. Unless you can clearly detect where the leak is tracking, then you may end up damaging parts of your home that aren’t required. You should certainly consider getting your leak tracked using our thermal imaging technology and moisture testing… then proceed to repair the source. Taking this course of action could certainly save you time and money, as it did for the home owner in the above case.

Contact us for a free quote!

How to Find Leak Around Window

Do you suspect a leak around your window?

Do you know how far the water leak has actually graduated to?

We had a couple of calls this week from people who are experiencing leaks around their windows after recent heavy rain. One of the leak detections we did was in the Waikato region and the other in Whangarei. Both home owners couldn’t identify if the water was coming from the roof above the window and running down, or if it was a window joinery failure.

window leak

In both cases we used thermal imaging and a moisture meter to quickly identify where the problem was originating. There was also one other issue that came from the inspections as a result of the water leak. The insulation in the area was also wet. Once insulation in the wall gets wet it takes quite a while to dry, that’s if it dries at all.

One of the other windows in the Waikato home was in the shape of an upside down triangle, and the home owner had it fixed recently. Although the leak in the window joinery was fixed, the gib and insulation below the window appeared to be moist (80%+ on the non-invasive moisture meter), so the area hadn’t dried out after the correction. Wet walls can cause heat loss through conduction, and an unhealthy home. Your timber framework and structural integrity of the area is also at risk if moisture in the walls is left to sit.

In conclusion: Fixing a window leak is one part of the process… but finding how far the moisture has potentially spread is just as important to know. That’s exactly what we do without needing to pull down any walls (non-invasive process).

Suspect a leak? Contact us today for a moisture test on your walls and around windows!